Laparoscopic Intracorporeal Suturing
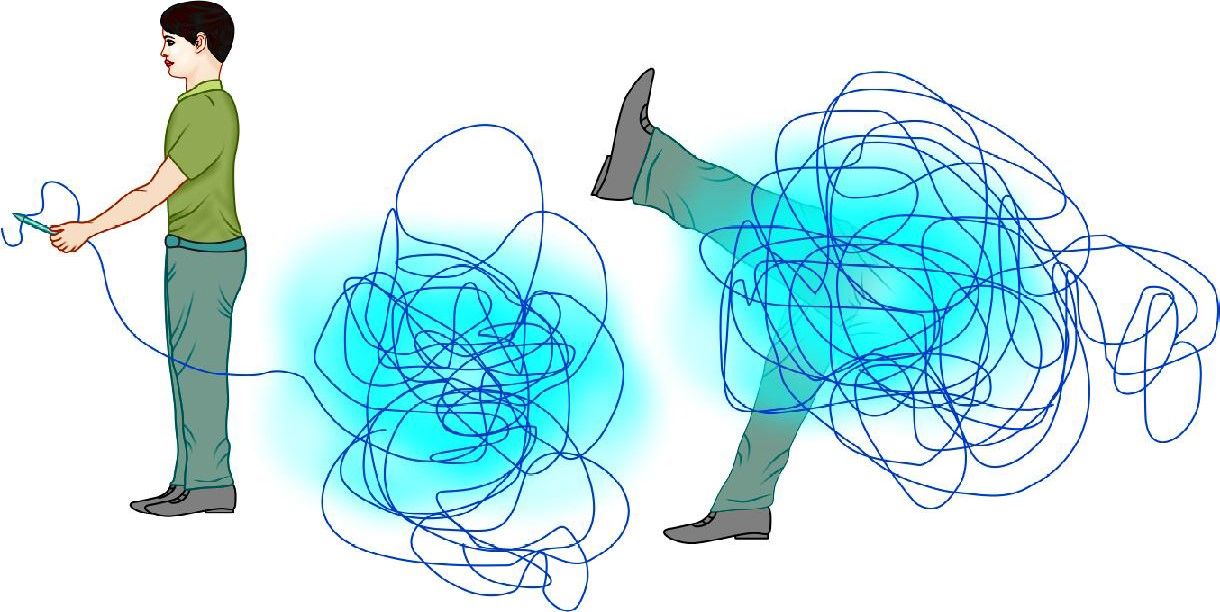
One of the most challenging aspects of laparoscopic surgery is intracorporeal suturing and knot tying. A loss of depth perception and tactile sense and visual obstruction make placing accurate and well-tied knots a difficult and time- consuming task. The technique for suturing needs to be modified depending on the instrumentation in use. A lot of work is currently being carried out on designs for new needle holders and automatic suturing.
Instrumentation
Endoski Needle
Although conventional open surgical needles (half circle) can be used endoscopically, the endoski needle developed in Dundee is designed specifically for endoscopic use and is a hybrid of the straight and half-circle needle. It carries an atraumatic suture and has a straight shaft and a terminal tapering curve (that corresponds to ¼ of a circle), giving it the shape of a miniature ski. The shaft is a modified rectangle, which becomes more and more rounded towards the tip so that the curved portion of the needle is round-bodied. This combination allows for an easier grip of the shaft by the jaws of the needle holder and smooth passage of the curved portion of the needle through the tissues.
Needle Holders
The most commonly used is 5 mm Cuschieri needle holders. These have single action tapered jaws. The handles are spring-loaded and the most recent versions have a diamond coating for gripping the suture material without damage. A relaxed “open hand” grip is strongly recommended for these instruments. Please note that there is a wide variety of needle holders (or drivers). In practice, it is vital for each surgeon to become accustomed to a particular type and use that pair all the time. This is crucial for efficient and safe suturing.
Needle Control
Introduction into the Body Cavity
We recommend the use of the introducer tube to protect all ligatures and sutures from the cannula valve mechanisms.
The suture material on the endoski needle is trimmed to a suitable length. For a continuous suture, this will be approximately 15 to 20 cm.
The suture length must never exceed 20 cm as this will result in very difficult intracorporeal suturing since the length is magnified (2.5 times) by the imaging system.
The needle holder is first passed through an introducer tube. The tail of the suture is held next to the tip of the needle and the suture picked up by the needle holder at its midpoint. It is then withdrawn into the introducer tube until neither the needle nor the tail is visible. The introducer tube can then be passed through a port and the needle extruded from the tube. The suture is watched into the abdomen and placed on a convenient surface, e.g. the flat, smooth anterior surface of the stomach.
The length of suture should not be more than 20 cm
To Insert the Needle
• Pass the needle holder through the reducing tube.
• Pick up the suture material with the needle holder at a point midway from the tip of the needle and the tail of the thread.
• Withdraw the suture and needle inside the tube so that it is completely out of sight.
• Insert the tube through an appropriate port.
• Extrude the needle and suture from the tube by advancing the needle holder and position on a safe surface, e.g. the anterior surface of the stomach.
Manipulation
• A trailing needle is a safe needle.
• A held needle should always be in view.
• Tips of the two-needle holders must always be in view.
• Two-needle holders must never cross each other by moving parallel to each other from one side to the other.
The ability to maneuver the needle into the desired position in the needle holder jaw is one of the first skills you must acquire. It is well worth practicing the techniques for this as it will make all subsequent tasks much easier. This task causes much frustration until it can be achieved at will. The first step is to arrange the needle to the required orientation on the tissues (preferably on a serosal surface and not fatty tissue). Recommended techniques to get the needle in the right attitude on the tissues include the “nudge”, the “push”, and the twist” techniques. This maneuver should be better demonstrated for learning.
Position
The needle must next be positioned correctly in the jaws of the needle holder. Ideally, the needle is grasped in the right orientation by the tips of the jaws. It is a mistake to grasp the needle by the back of the jaws as this impairs precision needle driving through the tissues and also reduces the grasping force so that needle swivel is more likely.
For a right-handed surgeon in a straight forward situation, the needle is held in the right-hand needle (RH) holder with the tip pointing to the left. The tip of the needle points upward and the shaft of the needle should make an obtuse angle with the shaft of the holder.
The key elements in achieving this are:
• The needle position on the tissues
• The angle of approach of the holder
• The pickup actions.
Adjustments to the angle can be made using:
• Other needle holders
• Surrounding tissue
• Tensioned suture material.
Passage Through the Tissues
Position the needle appropriately in the needle holder and identify the position of the first entry point. Place the tip of the needle at this position so that the sharp tip enters the tissue at right angles. When approximately 1/2 of the curve of the needle has entered the tissue (corresponding to 2.0 mm) the wrist is supinated and lifted slightly to passage the curved section of the needle through the tissue. When the point of the needle is seen to emerge at the exit point, the grasp is maintained and the needle end (not tip) is grasped by the other (assisting) needle holder before it is released by the dominant needle holder. For the second bite (in other tissue edges) the dominant needle holder can retrieve the needle directly from the assisting needle holder provided the needle is in a favorable position for direct transfer. Otherwise, it is more ergonomic to drop the needle and pick it up by the dominant holder. Once the two edges have been passaged, the needle is dropped and the suture pulled to the desired point by an instrument to instrument technique through the tissues. A trailing needle does less harm than one that is held rigid in the holder. A grasped needle must always be in view.
Tensioning
A continuous suture is initially tensioned by pulling through the suture material. Further tightening can be achieved by the use of the dominant needle holder although one must be careful not to fray or damage the suture. The open jaws of needle holders are placed on the side of the suture as it exits from the tissues. They can then be used to apply counter pressure on the tissues as the suture is pulled tight by the assisting needle driver. Tension in a suture line is then maintained by occasional locking sutures and the appropriate use of an assistant. In clinical practice, the tension on the suture line is kept by the assistant using a special suture holder that does not damage the suture which has rounded jaws.
Microsurgical Tying
This is a precisely choreographed set of actions. Each maneuver is designed to help make the whole process smooth and reproducible with the economy of movement and structured choreography, so that suturing is efficient with a minimum of wasted time. Note the following important points:
• The passive and active role of the holders
• The formation of the initial “C”
• Its relation to the tail of the suture
• The conscious assessment of the position
• The use of the natural bias of the thread
• Appropriate rotations of the needle active and passive needle holder that must be manipulated in consort
• Note the importance of keeping the ends of the two-needle holders in the operative field
• Note the importance of two-handedness for efficient suturing.
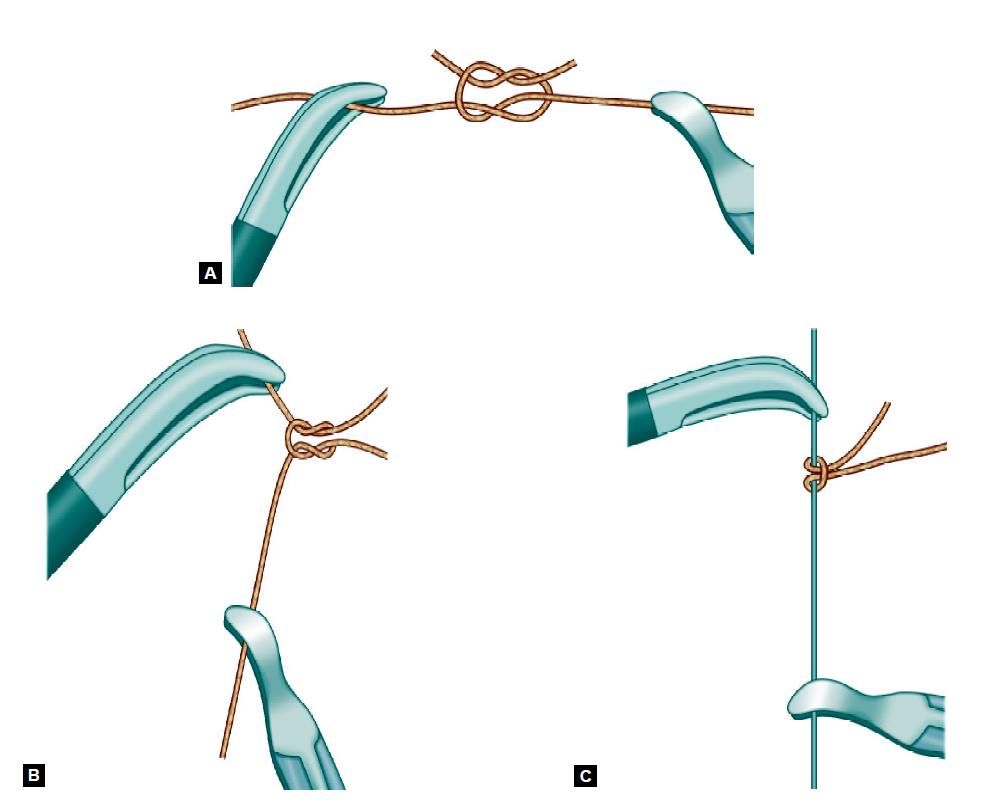
Steps of Surgeons Knot
• A “C” loop is made.
• The instrument of the side of “C” should be kept above the “C” and two winds are taken with the help of a right instrument.
• Winds are slipped in the line of the left instrument.
• Knot is tightened with the help of both the instruments.
• First knot of surgeons knot is complete.
• A reverse “C” is made and the single wind is taken over the right instrument with the help of a left instrument.
• Again “C” loop is made and single winds are taken to complete surgeons knot.
• Surgeons knot contains double wrap on the first throw, followed by two opposing, alternating single throws.
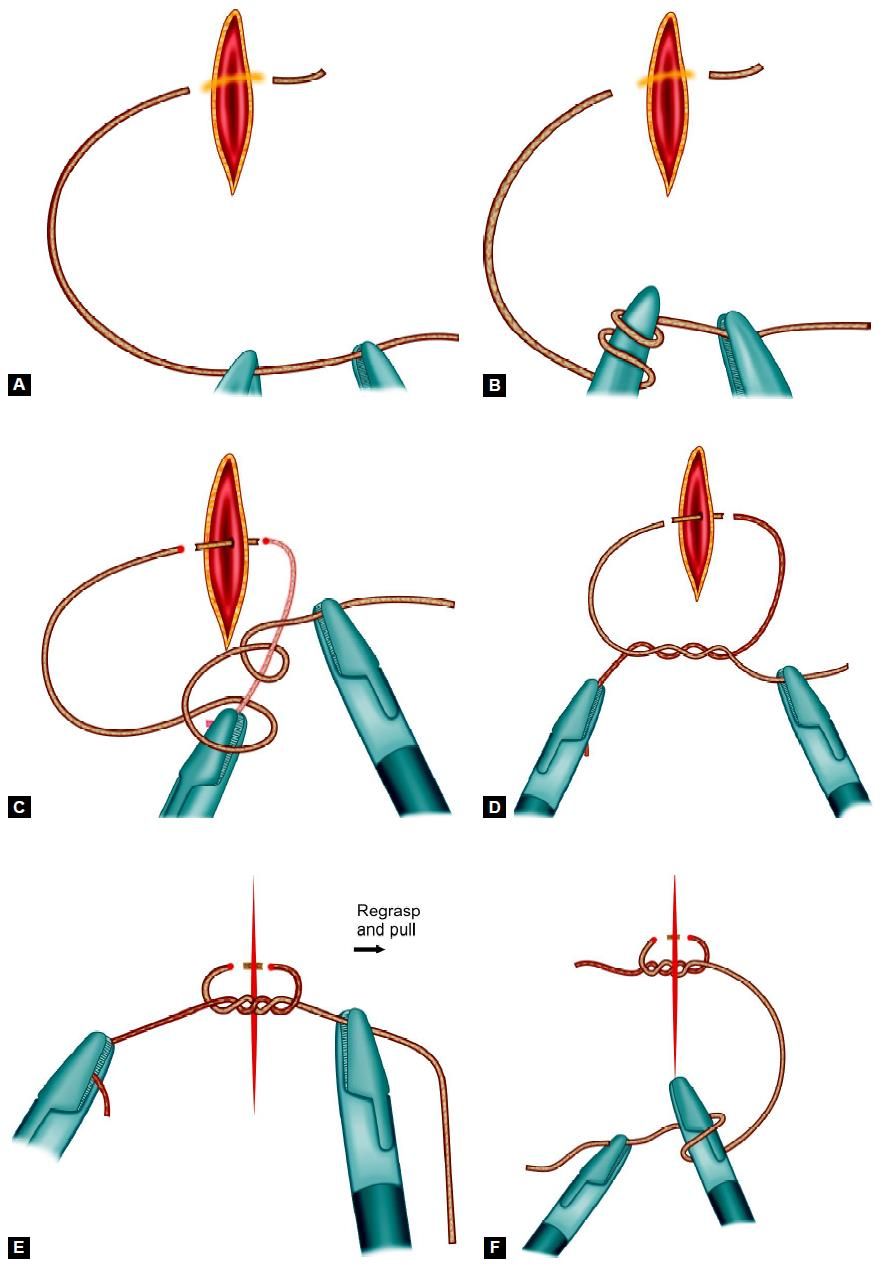
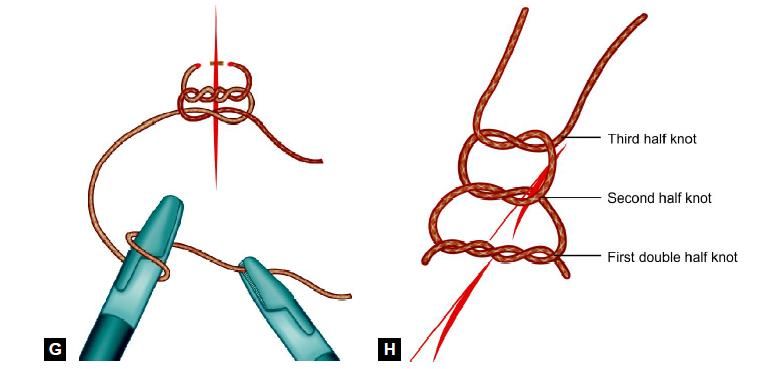
Various Steps of Surgeons Knot
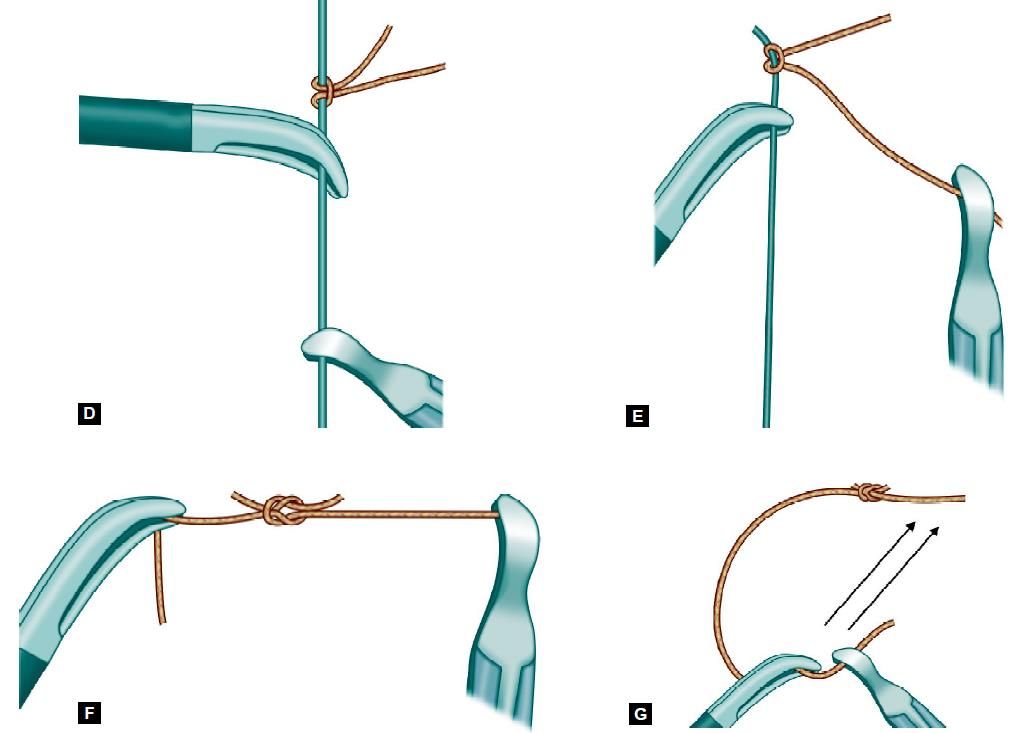
Tumble Square Knot
This is a simple square knot which can be changed to slipping configuration by tightening of the same side of thread.
• A square knot is tied.
• The Same side of thread should be straightened with the help of two Maryland or needle holders.
• After straightening of the same side of thread it is ready to slide.
• Closed jaw of Maryland forceps will slide the knot.
• After tightening, the knot is locked again by pulling both the thread.
• One more knot is tied to prevent slipping of tumble square knot.
Various steps of tumble square knot
One of the most challenging aspects of laparoscopic surgery is intracorporeal suturing and knot tying. A loss of depth perception and tactile sense and visual obstruction make placing accurate and well-tied knots a difficult and time- consuming task. The technique for suturing needs to be modified depending on the instrumentation in use. A lot of work is currently being carried out on designs for new needle holders and automatic suturing.
Instrumentation
Endoski Needle
Although conventional open surgical needles (half circle) can be used endoscopically, the endoski needle developed in Dundee is designed specifically for endoscopic use and is a hybrid of the straight and half-circle needle. It carries an atraumatic suture and has a straight shaft and a terminal tapering curve (that corresponds to ¼ of a circle), giving it the shape of a miniature ski. The shaft is a modified rectangle, which becomes more and more rounded towards the tip so that the curved portion of the needle is round-bodied. This combination allows for an easier grip of the shaft by the jaws of the needle holder and smooth passage of the curved portion of the needle through the tissues.
Needle Holders
The most commonly used is 5 mm Cuschieri needle holders. These have single action tapered jaws. The handles are spring-loaded and the most recent versions have a diamond coating for gripping the suture material without damage. A relaxed “open hand” grip is strongly recommended for these instruments. Please note that there is a wide variety of needle holders (or drivers). In practice, it is vital for each surgeon to become accustomed to a particular type and use that pair all the time. This is crucial for efficient and safe suturing.
Needle Control
Introduction into the Body Cavity
We recommend the use of the introducer tube to protect all ligatures and sutures from the cannula valve mechanisms.
The suture material on the endoski needle is trimmed to a suitable length. For a continuous suture, this will be approximately 15 to 20 cm.
The suture length must never exceed 20 cm as this will result in very difficult intracorporeal suturing since the length is magnified (2.5 times) by the imaging system.
The needle holder is first passed through an introducer tube. The tail of the suture is held next to the tip of the needle and the suture picked up by the needle holder at its midpoint. It is then withdrawn into the introducer tube until neither the needle nor the tail is visible. The introducer tube can then be passed through a port and the needle extruded from the tube. The suture is watched into the abdomen and placed on a convenient surface, e.g. the flat, smooth anterior surface of the stomach.
The length of suture should not be more than 20 cm
To Insert the Needle
• Pass the needle holder through the reducing tube.
• Pick up the suture material with the needle holder at a point midway from the tip of the needle and the tail of the thread.
• Withdraw the suture and needle inside the tube so that it is completely out of sight.
• Insert the tube through an appropriate port.
• Extrude the needle and suture from the tube by advancing the needle holder and position on a safe surface, e.g. the anterior surface of the stomach.
Manipulation
• A trailing needle is a safe needle.
• A held needle should always be in view.
• Tips of the two-needle holders must always be in view.
• Two-needle holders must never cross each other by moving parallel to each other from one side to the other.
The ability to maneuver the needle into the desired position in the needle holder jaw is one of the first skills you must acquire. It is well worth practicing the techniques for this as it will make all subsequent tasks much easier. This task causes much frustration until it can be achieved at will. The first step is to arrange the needle to the required orientation on the tissues (preferably on a serosal surface and not fatty tissue). Recommended techniques to get the needle in the right attitude on the tissues include the “nudge”, the “push”, and the twist” techniques. This maneuver should be better demonstrated for learning.
Position
The needle must next be positioned correctly in the jaws of the needle holder. Ideally, the needle is grasped in the right orientation by the tips of the jaws. It is a mistake to grasp the needle by the back of the jaws as this impairs precision needle driving through the tissues and also reduces the grasping force so that needle swivel is more likely.
For a right-handed surgeon in a straight forward situation, the needle is held in the right-hand needle (RH) holder with the tip pointing to the left. The tip of the needle points upward and the shaft of the needle should make an obtuse angle with the shaft of the holder.
The key elements in achieving this are:
• The needle position on the tissues
• The angle of approach of the holder
• The pickup actions.
Adjustments to the angle can be made using:
• Other needle holders
• Surrounding tissue
• Tensioned suture material.
Passage Through the Tissues
Position the needle appropriately in the needle holder and identify the position of the first entry point. Place the tip of the needle at this position so that the sharp tip enters the tissue at right angles. When approximately 1/2 of the curve of the needle has entered the tissue (corresponding to 2.0 mm) the wrist is supinated and lifted slightly to passage the curved section of the needle through the tissue. When the point of the needle is seen to emerge at the exit point, the grasp is maintained and the needle end (not tip) is grasped by the other (assisting) needle holder before it is released by the dominant needle holder. For the second bite (in other tissue edges) the dominant needle holder can retrieve the needle directly from the assisting needle holder provided the needle is in a favorable position for direct transfer. Otherwise, it is more ergonomic to drop the needle and pick it up by the dominant holder. Once the two edges have been passaged, the needle is dropped and the suture pulled to the desired point by an instrument to instrument technique through the tissues. A trailing needle does less harm than one that is held rigid in the holder. A grasped needle must always be in view.
Tensioning
A continuous suture is initially tensioned by pulling through the suture material. Further tightening can be achieved by the use of the dominant needle holder although one must be careful not to fray or damage the suture. The open jaws of needle holders are placed on the side of the suture as it exits from the tissues. They can then be used to apply counter pressure on the tissues as the suture is pulled tight by the assisting needle driver. Tension in a suture line is then maintained by occasional locking sutures and the appropriate use of an assistant. In clinical practice, the tension on the suture line is kept by the assistant using a special suture holder that does not damage the suture which has rounded jaws.
Microsurgical Tying
This is a precisely choreographed set of actions. Each maneuver is designed to help make the whole process smooth and reproducible with the economy of movement and structured choreography, so that suturing is efficient with a minimum of wasted time. Note the following important points:
• The passive and active role of the holders
• The formation of the initial “C”
• Its relation to the tail of the suture
• The conscious assessment of the position
• The use of the natural bias of the thread
• Appropriate rotations of the needle active and passive needle holder that must be manipulated in consort
• Note the importance of keeping the ends of the two-needle holders in the operative field
• Note the importance of two-handedness for efficient suturing.
Steps of Surgeons Knot
• A “C” loop is made.
• The instrument of the side of “C” should be kept above the “C” and two winds are taken with the help of a right instrument.
• Winds are slipped in the line of the left instrument.
• Knot is tightened with the help of both the instruments.
• First knot of surgeons knot is complete.
• A reverse “C” is made and the single wind is taken over the right instrument with the help of a left instrument.
• Again “C” loop is made and single winds are taken to complete surgeons knot.
• Surgeons knot contains double wrap on the first throw, followed by two opposing, alternating single throws.
Various Steps of Surgeons Knot
Tumble Square Knot
This is a simple square knot which can be changed to slipping configuration by tightening of the same side of thread.
• A square knot is tied.
• The Same side of thread should be straightened with the help of two Maryland or needle holders.
• After straightening of the same side of thread it is ready to slide.
• Closed jaw of Maryland forceps will slide the knot.
• After tightening, the knot is locked again by pulling both the thread.
• One more knot is tied to prevent slipping of tumble square knot.
Various steps of tumble square knot