Troubleshooting and Checklist in Laparoscopic Surgery
What would you do if the following situations occurred during laparoscopic surgery?
The field turns pink or yellow
• White balancing may not be initially before inserting the telescope into the abdomen. White balance the camera should be done after withdrawing it.
• There may be wrongly connected RGB cable. The RGB cable should be checked for proper connection.
• Low voltage can sometimes alter the color.
• Bile or blood spillage may turn the field pink or yellow due to staining of the field. The inadvertent injury to the bowel and spillage of bowel content may cause the field to turn yellow.
Sudden blackout
• The cause of sudden blackout may be due to the fused bulb of the light source. A switch of the light source should be turned to use a backup bulb.
• There may be a disconnected camera or monitor cable or the fuse of camera blown due to fluctuation in voltage. The fuse and connection of the camera and monitor should be checked.
• The tip of the telescope may be touching any object completely so there is no way for light to come out. The telescope should be repositioned.
Poor definition of picture
• The poor picture may be due to a soiled lens with blood or other body fluids. It should be cleaned with warm water.
• The camera may not be white balanced or focused properly. The fine-tuning of the camera should be tried. The proper white balance of the camera is necessary to get a good quality picture. White balancing of the camera should be done by placing the telescope 6 cm away from a complete white gauge piece of tissue paper.
• Excessive blood in the operative field resulting in absorption of light and poor field is one of the causes of poor vision of the operating field. Proper irrigation and suction should be tried to get a clear view.
What action would you take to control marked intra-abdominal bleeding from a trocar site?
For immediate control
• With inserted trocar, pressure should be applied on the bleeding site either from outside or using a pledget from within under vision.
• A Foley’s catheter can be inserted and the balloon can be inflated and pulled up creating a tamponade effect.
• A purse-string suture can be taken around the incision of the trocar and tightened to check the bleeding.
• A clamp can be applied to the port site until the bleeding is controlled.
For more permanent control
• The bleeding vessel can be sutured from within under vision or controlled with diathermy, or a full-thickness bite can be taken externally at the region of the bleeding vessel.
• The incision can be extended and the vessel can be found by proper debridement and then the bleeding vessel should be ligated.
What action would you take if trocar injury to a large vessel occurs?
• The trocar should be left in place. Adequate resuscitative measures should be taken (like blood should be at hand for the transfusion).
• Urgent laparotomy should be performed and repair of the vessel with adequate exposure should be done.
• The help of a vascular surgeon should be asked.
What would you do following a sudden collapse of the patient during an endoscopic procedure?
Possible causes for the collapse could be:
• Vasovagal shock due to peritoneal irritation.
• CO2 embolism either by direct entry of gas into a vessel or through absorption.
• Hypercarbia due to systemic CO2 absorption results in respiratory acidosis, pulmonary hypertension leading to cardiac dysrhythmia.
• Arrhythmias: AV dissociation, junctional rhythm, sinus bradycardia, and asystole due to vagal response to peritoneal stretching.
Insufflation should be stopped and the abdomen should be deflated. The patient should be kept a head-down and right up (steep left lateral Trendelenburg’s position) and 100 percent O2 should be administered. The blood gas levels should be analyzed and corrected accordingly. The gas in the right ventricle should be removed with a central venous catheter if possible. If there is any arrhythmia, atropine and anti-arrhythmic should be given. In the case of ventricular fibrillation, there may be a need for a DC defibrillator.
What would you select the pressure insufflator at the start of diagnostic laparoscopy in an adult healthy patient?
If general anesthesia is employed the starting flow rate is set at 1 L/minute, 12 mm Hg, and volume 2 to 3 L.
During diagnostic laparoscopy under local anesthesia, insufflation is begun at a flow rate of 1 L/min. Initial low pressure 2 to 3 mm Hg and volume not exceeding 2 L.
What would you do when?
High pressure is registered when CO2 is insufflated in the VN before the needle has been placed in the body
• Veress needle may be blocked
• The gas tap may not be opened
• Gas tube may be kinked.
The tap should be checked in the right direction and the needle should be flushed with saline to ensure that it is not blocked. The faulty Veress needle should be changed.
High pressures (10 or 15 mm Hg) are obtained during insufflation at 1 L/min
• The needle may be in the wrong plane and not in the peritoneal cavity.
• Gas tap or needle may be partially blocked.
The right plane of insertion of the needle should be checked by the saline drop test and negative aspiration test. If the problem continues then the needle should be withdrawn and reinserted.
What would you do if after insufflation and on insertion of the telescope?
You saw gas in the greater omentum
If there is gas in the greater omentum the probability is that either the Veress needle or the trocar has entered and insufflated gas into it. There is an increased risk of systemic absorption of CO2 resulting in embolism. The necessary precautions to prevent this should be taken. Antithrombotics (Heparin) should be given, the patient should be tilted head down and left lateral and 100 percent O2 should be given for inspiration.
Only fat is seen and there is no crepitant in the abdominal wall
The telescope is probably in the omentum and should be withdrawn and any possible injury to the omental vessel should be checked.
What action would you take when?
You are unable to advance trocar into abdomen
If the trocar is a disposable one confirm whether the blade tip is charged and reintroduce. Alternatively, the tip may get discharged half way. The trocar should be removed recharged and inserted again. If it is a reusable trocar the tip may be blunt in which case it would be better to use a different sharp trocar.
The tip of the obturator is seen entering the abdominal cavity during insertion of a secondary trocar
The skin incision may be small so the trocar has to be removed, the incision should be extended and the trocar should be reinserted.
List the safety mechanisms of different types of trocars.
Blunt (Hasson) trocar-blunt with insertion under direct vision. This type of trocar works on the safety of direct vision
Some disposable trocar has a sharp blade with a spring-loaded safety shield that covers the blade tip once the peritoneal cavity is entered. This spring-loaded spring mechanism reduces the risk of injury to the underlying viscera by the blade tip.
Other disposable trocars require charging before insertion and when the tip enters the peritoneal cavity the blade tip retracts inside.
Reusable trocars have triangular and conical tips. The triangular tips are sharper and tend to cause more vascular injury.
Some disposable trocars have a screw-shaped cannula, which has to be inserted like a screw, which enables the surgeon to have more control over the force with which he inserts the trocar. These have an additional advantage of not slipping out during the procedure.
The non-bladed obturator is used in some trocars for careful insertion where the problem of charging the blade tip and its potency does not arise.
Visiport is a mechanism in which the telescope is inserted into the cannula and the gun is fired through the abdominal wall visualizing each layer until the peritoneal cavity is reached. The trocars are thus inserted under vision layer by layer.
Radially dilating trocars are also available. It has the advantage of entry through a very small incision and then incision can be dilated with the serial dilator.
An ultrasonically activated trocar system is used in some high-risk patients. It consists of an ultrasonic generator and a transducer attached to the trocar spike.
The sharp pyramidal tip is activated with a frequency of 23.5 kHz and an amplitude of 150 micrometers. The trocar fits a 5 mm plastic sheath that is introduced inside a 10 mm dilator whose tip is conical.
List the factors that contribute to increasing the risk of complications with using a Veress needle.
• Faulty needle – dysfunctional spring tip
• Wrong method of insertion
• Not guarding the needle and not inserting like a dart
• Uncontrolled forceful insertion of the needle
• Wrong angle of insertion, i.e. directing straight down, instead of towards the pelvic cavity
• Excessive force from the shoulder rather than wrist while inserting
• Previous abdominal surgery and scarred abdomen
• Thin scaphoid individual: Risk of deep entry
• Spinal deformities: Kyphoscoliosis
• Late pregnancy
• Morbid obesity
• Organomegaly
• Portal hypertension.
Procedure Checklists: Veress Needle Insertion
Check and Set the Insufflator
Pressure Level and Flow Rate
Initial flow rates should be set at around 1 L/min. Optimal exposure is obtained with intra-abdominal pressures of 12.0–16.0 mm Hg. Lower pressures (e.g. 10 mm Hg) may give adequate visualization, especially in women with lax abdominal walls. This causes less stretching of the diaphragm, possibly reducing postoperative pain. Low-pressure pneumoperitoneum may be used in conjunction with techniques to lift the abdominal wall in patients with impaired respiratory or cardiac states. An initial setting of 10.0–15.0 mm Hg is recommended for routine procedures.
• Connect gas supply to the Veress needle.
• Check gas flow, needle patency, and spring-loaded central blunt stylet.
• Palpation test.
• Assessment of abdominal wall thickness by palpation with the fingers down to the aorta.
• Make a small skin incision.
• Tension abdominal wall and insert the needle.
The safest technique is to hold the needle at a point along its shaft at a distance from the tip which equates with that estimated by palpation as the abdominal wall thickness. The other hand holds up the abdominal wall, providing counter tension as the needle is “threaded” in. You should be able to feel the needle puncture two distinct layers. Once the sharp tip enters the peritoneal cavity, the spring-loaded blunt stylet is released with an audible (palpable) click.
Check that the Needle is in the Correct Position
A number of tests exist to confirm the correct positioning of the needle tip.
• Aspiration: Uses a saline-filled syringe
• Saline drop test: Uses a drop of saline in the Veress needle hub
• Negative pressure test: Retraction of the anterior abdominal wall
• Early insufflation pressures
• Volume test: Approximate 3 liters of gas are required to reach pressures of 10 mm Hg.
If an extraperitoneal position is suspected the needle can be withdrawn and repositioned. The number of passes required should be recorded. If a small amount of blood is aspirated, reinsertion is justified. If large amounts of blood escape up the needle, laparotomy is indicated. If bowel content is aspirated, the needle is withdrawn and reinserted in another location. Subsequent inspection and adequate treatment for bowel injury are mandatory.
Insufflate
After a minimum of one liter of gas has been insufflated and needle position has been confirmed, the rate may be increased for more rapid filling. Periodic checks should be made of symmetric distension and abdominal resonance. Once the desired pressure has been reached, close the gas tap on the needle and withdraw it.
Use of the Diathermy Hook
• Use a metal trocar
• Pass the hook through an introducer tube or manually open the valve of the cannula to protect the hook from damage. Trumpet type valves necessitate the use of the introducer.
• Select the tissue to be divided. You may require inserting the tip of the hook parallel to the margin of the structure and then rotating it away to hook up tissue. You may need to use sweeping movements to separate the tissues. Do not lift too large an amount of tissue. Several small “bites” are more effective and safer. Work away from important structures.
• Inspect the tissue on the hook.
• Be aware of possible additional contact points.
• The camera operator may need to withdraw slightly to prevent the lens from being splattered.
• Coagulate and/or cut the tissue on the hook.
• Control any possible overshoot.
• Continued dissection using this technique may require the hook to be cleaned of charred material withdraw and clean with the supplied implement until clean. Smoke is generated if charring occurs, this can obscure the field. Open a tap on one of the cannulas to allow gas to escape from the abdomen. This will automatically be replaced by fresh gas from the insufflator.
• When the dissection is finished, watch the hook into the introducer tube as tissue may accidentally catch up and get damaged.
• Open the cannula valve if necessary to prevent damage to the hook.
Introduction of a Pledget into the Abdominal Cavity
• A traumatic, ratcheted grasper or a spiked biopsy forceps is passed through the introducer tube externally.
• The pledget is placed in the open jaws, making sure that enough pledget is placed between the jaws for a secure grip and enough pledget protrudes so that, in use, the grasper does not act on the tissues.
• The grip is secured by closing the jaws, doing up the racket, and, as an added precaution against intraabdominal loss, an elastic band is used to ensure closure is maintained.
• The pledget is then completely withdrawn into the introducer tube.
• The introducer tube is passed through a large cannula into the abdominal cavity.
• The pledget can now be extruded from the introducer and used.
Retrieval of a Pledget from the Abdominal Cavity
• When the pledget is no longer required it is withdrawn inside the introducer tube. It is extremely important that the camera follows the instrument and the pledget is seen to enter the tube.
• The tube can then be withdrawn from the cannula
• The pledget is extruded from the lower end and released from the grasper.
Application of Metal Clips
Is clip appropriate or would it be better to use a ligature?
• Load the clip applicator.
• Insert through an appropriate cannula.
• Place the jaws around the structure to be ligated
• Check for correct placement by observing from different angles or rotating the instrument.
• Partially close the instrument (This traps the tissue to be ligated and it can again be checked).
• Firmly close the jaws.
• Open and withdraw. Single clips should not be trusted for vessels of any size.
How do laparoscopy on the abdomen with a previous scar?
The patient with previous abdominal surgery is at high-risk for minimal access surgery. In these patients following techniques should be used:
• The open insufflation technique
– Hasson technique
– Fielding technique
• Pneumoperitoneum should be created with a Veress needle by selecting an alternate site of insertion distant from the old abdominal incision
• Insufflations with a Veress needle inserted in the posterior vaginal fornix or transuterus route
• Insertion of optical trocar- primary port.
Hasson’s Technique
This is a very safe technique to enter the abdomen, especially in patients with scarred abdomen from multiple previous surgeries.
This is an open technique where the surgeon can see what he is doing. It is performed in an area of the abdomen distant from previous scars and likely to be free of adhesions. After the induction of anesthesia 1 cm horizontal incision is made. Blunt dissection is carried out until the underlying fascia is identified. The fascia is elevated with a pair of Kocher’s clamps. Adherent subcutaneous tissue is gently dissected free. It is then incised to permit entry of trocar into the peritoneal cavity. Two heavy, absorbable sutures are placed on either side of the fascial incision just like the repair of umbilical hernia. Care must be taken when applying these sutures not to injure the underlying viscera. The Kocher clamps are next removed, and a 10 mm blunt trocar is advanced into the peritoneal cavity. The obturator is removed and the sleeve is secured in position with the previously placed two sutures. The sleeve of the trocar is wrapped with vaseline gauze to prevent leakage of insufflated gas around the trocar.
Open Fielding Technique
This technique developed by Fielding in 1992 involves a small incision over the everted umbilicus at a point where the skin and peritoneum are adjacent. Pneumoperitoneum can be created using the Fielding technique in patients with abdominal incisions from previous surgery providing there is no midline incision, portal hypertension and re-canalized umbilical vein, and umbilical abnormalities such as urachal cyst, sinus or umbilical hernia present. A suture is not usually required to prevent gas leakage because the umbilicus has been everted (so the angle of insertion of the laparoscopic port becomes oblique) and the incision required is relatively small. However, one may be needed to stabilize the port. Thorough skin preparation of the umbilicus is carried out and the everted umbilicus (with toothed grasping forceps) is incised from the apex in a caudal direction. Two small retractors are inserted to expose the cylindrical umbilical tube running from the undersurface of the umbilical skin down to the linea alba. This tube is then cut from its apex downwards towards its junction with the linea alba. Further blunt dissection through this plane permits direct entry into the peritoneum. Once the peritoneal cavity is breached the laparoscopic port (without trocar) can then be inserted directly and insufflations started. A blunt internal trocar facilitates the insertion of this port and an external grip that can be attached to the port to secure it in position.
The Advantages of Using the Open Technique are Many
• The incidence of injury to adhered organs although not eliminated is significantly reduced by entry into the peritoneal cavity under direct vision.
• There is a decreased risk of injury to the retroperitoneal vessels. The obturator is blunt and the angle of entry allows the surgeon to maneuver the cannulas at an angle, which avoids viscera, while still assuring peritoneal placement.
• The risk of extraperitoneal insufflation is eliminated. Placement under direct vision ensures that the insufflation of gas is actually into the peritoneal cavity.
• The likelihood of hernia formation is decreased because the fascia is closed as part of the technique.
• In experienced hands, the open technique is cost-effective. The Hasson technique does not increase the operative time required, creating a pneumoperitoneum and may even lessen it.
Alternative Sites for Introducing Veress Needle
For avoiding injury to the adhered portion of the bowel in the patient with previous abdominal surgeries, the alternative site for the introduction of a Veress needle can be chosen other than the umbilicus.
For Previous Laparotomy with Midline Incision
For a previously operated abdomen with a midline incision, the Veress needle should be placed in the upper left quadrant of the abdomen just lateral to the rectus sheath. The preperitoneal space in the hypochondriac region is more easily insufflated than at the umbilicus. The Veress needle at the hypochondriac region needs to be passed more deeply into the abdomen in order to enter the peritoneal cavity because all the layers of the abdomen are present here and there is a thick layer of muscle as well. The right upper quadrant should be avoided because of the size of the liver and the presence of the falciform ligament. There is some report of injury to the liver if the liver is enlarged or the careless insertion of veress needle to right hypochondrium is performed.
For a Previous Laparotomy with Upper Midline Incision
Inpatient with a scar on the upper midline of abdomen the Veress needle should be placed in the right lower quadrant, the left lower quadrant should generally be avoided since in older patients there are usually sigmoid adhesions in the left lower quadrant.
For Previously Operated Abdomen with a Solitary Incision in an Upper or Lower Abdominal Quadrant. In a patient with a scar in the upper or lower abdominal quadrant, the Veress needle should be passed in the opposite abdominal quadrant just lateral to the rectus muscle. The left lower and right upper quadrant should be avoided if it is possible.
For Patient with Previously Operated Abdomen in Multiple Quadrants
In these patients, a Veress needle or open cannula in an area farthest from the existing abdominal scar should be used. When there is any confusion regarding the presence of adhesion inside the abdomen where Veress needle has to go, the open cannula technique should be used.
Transvaginal or Transuterine Insufflation
Some surgeons prefer to introduce Veress needle through the posterior fornix or through the uterus in females with previous abdominal surgery. Although this method of pneumoperitoneum is now very popular the placement of a needle via the posterior fornix has been demonstrated to be safe. If this route of pneumoperitoneum has been chosen, then the needle must be placed in the midline about 1.75 cm behind the junction of the vaginal vault and smooth epithelium of external OS.
Insufflation with an Optical Trocar (Visiport)
This is one of the techniques used for performing laparoscopic procedures in patients with the previously scarred abdomen. An incision of 1 cm long is made in the area of the abdominal wall distant from the previous scars. The Littlewood forceps is used to elevate the abdomen. The visitor's optical trocar is introduced with a telescope. The optical trocar is advanced slowly through the different planes of the abdominal wall. The blade at the tip of the visitors cuts the tissue which is visible so there is very little chance of injury to the intra-abdominal organ if the surgeon is experienced.
What would you do if the following situations occurred during laparoscopic surgery?
The field turns pink or yellow
• White balancing may not be initially before inserting the telescope into the abdomen. White balance the camera should be done after withdrawing it.
• There may be wrongly connected RGB cable. The RGB cable should be checked for proper connection.
• Low voltage can sometimes alter the color.
• Bile or blood spillage may turn the field pink or yellow due to staining of the field. The inadvertent injury to the bowel and spillage of bowel content may cause the field to turn yellow.
Sudden blackout
• The cause of sudden blackout may be due to the fused bulb of the light source. A switch of the light source should be turned to use a backup bulb.
• There may be a disconnected camera or monitor cable or the fuse of camera blown due to fluctuation in voltage. The fuse and connection of the camera and monitor should be checked.
• The tip of the telescope may be touching any object completely so there is no way for light to come out. The telescope should be repositioned.
Poor definition of picture
• The poor picture may be due to a soiled lens with blood or other body fluids. It should be cleaned with warm water.
• The camera may not be white balanced or focused properly. The fine-tuning of the camera should be tried. The proper white balance of the camera is necessary to get a good quality picture. White balancing of the camera should be done by placing the telescope 6 cm away from a complete white gauge piece of tissue paper.
• Excessive blood in the operative field resulting in absorption of light and poor field is one of the causes of poor vision of the operating field. Proper irrigation and suction should be tried to get a clear view.
What action would you take to control marked intra-abdominal bleeding from a trocar site?
For immediate control
• With inserted trocar, pressure should be applied on the bleeding site either from outside or using a pledget from within under vision.
• A Foley’s catheter can be inserted and the balloon can be inflated and pulled up creating a tamponade effect.
• A purse-string suture can be taken around the incision of the trocar and tightened to check the bleeding.
• A clamp can be applied to the port site until the bleeding is controlled.
For more permanent control
• The bleeding vessel can be sutured from within under vision or controlled with diathermy, or a full-thickness bite can be taken externally at the region of the bleeding vessel.
• The incision can be extended and the vessel can be found by proper debridement and then the bleeding vessel should be ligated.
What action would you take if trocar injury to a large vessel occurs?
• The trocar should be left in place. Adequate resuscitative measures should be taken (like blood should be at hand for the transfusion).
• Urgent laparotomy should be performed and repair of the vessel with adequate exposure should be done.
• The help of a vascular surgeon should be asked.
What would you do following a sudden collapse of the patient during an endoscopic procedure?
Possible causes for the collapse could be:
• Vasovagal shock due to peritoneal irritation.
• CO2 embolism either by direct entry of gas into a vessel or through absorption.
• Hypercarbia due to systemic CO2 absorption results in respiratory acidosis, pulmonary hypertension leading to cardiac dysrhythmia.
• Arrhythmias: AV dissociation, junctional rhythm, sinus bradycardia, and asystole due to vagal response to peritoneal stretching.
Insufflation should be stopped and the abdomen should be deflated. The patient should be kept a head-down and right up (steep left lateral Trendelenburg’s position) and 100 percent O2 should be administered. The blood gas levels should be analyzed and corrected accordingly. The gas in the right ventricle should be removed with a central venous catheter if possible. If there is any arrhythmia, atropine and anti-arrhythmic should be given. In the case of ventricular fibrillation, there may be a need for a DC defibrillator.
What would you select the pressure insufflator at the start of diagnostic laparoscopy in an adult healthy patient?
If general anesthesia is employed the starting flow rate is set at 1 L/minute, 12 mm Hg, and volume 2 to 3 L.
During diagnostic laparoscopy under local anesthesia, insufflation is begun at a flow rate of 1 L/min. Initial low pressure 2 to 3 mm Hg and volume not exceeding 2 L.
What would you do when?
High pressure is registered when CO2 is insufflated in the VN before the needle has been placed in the body
• Veress needle may be blocked
• The gas tap may not be opened
• Gas tube may be kinked.
The tap should be checked in the right direction and the needle should be flushed with saline to ensure that it is not blocked. The faulty Veress needle should be changed.
High pressures (10 or 15 mm Hg) are obtained during insufflation at 1 L/min
• The needle may be in the wrong plane and not in the peritoneal cavity.
• Gas tap or needle may be partially blocked.
The right plane of insertion of the needle should be checked by the saline drop test and negative aspiration test. If the problem continues then the needle should be withdrawn and reinserted.
What would you do if after insufflation and on insertion of the telescope?
You saw gas in the greater omentum
If there is gas in the greater omentum the probability is that either the Veress needle or the trocar has entered and insufflated gas into it. There is an increased risk of systemic absorption of CO2 resulting in embolism. The necessary precautions to prevent this should be taken. Antithrombotics (Heparin) should be given, the patient should be tilted head down and left lateral and 100 percent O2 should be given for inspiration.
Only fat is seen and there is no crepitant in the abdominal wall
The telescope is probably in the omentum and should be withdrawn and any possible injury to the omental vessel should be checked.
What action would you take when?
You are unable to advance trocar into abdomen
If the trocar is a disposable one confirm whether the blade tip is charged and reintroduce. Alternatively, the tip may get discharged half way. The trocar should be removed recharged and inserted again. If it is a reusable trocar the tip may be blunt in which case it would be better to use a different sharp trocar.
The tip of the obturator is seen entering the abdominal cavity during insertion of a secondary trocar
The skin incision may be small so the trocar has to be removed, the incision should be extended and the trocar should be reinserted.
List the safety mechanisms of different types of trocars.
Blunt (Hasson) trocar-blunt with insertion under direct vision. This type of trocar works on the safety of direct vision
Some disposable trocar has a sharp blade with a spring-loaded safety shield that covers the blade tip once the peritoneal cavity is entered. This spring-loaded spring mechanism reduces the risk of injury to the underlying viscera by the blade tip.
Other disposable trocars require charging before insertion and when the tip enters the peritoneal cavity the blade tip retracts inside.
Reusable trocars have triangular and conical tips. The triangular tips are sharper and tend to cause more vascular injury.
Some disposable trocars have a screw-shaped cannula, which has to be inserted like a screw, which enables the surgeon to have more control over the force with which he inserts the trocar. These have an additional advantage of not slipping out during the procedure.
The non-bladed obturator is used in some trocars for careful insertion where the problem of charging the blade tip and its potency does not arise.
Visiport is a mechanism in which the telescope is inserted into the cannula and the gun is fired through the abdominal wall visualizing each layer until the peritoneal cavity is reached. The trocars are thus inserted under vision layer by layer.
Radially dilating trocars are also available. It has the advantage of entry through a very small incision and then incision can be dilated with the serial dilator.
An ultrasonically activated trocar system is used in some high-risk patients. It consists of an ultrasonic generator and a transducer attached to the trocar spike.
The sharp pyramidal tip is activated with a frequency of 23.5 kHz and an amplitude of 150 micrometers. The trocar fits a 5 mm plastic sheath that is introduced inside a 10 mm dilator whose tip is conical.
List the factors that contribute to increasing the risk of complications with using a Veress needle.
• Faulty needle – dysfunctional spring tip
• Wrong method of insertion
• Not guarding the needle and not inserting like a dart
• Uncontrolled forceful insertion of the needle
• Wrong angle of insertion, i.e. directing straight down, instead of towards the pelvic cavity
• Excessive force from the shoulder rather than wrist while inserting
• Previous abdominal surgery and scarred abdomen
• Thin scaphoid individual: Risk of deep entry
• Spinal deformities: Kyphoscoliosis
• Late pregnancy
• Morbid obesity
• Organomegaly
• Portal hypertension.
Procedure Checklists: Veress Needle Insertion
Check and Set the Insufflator
Pressure Level and Flow Rate
Initial flow rates should be set at around 1 L/min. Optimal exposure is obtained with intra-abdominal pressures of 12.0–16.0 mm Hg. Lower pressures (e.g. 10 mm Hg) may give adequate visualization, especially in women with lax abdominal walls. This causes less stretching of the diaphragm, possibly reducing postoperative pain. Low-pressure pneumoperitoneum may be used in conjunction with techniques to lift the abdominal wall in patients with impaired respiratory or cardiac states. An initial setting of 10.0–15.0 mm Hg is recommended for routine procedures.
• Connect gas supply to the Veress needle.
• Check gas flow, needle patency, and spring-loaded central blunt stylet.
• Palpation test.
• Assessment of abdominal wall thickness by palpation with the fingers down to the aorta.
• Make a small skin incision.
• Tension abdominal wall and insert the needle.
The safest technique is to hold the needle at a point along its shaft at a distance from the tip which equates with that estimated by palpation as the abdominal wall thickness. The other hand holds up the abdominal wall, providing counter tension as the needle is “threaded” in. You should be able to feel the needle puncture two distinct layers. Once the sharp tip enters the peritoneal cavity, the spring-loaded blunt stylet is released with an audible (palpable) click.
Check that the Needle is in the Correct Position
A number of tests exist to confirm the correct positioning of the needle tip.
• Aspiration: Uses a saline-filled syringe
• Saline drop test: Uses a drop of saline in the Veress needle hub
• Negative pressure test: Retraction of the anterior abdominal wall
• Early insufflation pressures
• Volume test: Approximate 3 liters of gas are required to reach pressures of 10 mm Hg.
If an extraperitoneal position is suspected the needle can be withdrawn and repositioned. The number of passes required should be recorded. If a small amount of blood is aspirated, reinsertion is justified. If large amounts of blood escape up the needle, laparotomy is indicated. If bowel content is aspirated, the needle is withdrawn and reinserted in another location. Subsequent inspection and adequate treatment for bowel injury are mandatory.
Insufflate
After a minimum of one liter of gas has been insufflated and needle position has been confirmed, the rate may be increased for more rapid filling. Periodic checks should be made of symmetric distension and abdominal resonance. Once the desired pressure has been reached, close the gas tap on the needle and withdraw it.
Use of the Diathermy Hook
• Use a metal trocar
• Pass the hook through an introducer tube or manually open the valve of the cannula to protect the hook from damage. Trumpet type valves necessitate the use of the introducer.
• Select the tissue to be divided. You may require inserting the tip of the hook parallel to the margin of the structure and then rotating it away to hook up tissue. You may need to use sweeping movements to separate the tissues. Do not lift too large an amount of tissue. Several small “bites” are more effective and safer. Work away from important structures.
• Inspect the tissue on the hook.
• Be aware of possible additional contact points.
• The camera operator may need to withdraw slightly to prevent the lens from being splattered.
• Coagulate and/or cut the tissue on the hook.
• Control any possible overshoot.
• Continued dissection using this technique may require the hook to be cleaned of charred material withdraw and clean with the supplied implement until clean. Smoke is generated if charring occurs, this can obscure the field. Open a tap on one of the cannulas to allow gas to escape from the abdomen. This will automatically be replaced by fresh gas from the insufflator.
• When the dissection is finished, watch the hook into the introducer tube as tissue may accidentally catch up and get damaged.
• Open the cannula valve if necessary to prevent damage to the hook.
Introduction of a Pledget into the Abdominal Cavity
• A traumatic, ratcheted grasper or a spiked biopsy forceps is passed through the introducer tube externally.
• The pledget is placed in the open jaws, making sure that enough pledget is placed between the jaws for a secure grip and enough pledget protrudes so that, in use, the grasper does not act on the tissues.
• The grip is secured by closing the jaws, doing up the racket, and, as an added precaution against intraabdominal loss, an elastic band is used to ensure closure is maintained.
• The pledget is then completely withdrawn into the introducer tube.
• The introducer tube is passed through a large cannula into the abdominal cavity.
• The pledget can now be extruded from the introducer and used.
Retrieval of a Pledget from the Abdominal Cavity
• When the pledget is no longer required it is withdrawn inside the introducer tube. It is extremely important that the camera follows the instrument and the pledget is seen to enter the tube.
• The tube can then be withdrawn from the cannula
• The pledget is extruded from the lower end and released from the grasper.
Application of Metal Clips
Is clip appropriate or would it be better to use a ligature?
• Load the clip applicator.
• Insert through an appropriate cannula.
• Place the jaws around the structure to be ligated
• Check for correct placement by observing from different angles or rotating the instrument.
• Partially close the instrument (This traps the tissue to be ligated and it can again be checked).
• Firmly close the jaws.
• Open and withdraw. Single clips should not be trusted for vessels of any size.
How do laparoscopy on the abdomen with a previous scar?
The patient with previous abdominal surgery is at high-risk for minimal access surgery. In these patients following techniques should be used:
• The open insufflation technique
– Hasson technique
– Fielding technique
• Pneumoperitoneum should be created with a Veress needle by selecting an alternate site of insertion distant from the old abdominal incision
• Insufflations with a Veress needle inserted in the posterior vaginal fornix or transuterus route
• Insertion of optical trocar- primary port.
Hasson’s Technique
This is a very safe technique to enter the abdomen, especially in patients with scarred abdomen from multiple previous surgeries.
This is an open technique where the surgeon can see what he is doing. It is performed in an area of the abdomen distant from previous scars and likely to be free of adhesions. After the induction of anesthesia 1 cm horizontal incision is made. Blunt dissection is carried out until the underlying fascia is identified. The fascia is elevated with a pair of Kocher’s clamps. Adherent subcutaneous tissue is gently dissected free. It is then incised to permit entry of trocar into the peritoneal cavity. Two heavy, absorbable sutures are placed on either side of the fascial incision just like the repair of umbilical hernia. Care must be taken when applying these sutures not to injure the underlying viscera. The Kocher clamps are next removed, and a 10 mm blunt trocar is advanced into the peritoneal cavity. The obturator is removed and the sleeve is secured in position with the previously placed two sutures. The sleeve of the trocar is wrapped with vaseline gauze to prevent leakage of insufflated gas around the trocar.
Open Fielding Technique
This technique developed by Fielding in 1992 involves a small incision over the everted umbilicus at a point where the skin and peritoneum are adjacent. Pneumoperitoneum can be created using the Fielding technique in patients with abdominal incisions from previous surgery providing there is no midline incision, portal hypertension and re-canalized umbilical vein, and umbilical abnormalities such as urachal cyst, sinus or umbilical hernia present. A suture is not usually required to prevent gas leakage because the umbilicus has been everted (so the angle of insertion of the laparoscopic port becomes oblique) and the incision required is relatively small. However, one may be needed to stabilize the port. Thorough skin preparation of the umbilicus is carried out and the everted umbilicus (with toothed grasping forceps) is incised from the apex in a caudal direction. Two small retractors are inserted to expose the cylindrical umbilical tube running from the undersurface of the umbilical skin down to the linea alba. This tube is then cut from its apex downwards towards its junction with the linea alba. Further blunt dissection through this plane permits direct entry into the peritoneum. Once the peritoneal cavity is breached the laparoscopic port (without trocar) can then be inserted directly and insufflations started. A blunt internal trocar facilitates the insertion of this port and an external grip that can be attached to the port to secure it in position.
The Advantages of Using the Open Technique are Many
• The incidence of injury to adhered organs although not eliminated is significantly reduced by entry into the peritoneal cavity under direct vision.
• There is a decreased risk of injury to the retroperitoneal vessels. The obturator is blunt and the angle of entry allows the surgeon to maneuver the cannulas at an angle, which avoids viscera, while still assuring peritoneal placement.
• The risk of extraperitoneal insufflation is eliminated. Placement under direct vision ensures that the insufflation of gas is actually into the peritoneal cavity.
• The likelihood of hernia formation is decreased because the fascia is closed as part of the technique.
• In experienced hands, the open technique is cost-effective. The Hasson technique does not increase the operative time required, creating a pneumoperitoneum and may even lessen it.
Alternative Sites for Introducing Veress Needle
For avoiding injury to the adhered portion of the bowel in the patient with previous abdominal surgeries, the alternative site for the introduction of a Veress needle can be chosen other than the umbilicus.
For Previous Laparotomy with Midline Incision
For a previously operated abdomen with a midline incision, the Veress needle should be placed in the upper left quadrant of the abdomen just lateral to the rectus sheath. The preperitoneal space in the hypochondriac region is more easily insufflated than at the umbilicus. The Veress needle at the hypochondriac region needs to be passed more deeply into the abdomen in order to enter the peritoneal cavity because all the layers of the abdomen are present here and there is a thick layer of muscle as well. The right upper quadrant should be avoided because of the size of the liver and the presence of the falciform ligament. There is some report of injury to the liver if the liver is enlarged or the careless insertion of veress needle to right hypochondrium is performed.
For a Previous Laparotomy with Upper Midline Incision
Inpatient with a scar on the upper midline of abdomen the Veress needle should be placed in the right lower quadrant, the left lower quadrant should generally be avoided since in older patients there are usually sigmoid adhesions in the left lower quadrant.
For Previously Operated Abdomen with a Solitary Incision in an Upper or Lower Abdominal Quadrant. In a patient with a scar in the upper or lower abdominal quadrant, the Veress needle should be passed in the opposite abdominal quadrant just lateral to the rectus muscle. The left lower and right upper quadrant should be avoided if it is possible.
For Patient with Previously Operated Abdomen in Multiple Quadrants
In these patients, a Veress needle or open cannula in an area farthest from the existing abdominal scar should be used. When there is any confusion regarding the presence of adhesion inside the abdomen where Veress needle has to go, the open cannula technique should be used.
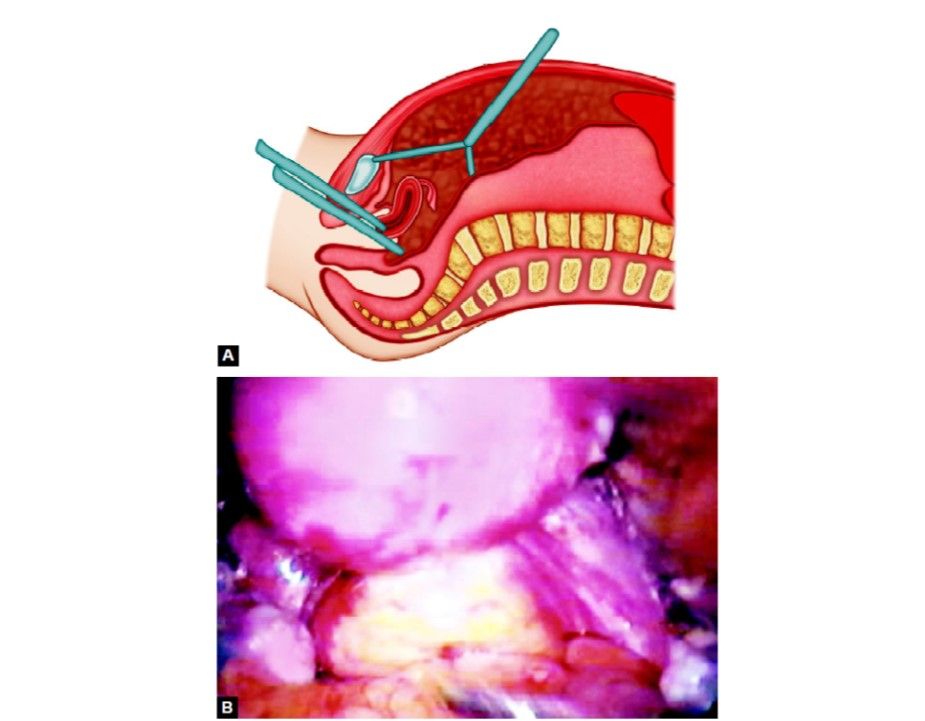
Transvaginal or Transuterine Insufflation
Some surgeons prefer to introduce Veress needle through the posterior fornix or through the uterus in females with previous abdominal surgery. Although this method of pneumoperitoneum is now very popular the placement of a needle via the posterior fornix has been demonstrated to be safe. If this route of pneumoperitoneum has been chosen, then the needle must be placed in the midline about 1.75 cm behind the junction of the vaginal vault and smooth epithelium of external OS.
Transvaginal route of insufflation
Insufflation with an Optical Trocar (Visiport)
This is one of the techniques used for performing laparoscopic procedures in patients with the previously scarred abdomen. An incision of 1 cm long is made in the area of the abdominal wall distant from the previous scars. The Littlewood forceps is used to elevate the abdomen. The visitor's optical trocar is introduced with a telescope. The optical trocar is advanced slowly through the different planes of the abdominal wall. The blade at the tip of the visitors cuts the tissue which is visible so there is very little chance of injury to the intra-abdominal organ if the surgeon is experienced.