An Artist’s Impression Of A Robot
Robotic Surgery – Its Uses And Advantages
Dissertation submitted in partial fulfillment of the requirement for the MMAS(Master in Minimal Access Surgery)
The Global Open University, Nagaland (Recognised by UGC, Ministry of Human Resource Development, Government of India) 2014
CERTIFICATE This is to certify that this is the bonafide dissertation done by Dr.AJITH RAVINDRAN and submitted in partial fulfillment of the requirement for the MMAS(Master in Minimal Access Surgery), of the The Global Open University, Nagaland, India.
ACKNOWLEDGEMENT I would like to acknowledge the role played by Professor R K Mishra, Head of the Department of Minimal Access Surgery in guiding and being a source of encouragement. I also appreciate the helpfulness of other friends and colleagues for their various hints. I also thank my family and other dear ones who put up with me during the long hours of typing and use of the internet.
Above all, I praise and thank my Lord Jesus Christ for giving me of his abundant grace and strength in carrying out this study.
Dr.AJITH RAVINDRAN
An Artist’s Impression Of A Robot

Introduction :
The Origins of Robots :
The term "robot " was coined by the Czech playright Karel Capek in 1921 in his play Rossom's Universal Robots. The word "robot" is from the Czech word robota which means forced labor. Since that time, robots have developed from primitive machines that could perform a variety of menial tasks to today where they can perform very complex tasks. Robots are used in computers, in research, and in manufacturing. Robots have only recently entered the medicine. Industrial robots are now used for a variety of surgical techniques, are FDA approved, and are marketed.
Robots in Medicine

Photograph of Puma560 robot :
Robots were first introduced in 1987 with the first laparoscopic surgery, a cholescystecotomy. Since then, numerous procedures have been performed laparoscopically as technology and the skills of the surgeons have developed. This surgery is known as minimally invasive as incisions are smaller, there is less risk of infection, hospital stays are shorter, and recuperation is reduced. However, there are also drawbacks to minimally invasive surgery. The equipment requires a surgeon to move the instruments while watching a video monitor. The surgeon must move in the opposite direction from the target on the monitor to interact with the correct area on the patient so hand-eye coordination, tactile and force feedback, and dexterity aren't compromised. Other drawbacks of laparoscopic surgery include restricted degrees of motion, decreased sense of touch, increased sensitivity to hand movement.
The first non-laparoscopic robot was the Puma 560, used by Kwoh et al to perform neurosurgical biopsies with greater precision in 1985. Three years later, Davies et al performed a transurethral resection using the same machine. This system developed in the PROBOT, a robotic system specifically designed for transurethral resection. Next, ROBODOC was developed by Integrated Surgical Supplies of Sacramento, CA which was designed to move the femur during hip replacement surgeries. This became the first robot approved by the FDA.
Involvement of NASA and the U.S. Army :
As robots developed in the medical field, researchers at the NASA (National Air and Space Administration) Ames Research Center began working on a concept called telepresence surgery (telesurgery) which combined virtual reality, robots, and medicine. In the early 1990's, the scientists from the NASA-Ames team joined the Stanford Research Institute (SRA) to develop a telemanipulator for hand surgery. Eventually, surgeons and endoscopists joined the development team to give their project a full spectrum of experts.
The U.S. Army also became interested because through robots they hoped to decrease wartime mortality by bringing the surgery to the soldier. The system that was developed for the army is known as MASH (Mobile Advanced Surgical Hospital) where a soldier could be loaded into a vehicle with robotic surgical equipment and could be operated on by a surgeon in the mobile unit. It has not yet been tested or approved for the army.
Overview of Major Surgical Robotic Systems and Companies.
A variety of commercial companies have been developed to create surgical robotic systems for the general community.
Computer Motion, Inc. developed the AESOP® Endoscope Positioner: a voiceactivated robotic system for endoscopic surgery. In 1993, this became the first robot approved by the FDA for surgery. The HERMES® Control Center was also developed by Computer Motion, Inc. and brought a centralized voice command and recognition sytem to the robotic medical devices. Integrated Surgical Systems (now Intuitive Surgery, Inc.) redesigned the SRI Green Telepresence Surgery system and created the daVinci Surgical System® classified as a master-slave surgical system. It uses true 3-D visualization and EndoWrist®. It was approved by FDA in July 2000 for general laparoscopic surgery, in November 2002 for mitral valve repair surgery, and is also presently involved in a cardiac clinical trial in the United States for totally endoscopic coronary artery bypass graft surgery. There are over 210 da Vinci Systems in use throughout the United States, Europe and Japan.
In 2001, SOCRATES™ Robotic Telecollaboration System was created by Computer Motion, Inc.. It includes integrated telecommunication equipment along with the robotic devices in order to provide remote surgical telecollaboration. This system was used for the first-ever transatlantic telesurgery performed.
Computer Motion merged with Intuitive Surgical, Inc., in June of 2003.
They introduced the ZEUS® Surgical System in 1998. This system consists of a surgeon control center and three table-mounted robotic arms for endoscopic surgery. Zeus was the system used to perform the first fully endoscopic robotic surgery and the initial beating-heart, totally endoscopic coronary bypass procedure.
Many more robots and robot instruments and programs are being researched and developed in the United States and around the world. With a competitive healthcare market in the United States, having cutting edge equipment, the newest technologies, and the newest testing modalities are important to the success of the organization. Robotics in medicine is a fairly new, yet advancing field.
The da Vinci® Surgical System
The da Vinci Surgical System is a sophisticated robotic platform designed to expand the surgeon’s capabilities and offer a state-of-the-art minimally invasive option for major surgery.
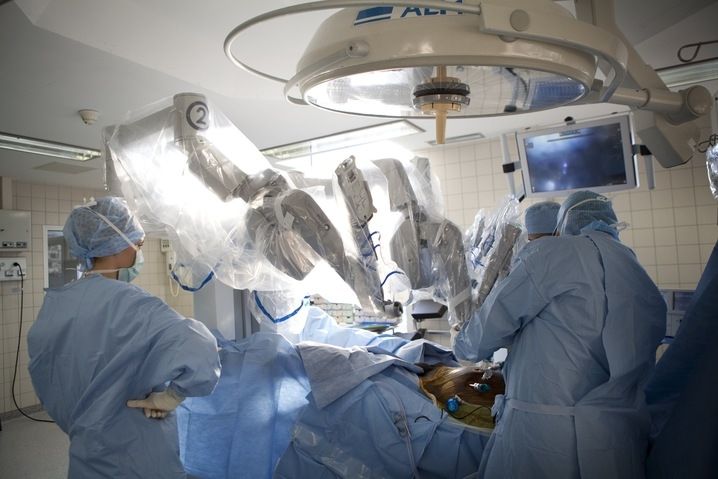
With da Vinci, small incisions are used to insert miniaturized wristed instruments and a high-definition 3D camera. Seated comfortably at the da Vinci console, the surgeon views a magnified, high-resolution 3D image of the surgical site inside the body.
At the same time, the latest robotic and computer technologies scale, filter and seamlessly translate the surgeon's hand movements into precise micromovements of the da Vinci instruments.
Although it is often called a “robot”, the da Vinci System cannot move or operate on its own; the surgeon is 100% in control.
Features :

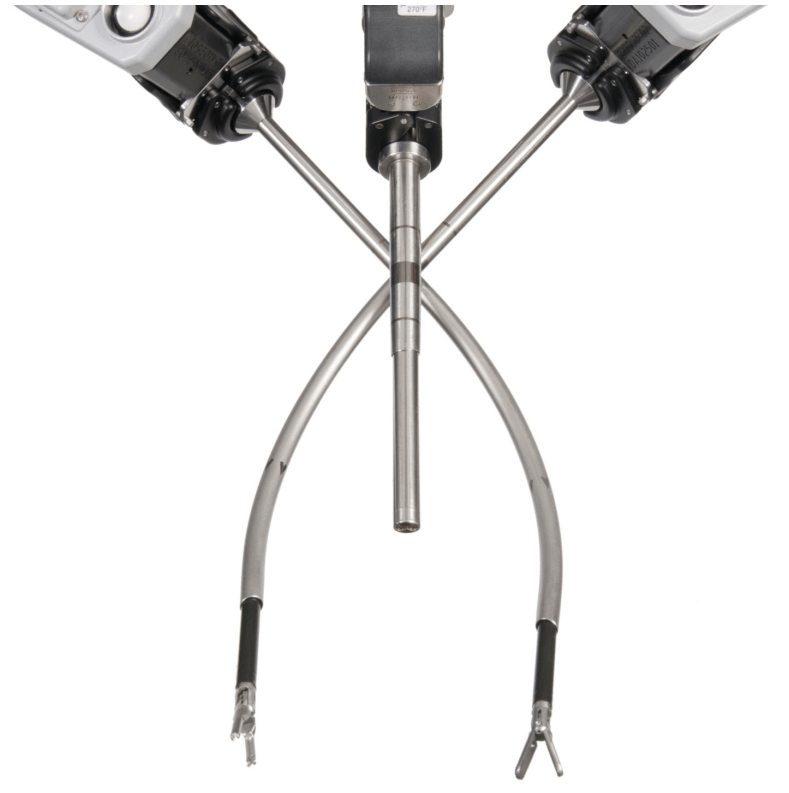
The da Vinci Surgical System is the only commercially available technology that can provide the surgeon with the precision, dexterity and control of traditional open surgery, while only requiring 1-2 cm incisions. da Vinci Surgical System consists of an ergonomically designed surgeon's console, a patient cart with four interactive robotic arms, a high-performance vision system and patented EndoWrist instruments.

At the da Vinci console, the surgeon operates while seated comfortably, viewing a highly magnified 3D image of the body’s interior. To operate, the surgeon uses master controls that work like forceps. As the surgeon manipulates the controls, da Vinci responds to the surgeon’s input in real time, translating his or her hand, wrist and finger movements into precise movements of miniaturized instruments at the patient-side cart.

da Vinci 's patient cart holds up to threeEndoWrist instruments and one 3D camera. To access the target anatomy, the surgeon introduces the precisely controlled EndoWristinstruments into the body through a series of dime-sized incisions. A broad range of instrument types are available to help the surgeon perform specialized surgical tasks with precision and control.
da Vinci Surgery Facts
More than 1.5 million da Vinci procedures have been performed worldwide since 2000 100% of top-ranked U.S. hospitals own at least one da Vinci System #1 minimally invasive surgical option for hysterectomy in the U.S. Used in 4 out of 5 radical prostatectomies in the U.S.
Components of the daVinci Surgical System
Surgeon Console

* Using the da Vinci Surgical System, the surgeon operates seated comfortably at a console while viewing a high definition, 3D image inside the patient’s body.
* The surgeon's fingers grasp the master controls below the display with hands and wrists naturally positioned relative to his or her eyes.
* The system seamlessly translates the surgeon's hand, wrist and finger movements into precise, real-time movements of surgical instruments.
Patient side-cart
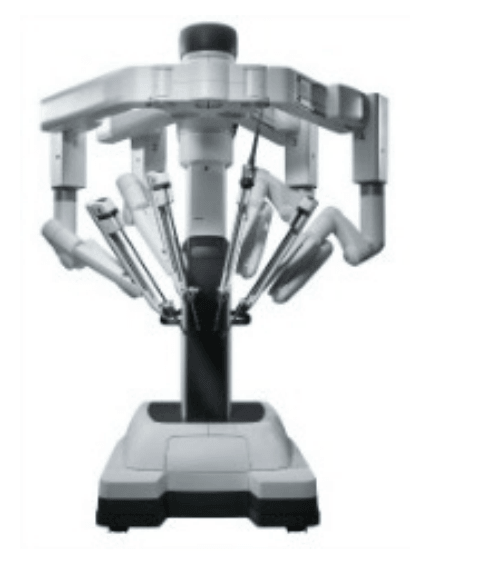
* The patient-side cart is where the patient is positioned during surgery. It includes either three or four robotic arms that carry out the surgeon's commands.
* The robotic arms move around fixed pivot points.
* The system requires that every surgical maneuver be under the direct control of the surgeon. Repeated safety checks prevent any independent movement of the instruments or robotic arms.
Endowrist instruments
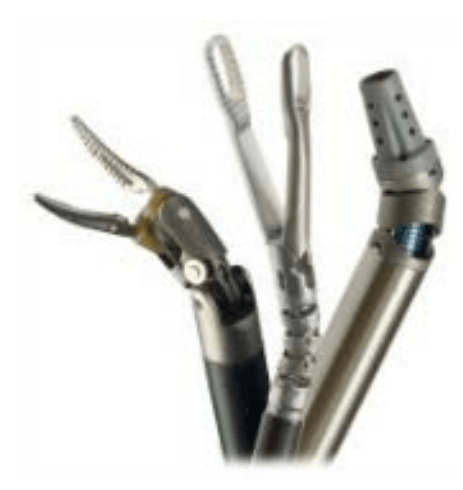
* A full range of Endowrist instruments is available to the surgeon while operating.
* The instruments are designed with seven degrees of motion - a range of motion even greater than the human wrist.
* Each instrument has a specific surgical mission such as clamping, suturing and tissue manipulation.
* Quick-release levers speed instrument changes during surgery.
Vision System
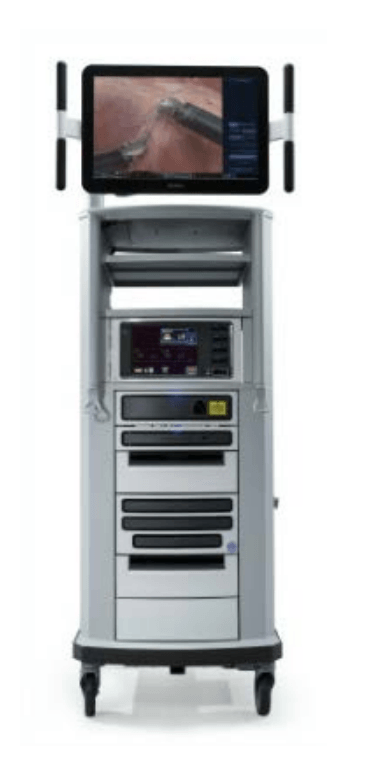
* The vision system is equipped with a high-definition, 3D endoscope (flexible tube with a camera and light at the tip) and image processing equipment that provides true-to-life images of the patient’s anatomy.
* A view of the operating field is available to the entire OR team on a large viewing monitor (vision cart). This widescreen view provides the surgical assistant at the patient’s side with a broad perspective and visualization of the procedure.
Recent advances
Firefly Fluorescence Imaging for the da Vinci Si system
The da Vinci® Si™ Surgical System now has integrated fluorescence imaging capability providing realtime, image-guided identification of key anatomical landmarks using near-infrared technology.
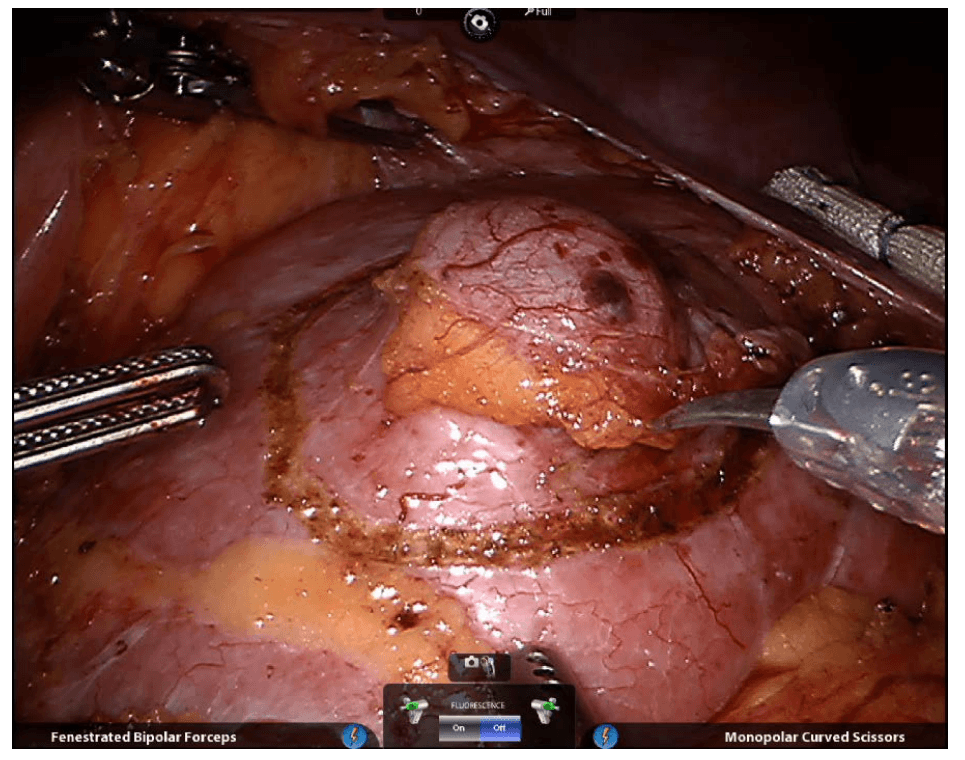
Renal parenchyma (before activation)
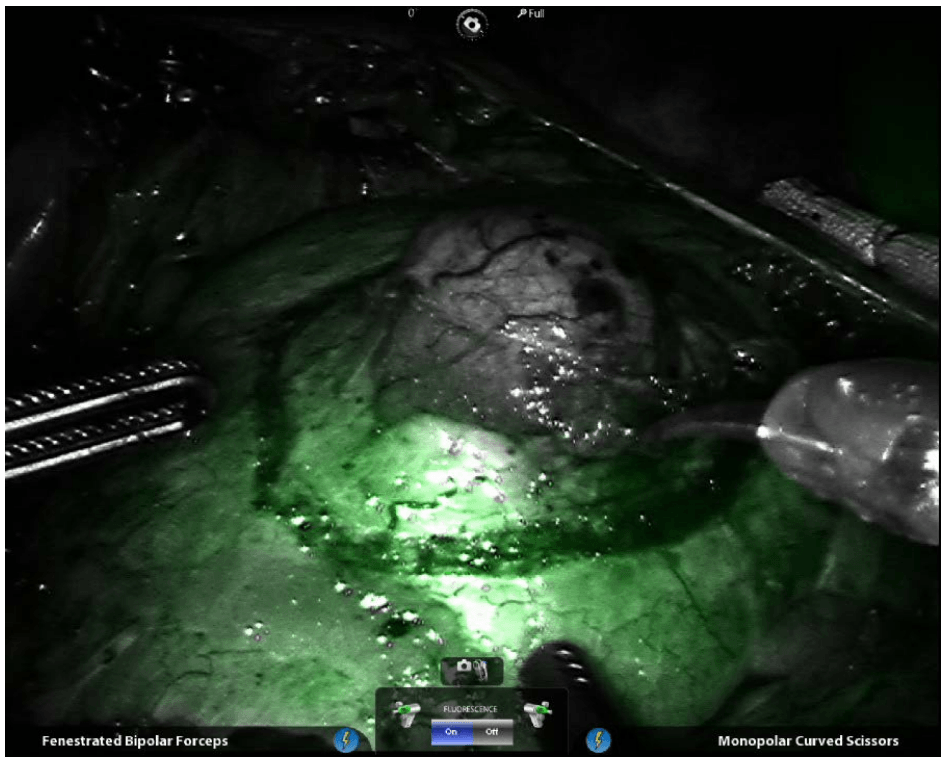
Renal parenchyma (after activation)
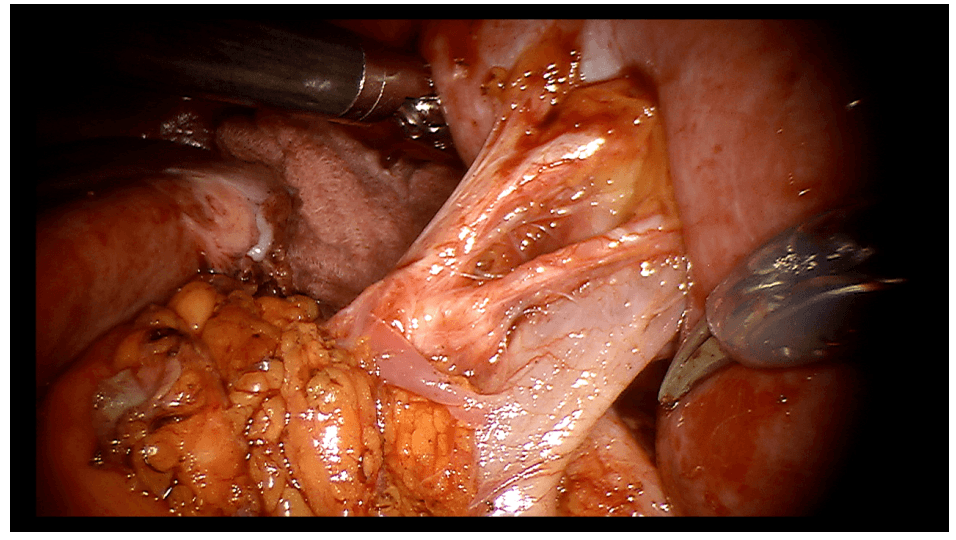
Renal hilum (before activation)
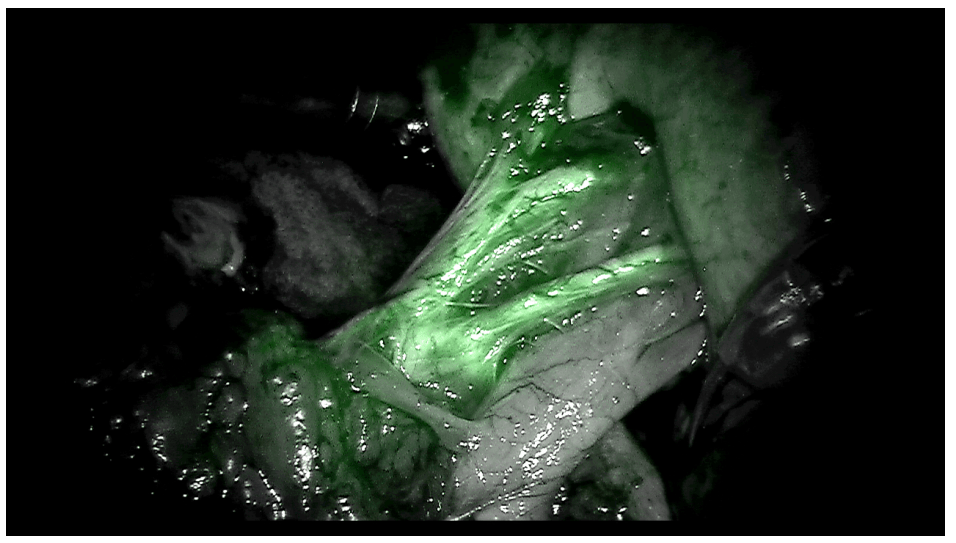
Renal hilum (after activation) ©2014 Intuitive Surgical, Inc
Single-Site™ camera and instruments
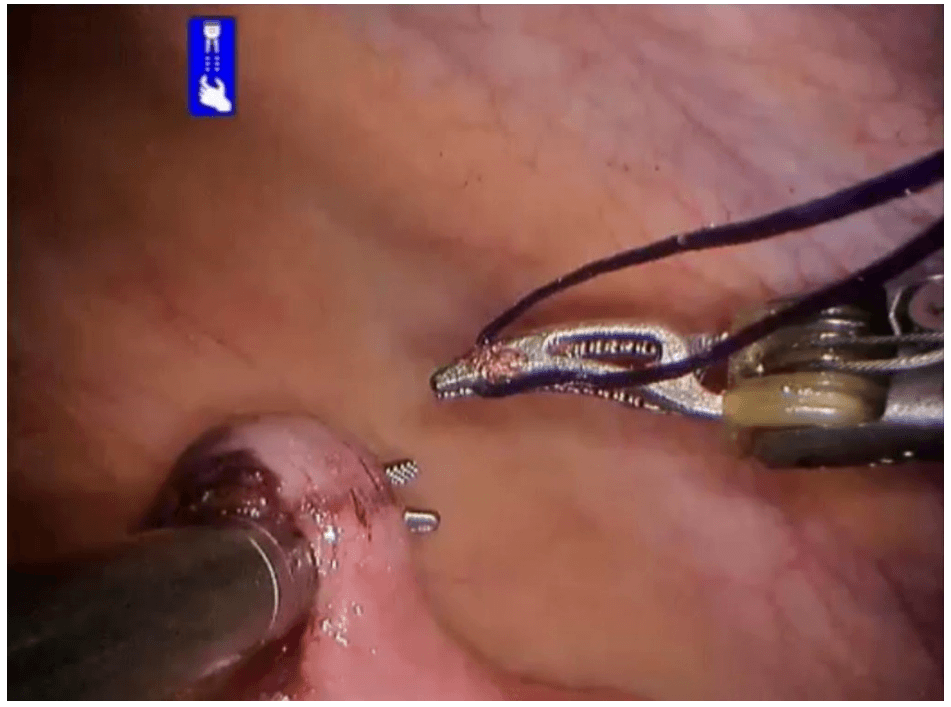
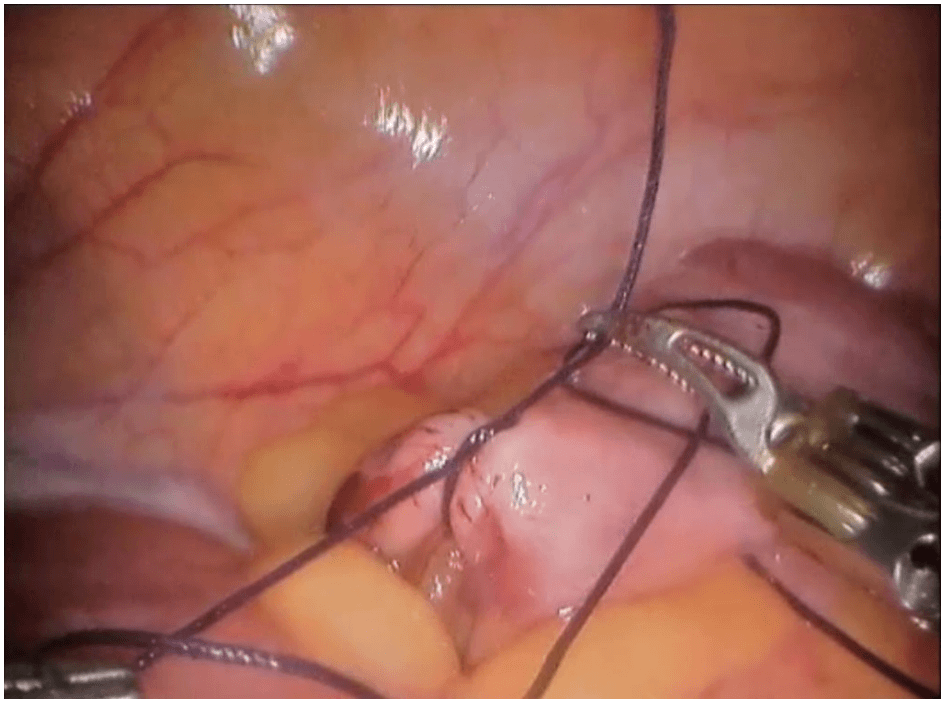
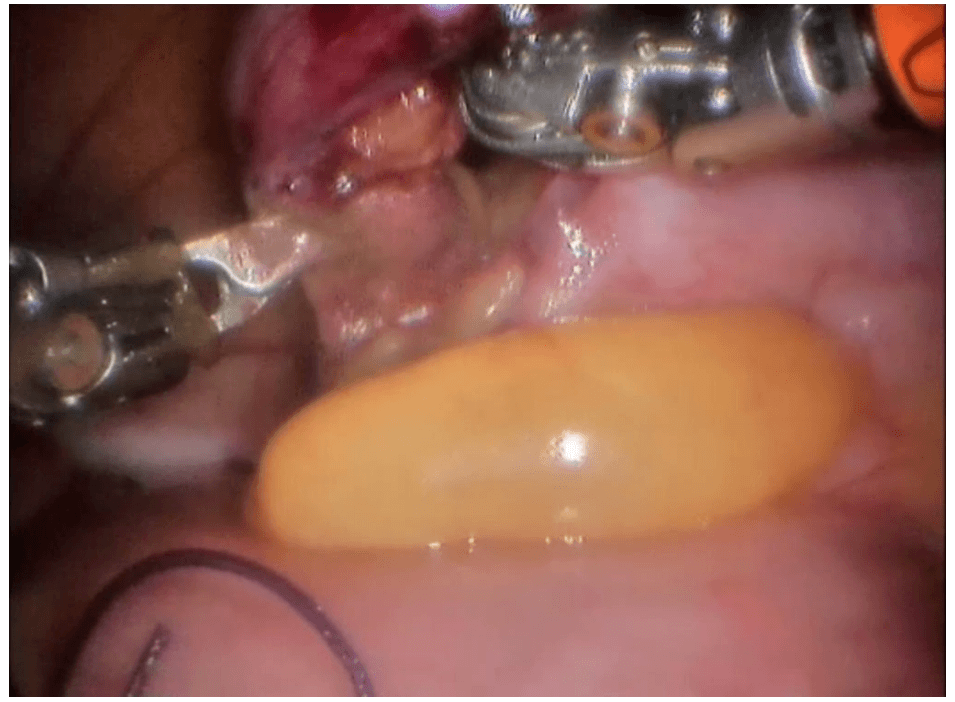
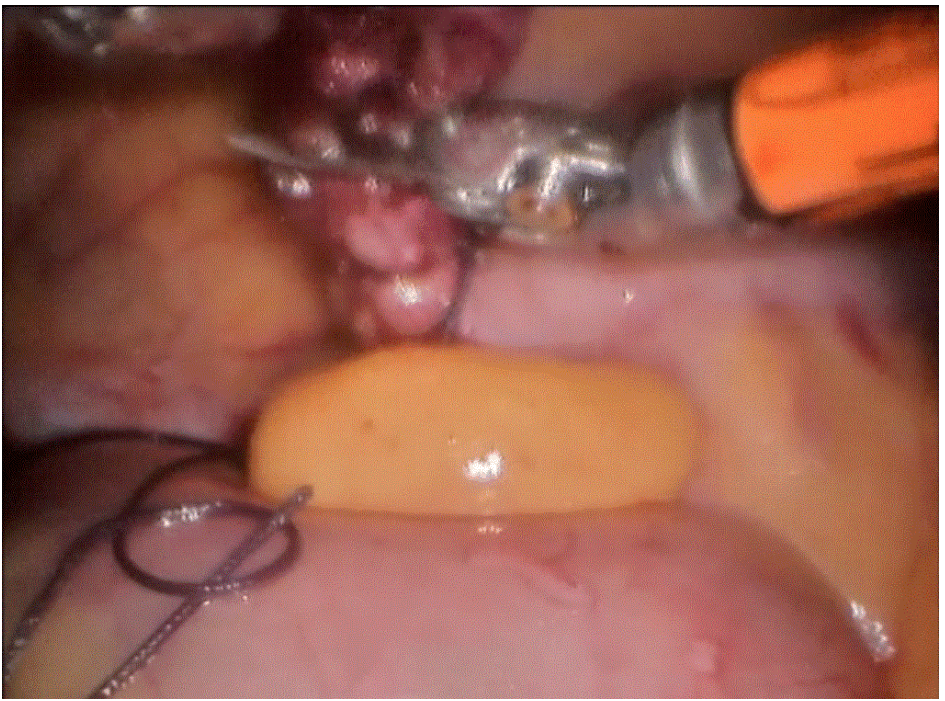
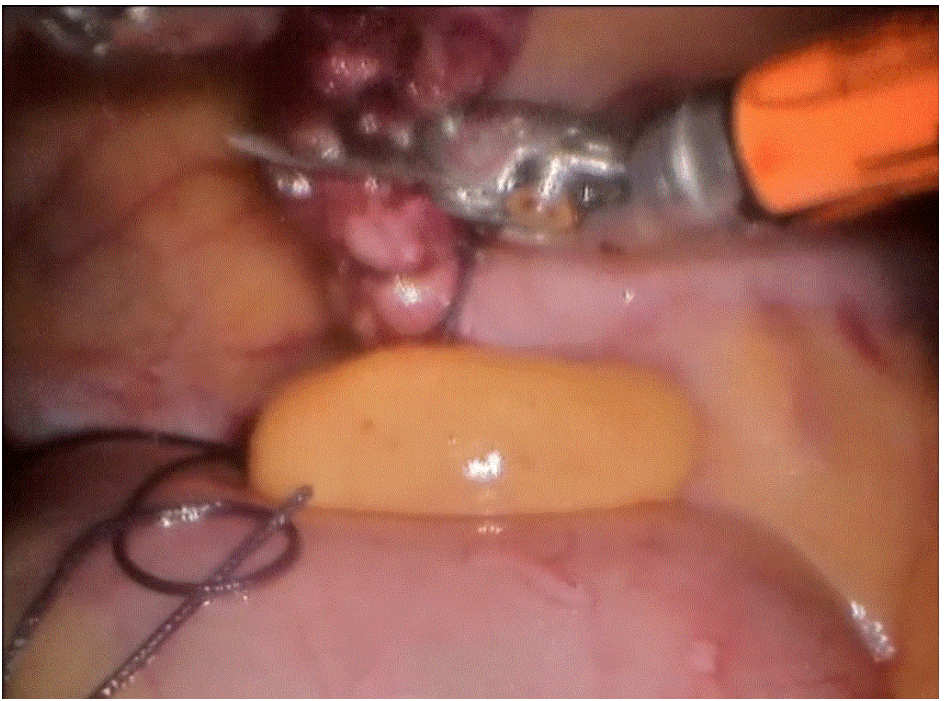
Robotic appendicectomy
Procedure
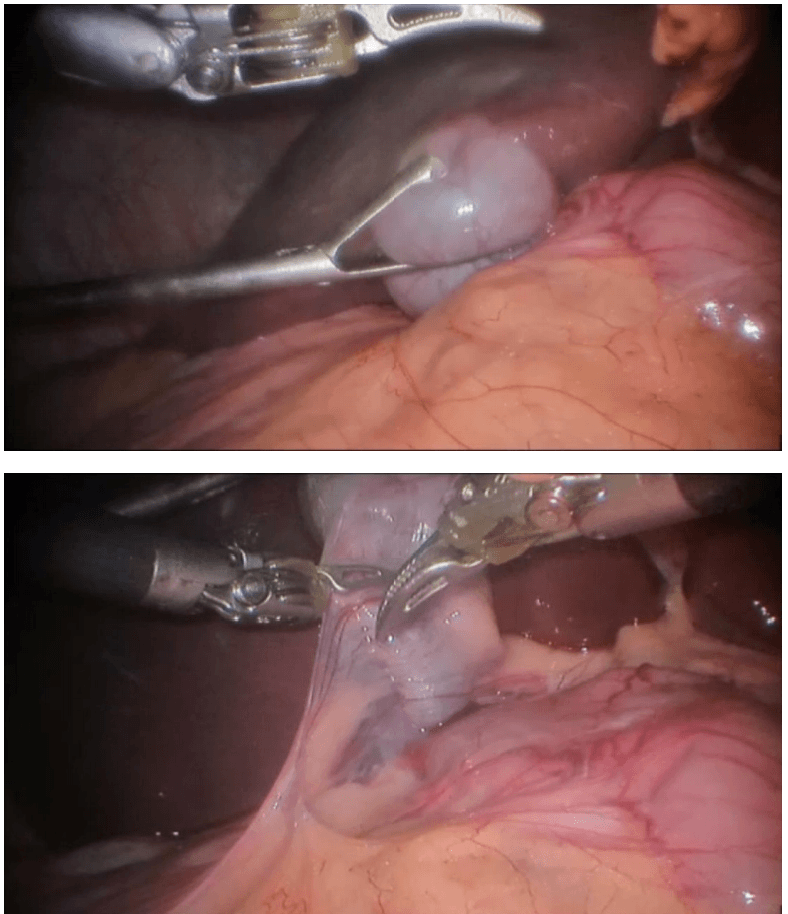
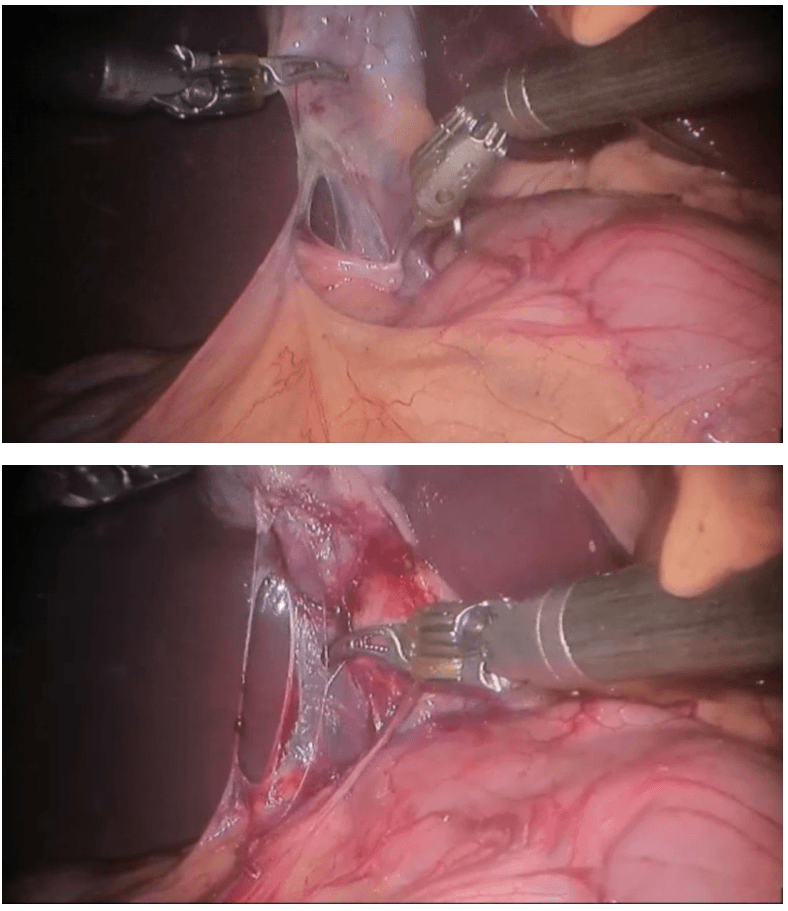
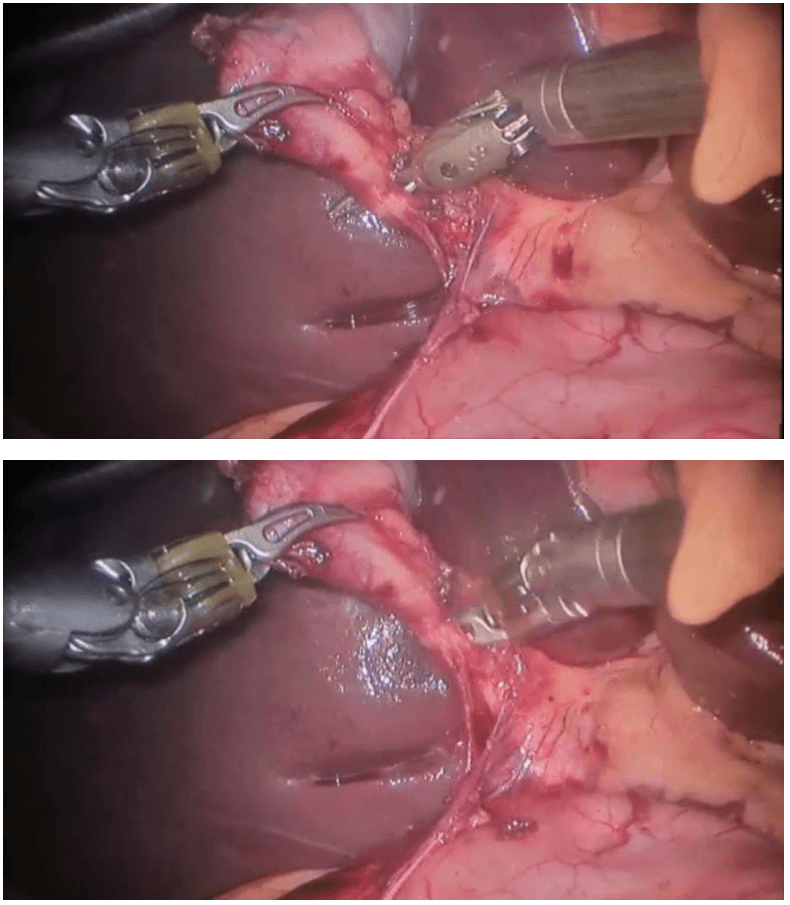
Robotic cholecystectomy
Procedure
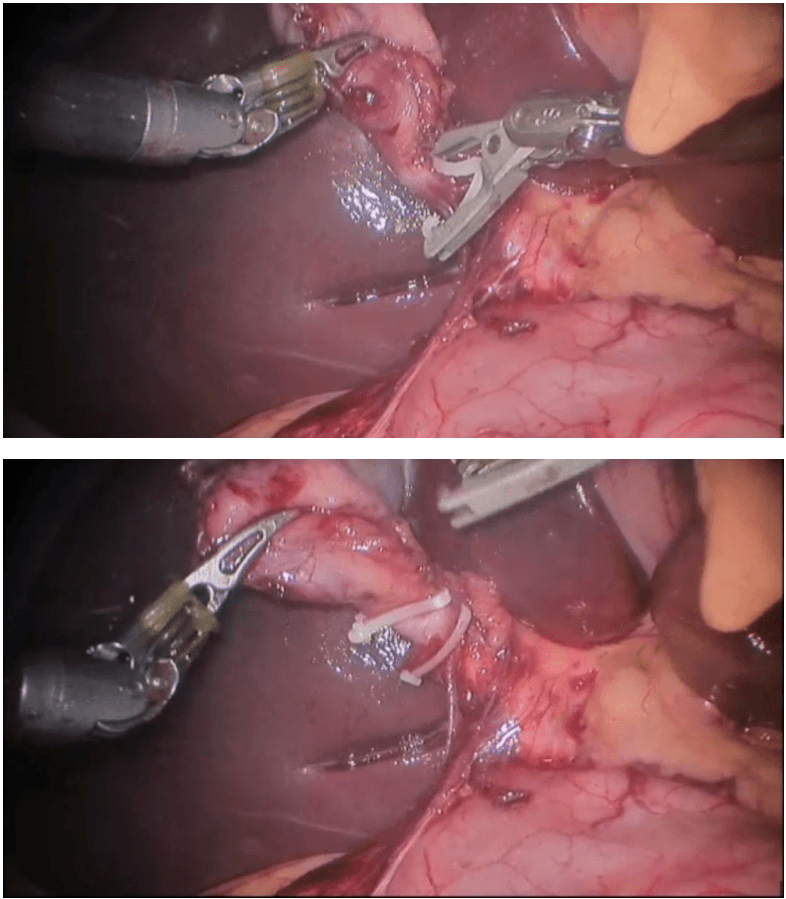
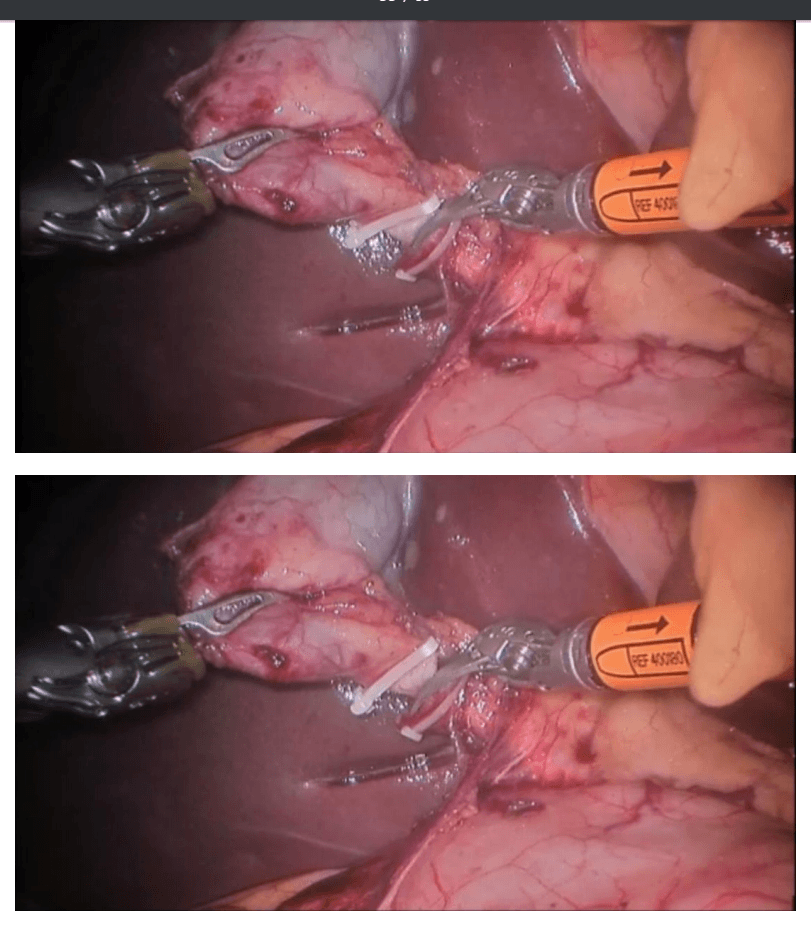
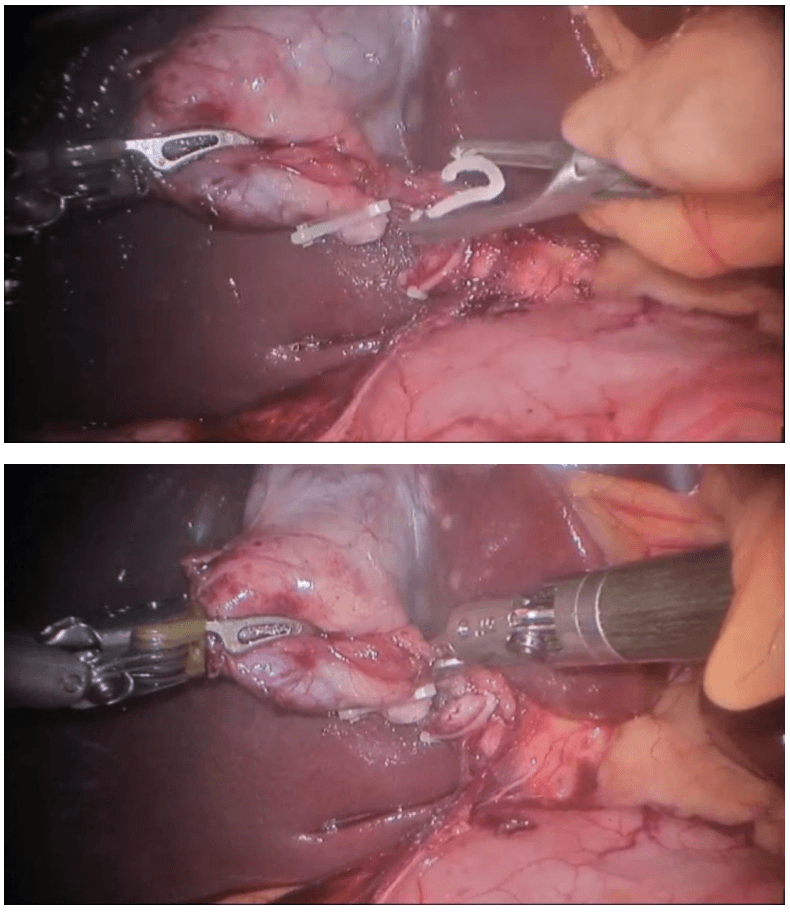
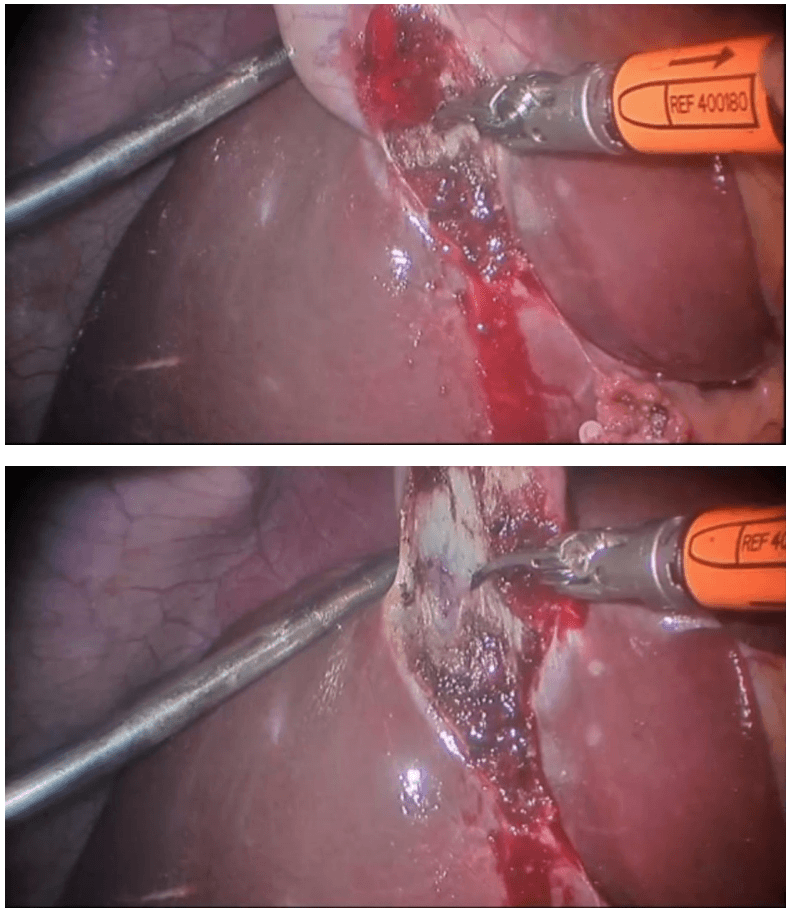
Robotic right hemicolectomy
Indications
Benign conditions
Adenomatous polyps of the colon that cannot be removed endoscopically, carcinoids, Irritable bowel syndrome (Crohn disease and sometimes ulcerative colitis), Caecal volvulus, Severe appendicitis with involvement of the cecum in the inflammatory process, Isolated right-side colonic diverticular disease (rare).
Malignant conditions
Adenocarcinoma of the right colon (most common) Malignant tumors of the appendix and cecum.
Contraindications
The main contraindication for right hemicolectomy in patients with malignancies is acute obstruction, in which a 2-stage right hemicolectomy is advisable. The authors believe that in cases of large intestinal obstruction with altered parameters and vital signs, a bypass procedure is initially a better choice than radical resection, which the patient is less likely to tolerate. Therefore, in the first stage, an ileotransverse anastomosis is performed, and in the second, right hemicolectomy is performed.
Other contraindications include significant cardiopulmonary impairment and coagulopathy.
Technical considerations
In order to plan an operation for a patient with colon cancer, the surgeon must have a thorough understanding of the tumor's location in the bowel, the stage of the cancer, and the patient's physiologic status. The location of the tumor and the histopathology are important data elements that allow preoperative selection of an operative plan and determination of the optimal resection margins.
The presence of a lesion at watershed areas of vascular supply, such as the hepatic and splenic flexures, may necessitate more extensive resection of colonic length for a safe and complete oncologic procedure. An extended right or left colectomy may be indicated to remove all contributing vascular supplies.
In addition, information consistent with hereditary nonpolyposis colon cancer supports the resection of the entire diseased colon rather than a simple segmental resection. This diagnosis may also be supported by special stains of the biopsy specimen that demonstrate microsatellite instability, the hallmark of the disease, which develops from mutations in the DNA mismatch repair system.
Relevant anatomy
The colon is a 5-6–ft long part of the large intestine (lower gastrointestinal tract) that is shaped like a "U." Embryologically, the colon develops partly from the midgut (ascending colon to proximal transverse colon) and partly from the hind gut (distal transverse colon to sigmoid colon). The ascending (right) colon lies vertically in the most lateral right part of the abdominal cavity. The cecum is at the proximal blind end (pouch) of the ascending colon. The ascending colon takes a right-angled turn just below the liver (right colic or hepatic flexure) and becomes the transverse colon, which has a horizontal course from right to left.
Preprocedural planning
Thorough preparation of the bowel is necessary before the operation. Standard bowel preparation may be conducted over a 24-hour period and is usually performed after admission. The patient is allowed to drink only clear liquids for 24 hours, and about 4 L of polyethylene glycol solution is given to the patient to be taken over 2-3 hours in the afternoon of the day before the procedure. A sodium phosphate enema is given on the night before the operation.
Two doses of metronidazole and neomycin sulfate are given after the lavage preparation on the day before surgery. An intravenous (IV) second-generation cephalosporin is administered within 1 hour before incision. Electrolyte levels are obtained again on the night before surgery after the lavage.
Equipment
Patient preparation includes adequate anesthesia and proper positioning
Anesthesia
General anesthesia is preferred for an open right hemicolectomy. An additional epidural block can be placed for postoperative pain management. After induction of anesthesia, a 16-French or 18-French Ryle tube is passed and kept on continuous drainage. The patient is then catheterized with a 14-F Foley catheter for monitoring of intraoperative and postoperative urine output.
Positioning
The standard position for an open right hemicolectomy is supine with strapping of the ankle and wrists to allow intraoperative changes to other positions, such as the Trendelenburg position. The surgeon stands on the patient's left, and the first assistant stands across from the surgeon on the patient's right. The scrub nurse stands beside the surgeon. If a second assistant is needed, he or she usually stands across from the surgeon to the left of the first assistant.
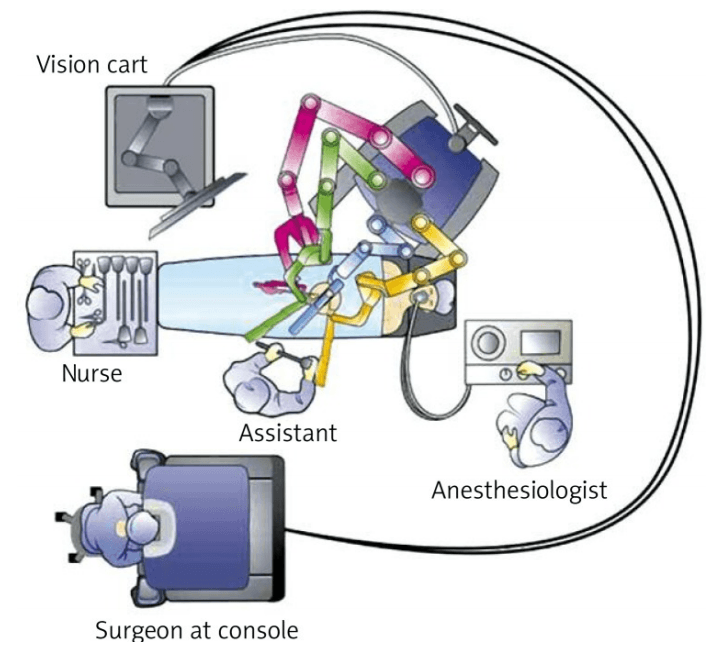
For right hemicolectomy, the patient is placed in a supine or lithotomy position. The patient is then secured to the operating table with the help of a bean bag, with both arms tucked at bedside. Additional shoulder harnesses are placed in order to support the patient when in the Trendelenburg position. The robot is brought in from the right side and the bedside assistant and the scrub nurse are situated to the patient’s left side. Once the robot is docked, there can be no change to the patient’s position or the robot’s position, without first undocking the robotic arms.
Monitoring and follow-up
Postoperatively, nasogastric aspiration is maintained until ileus resolves. Clear liquids are started when the patient has a soft abdomen with normal bowel sounds and expels flatus without nausea, vomiting, or abdominal distention. If the patient tolerates liquids well, normal intake can be started after 1 days. IV fluids should be continued until the patient can tolerate normal oral intake. The urinary catheter may be removed 2-3 days after the operation.
Patients who recover sufficiently may be discharged on day 7, and sutures or staples may be removed on day 10
Technique
Choice of ports
Port placement for the robotic procedure closely resembles the port configuration for laparoscopic right hemicolectomy. We routinely use only two of the three robotic working arms, along with a camera, although all three robotic working arms can be used if desired. One assistant laparoscopic port is added for additional retraction, as well as an energy device or an endostapler.
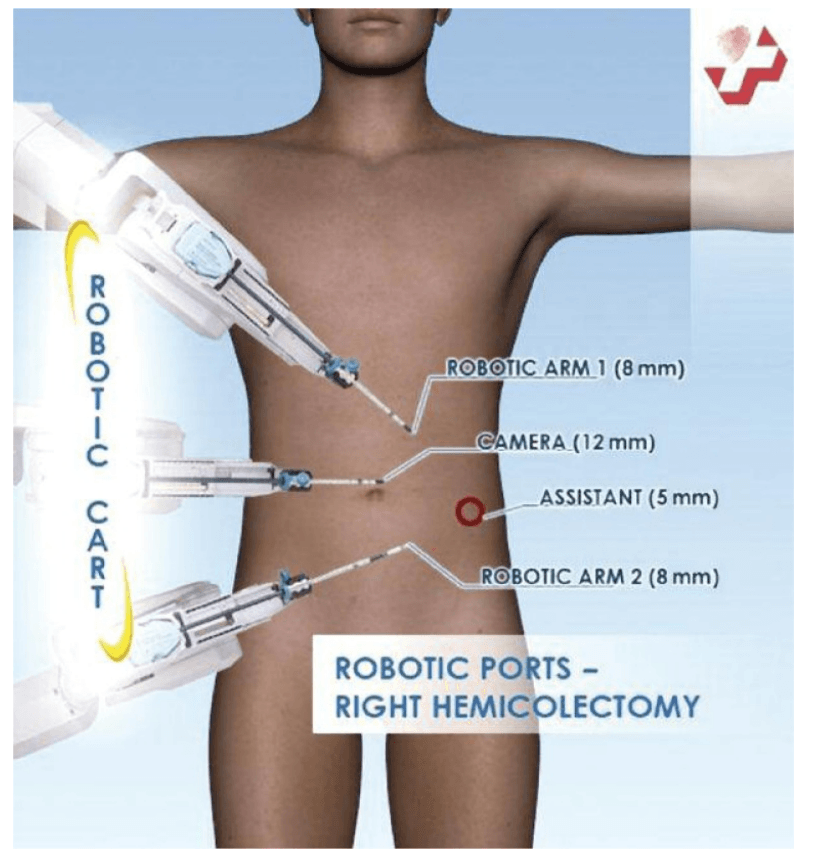
Determination of extent of resection
The location of the tumor determines the line of resection. If the tumor is in the cecum, a 10-cm margin of terminal ileum must be resected; however, if the tumor is in the ascending colon, only a few centimeters of ileum is required as a margin. The line of resection should extend to the right side of the transverse colon at the level of the right branch of the middle colic vessels (see the images below).
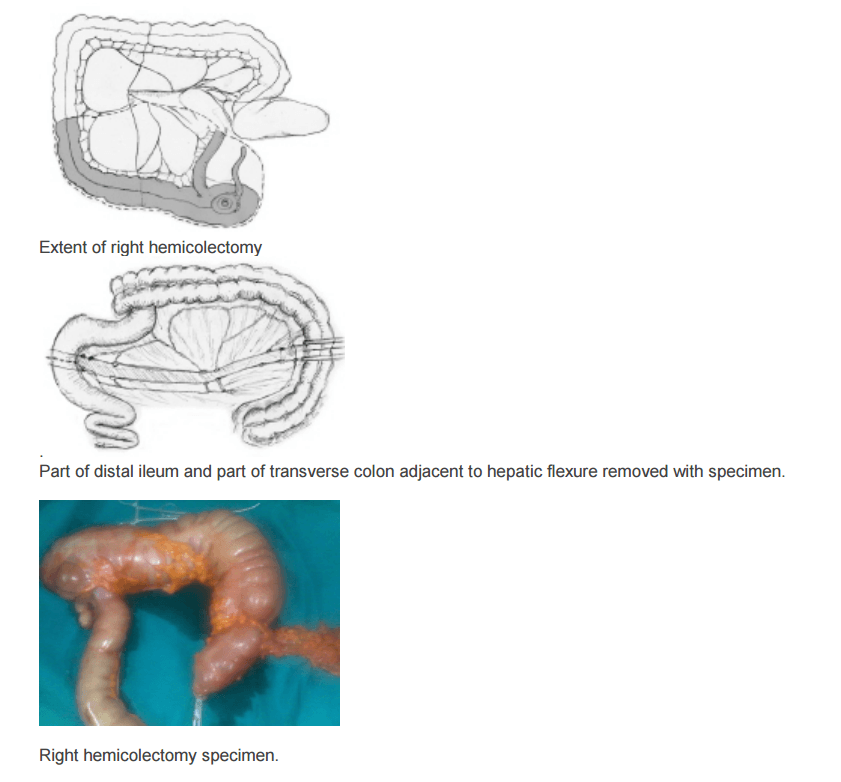
Take care to preserve the main branch of the middle colic vessels. To ensure proper lymph node harvesting, the right colic and ileocolic vessels are taken at their origins. Omental attachments to the right colon are generally removed with the specimen.
Procedure The procedure begins with diagnostic laparoscopy. The abdomen is inspected to determine the feasibility of minimally invasive resection and to identify the extent of disease. The patient is placed in the Trendelenburg position with the right side up. This allows for the small bowel and omentum to be displaced to the left upper quadrant, exposing the cecum and terminal ileum. The robot is then brought from the right side of the patient and docked onto the ports. We routinely use a robotic hook cautery on the left robotic arm and a bipolar fenestrated grasper on the right robotic arm. Depending on the surgeon’s preference and anatomical variations, either a medial to lateral or lateral to medial approach can be used. In this case presented, a lateral to medial technique was applied. The cecum is grasped and retracted medially and the peritoneum incised in the right pericolic gutter. This step helps to open up the avascular retroperitoneal plane of dissection. In this plane, the entire right colon is mobilized up to the hepatic flexure. During this part of the dissection, the right gonadal vessels and the right ureter should be identified and preserved. Next, the ileocolic pedicle is controlled. At this point, the cecum is retracted laterally and the ileocolic artery is carefully dissected close to its origin. The artery is then transected using a suitable energy device. Alternative methods include vascular endostapling or suture-ligation with the robotic system.
The mobilization of the hepatic flexure is the next step. The table is tilted to the reverse Trendelenburg position, which allows for the omentum and the transverse colon to shift caudad, thus exposing the hepatocolic ligament. At this point, it is necessary to undock the robotic arms temporarily from the ports before changing position. The transverse colon is retracted inferiorly and the gastrocolic ligament divided with the help of bipolar coagulation or an energy device. The dissection is continued toward the hepatic flexure and the final attachments of the colon to the retroperitoneum are divided. This completes the mobilization of the entire right colon and the robotic part of the procedure.
Once complete, the robot is undocked and the incision for a camera port is extended superiorly to create a small midline minilaparotomy. The mobilized right colon is then exteriorized through this incision and resected. The standard side to side ileocolic anastomosis is created in open fashion.
Totally robotic right hemicolectomy can also be done. Intracorporeal hand-sewn anastomosis may be required. The specimen may be retrieved through a Pfannenstiel incision.
Ref. Wideochir Inne Tech Malo Inwazyjne. Sep 2013; 8(3): 253–257 Robotassisted right colectomy: surgical technique and review of the literature Wojciech Witkiewicz, Marek Zawadzki, [...], and Sławomir Marecik
Advantages over laparoscopic procedure
Advocates of the robot-assisted technique point to superior retraction, visualization, and dissection offered with the robot, resulting in a better mesorectal grade, earlier recovery of urogenital function, and lower conversion rates.
Gynaecology
Steps of robotic hysterectomy
1 Visualisation of the active colpotomiser
1 Ligation and division of right upper pedicles. Ligation and division of left upper pedicles
2 Dissection of the UV fold and creation of the bladder flap (Ureteric studies confirm that the ureters are 10-40mm away from the colpotomizer lip. By using the UV fold incisions as a marker, you have a landmark to aim for once you do your upper pedicles. This is particularly useful in dealing with a large uterus as making your UV fold incision first guides the direction of your broad ligament dissection. Again, rotating the colpotomizer lip under the uterine vessels allows precise coagulation.)
5 Coagulation of the right uterine artery. Coagulation of the left uterine artery
6 Colpotomy incision left side anterolateral, continue the incision inferiorly following the contour of the colpotomiser. The green colpotomiser funnel lip is clearly visualized. The colpotomy incision follows the contour of the colpotomiser funnel. Elevate the uterus and rotate the colpotomiser. Continue the colpotomy following the contour of the colpotomiser posterior , medially. (Note how the colpotomiser elongates the vaginal tissue for haemostatic transection. Posterior colpotomy left side
8 Colpotomy incision right side. Colpotomy is initiated antero lateral mirror image of the left side. The green lip of the colpotomiser is easily visualized. The colpotomy incision follows the contour of the colpotomiser. The uterus is elevated and the colpotomiser is rotated. Posterior colpotomy is completed. Anterior colpotomy. Colpotomiser lip is rotated to facilitate haemostatic completion of the colpotomy. (Note how the colpotomy incision is performed inside the lip of the colpotomiser).
9 The uterus is removed.
10 The right adnexa is identified and grasped. IP ligament and ureter are located and identified. IP ligament is coagulated. IP ligament is divided. Right adnexa is placed inside the collection probe. The left adnexa is grasped and identified. Ureter and IP ligament are located and identified. IP ligament is coagulated and divided. Left adnexa is placed into the collection probe.
11 Vaginal vault closure right side (using figure of eight sutures). Collection probe maintains pneumoperitoneum. Vaginal vault closure left side (using figure of eight sutures).
Laparoscopic Assisted Robotic Myomectomy
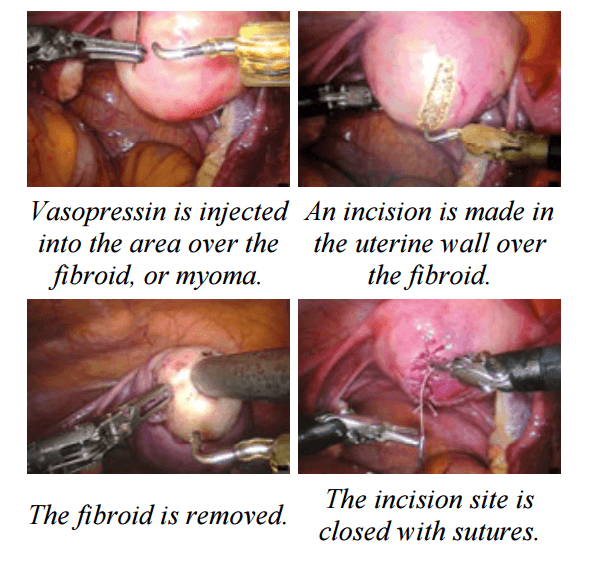
Robotic-assisted laparoscopic myomectomy for the surgical removal of uterine fibroids. while leaving the uterus intact.
The robot's arms are fitted with five to eight millimeter surgical instruments to perform the various steps of the surgical procedure.
The keys steps of a robotic myomectomy are illustrated in the images below. The images were taken during an actual robotic myomectomy procedure.
da Vinci endometriosis
Steps Involved In Robotic Prostatectomy
Posterior dissection of seminal vesicles and prostate :
The seminal vesicles are cystic structures attached to the prostate and function in storing and adding the nutrients to the semen. The seminal vesicles are always removed with the prostate during surgery. A posterior approach allows for energy free and traction free dissection of the nerve bundles that run along the side and tips of the seminal vesicles. The posterior approach also allows for perfect visualization of large or asymmetric seminal vesicles, situations which could be very complicated in an anterior approach. In addition, this type of approach allows us to bypass a large median lobe (protrusion of the prostate into the bladder) without compromising visualization.
Developing the space of Retzius and anterior prostate dissection with sparing of the Endopelvic Fascia.
This step drops the bladder and the prostate from the abdominal wall. It allows the surgeon direct visualization of the anterior prostate and the dorsal vascular complex. By sparing the Endopelvic fascia, an Intra-facial dissection is more likely to be successful. See neurovascual bundle dissection below for more details.
Division of the prostate from the bladder by bladder-neck sparing technique to preserve the internal sphincter mechanism.
The bladder and prostate are fused together by two layers of bladder muscle in addition to fatty tissue. This area includes the internal urinary sphincter that includes muscle fibers that have a role in the subconscious control of urinary function. In most patients preservation of the bladder neck sphincter mechanism can result in early urinary continence. A proper preservation can also decrease the risk of strictures or scars of the bladder neck known as bladder neck contractures. When the bladder neck is not spared, the subsequent large opening may result in a time-consuming reconstruction to taper the opening. Larger openings also require a longer suture line and therefore may be more susceptible to leakage of urine from the anastamsosis. Given all these factors and assuming there are no biopsy features putting the patient at risk for bladder neck involvement or the presence of a large median lobe, we always strive to preserve the bladder neck.
Dissection of lateral prostatic fascia and sparing of the neurovascular bundles (NVB) :
The nerve bundles carry neural information and blood flow into the deep pelvis. These structures are critical for both erections and urinary control after surgery. Multiple studies to date have shown a direct relationship between the degree of nerve sparing and post-operative potency and urinary control. Contrary to what most patients believe, the nerve sparing is not an all or none concept. Depending on the extent of the cancer, the nerve dissection can be individually tailored to the patient and his cancer. Many factors come into the decision but include the risk of extracapsular extension based on preoperative nomograms/risk-tables (link to separate section/post), the results of pre-operative T3 MRI of the prostate (link so section), the findings of a rectal exam under anesthesia, intra-operative findings and the ease of “peeling” the bundles away from the prostate. The degree of precision and dexterity that is needed to perform the dissection of the nerve bundles away from the prostate is similar to what is required to “peel” the skin off of a table top grape (link to video). Our goal is to clearly remove all prostate and cancerous tissue but as important of a goal is to leave all non-prostate tissue as it was prior to the surgery. Many times, surgeons use the terms extrafascial, interfascial, and intrafascial to describe different techniques to dissect the prostate and the nerve bundles.
Extrafascial: This is also known as non-nerve sparing or wide-excision dissection. When there is either high suspicion that the tumor has penetrated the capsule wall deep into the extracapsular fatty tissue or is involving the nerve bundle itself this may require us to resect the nerve bundle all together with the prostate. Usually a pre-operative MRI can identify the extent of involvement. In this type of dissection, the endopelvic fascia is incised deep near the levator ani muscles to carry out this type of dissection. In patients who are not interested in nerve preservation due to baseline erectile dysfunction a wideexcision may not be critical. However, even in patients with clear evidence of extracapsular involvement we may be able to do a graded dissection and spare some of the neurovascular bundle on the side affected with cancer in hopes of maximizing post-surgical potency. We use intra-operative frozen sections whereby we send tissue at the edge of the dissection to get a preliminary assessment of any tumor at the margin and subsequently guide our dissection based on those results. We are also currently working on a novel technology that will be able to guide us in real-time identification of prostate tumor using fluorescent dyes targeting the tumor and near-infared imaging similar to what we have been able to pioneer with kidney cancer surgery (link to Firefly). Although we are currently evaluating with this technology in an animal model, we hope to soon apply this to clinical use and recruit patients into a clinical trial.
Interfascial dissection: The endopelvic fascia is incised and the neurovascular bundles are spared posterolaterally to take some of the tissue around the prostate (periprostatic fascia) with the specimen. The component of nerves and vessels that can sometimes be found on the anterior aspect of the prostate are therefore not spared. As noted above, the clinical extent of the tumor has an impact of whether or not we decide to do this type of graded dissection.
Intrafascial dissection: This is the most delicate and precise type of dissection. Think of this as a custommade, very “fitted” type of dissection. In this type of dissection, the endoplevic fascia, the neurovascular bundles, the periprostatic fascia and Denonvillier’s fascia are all spared and left intact. The plane of dissection is directly guided on top of the prostate capsule. By sparing all these structures, we maximize the patient’s chance of regaining erection and urinary control after surgery.
Control of dorsal vascular complex (DVC) :
As its name implies, the DVC contains an array of both veins and arteries that carry and drain blood from the penis. Due to the large amount of blood flowing in this structure, inadvertent injury can result in significant amount of bleeding. The higher amount of blood loss associated historically with open prostatectomy techniques was related directly to this point of the procedure. Fortunately, with the utilization of the CO2 gas utilized for laparoscopic and robotic surgery, venous bleeding from the DVC is no longer a major issue as the gas can provide passive pressure and prevent oozing from this area. Two methods are used to control the DVC: either suture ligation or endoscopic stapling. One of our preferred methods of control is to used an endoscopic stapler. As we have previously published, endoscopic stapling allows for a consistent, efficient and reliable method for getting control without risking a positive margin at the apex of the prostate.
Preparation of Apical Urethra – preserve length and muscle fibers :
Prostates come in all sizes and shapes. Some are smaller, some are bigger. Most of the variation that can be seen in shape is usually seen at the apex. The apical prostate surrounds the urethra near the external sphincter complex. The goal at this point of the operation is to achieve a long and thick urethral stump that will subsequently be re-connected to the bladder neck. There is a fine line between dissecting too deep (the levator muscles and the external sphincter complex can be inadvertently damaged) or too shallow (risk leaving prostate tissue behind).
Posterior Reconstruction :
Also known as a Male sling, Rocco reconstruction or Rhabdosphincter reapproximation. This technique allows for a posterior support of the sphincter complex like a hammock and prevents the urethra from slipping further down into the pelvis during activity which may lead to leakage such as coughing, sneezing or laughing. The reconstruction also brings the bladder down into a supported position and therefore removes any tension on the completed urethra-bladder anastamosis. Most experts agree that this type of reconstruction leads to shorter recovery times to recover urinary control..
Urethrovesical anastomosis :
The goal at this point of the procedure is to create a watertight and tension-free connection between the urethra and the prostate. One of the most important advancements to our practice has been the ability to utilize a barbed suture (V-Loc Link to Covidien) that maintains the reapproximated ends without allowing any gaps between the edges of the tissue. As a results for years now we have avoided using any post-oeprative drains unless we are dealing with a very large bladder neck or a reconstructed bladder neck.
Pelvic Lymph Node dissection: Removal of pelvic lymph nodes – extended dissection for patients at greater risk of involvement based on biopsy features, clinical exam and PSA
Even tough pre-operative CT or MRI may not show evidence of regional lymph node involvement, the accuracy of these imaging tests is only around 80%. The decision to identify and remove the lymph nodes that drain the prostate during prostatectomy is made on an individual basis. We calculate risk of lymph node involvement based on widely available nomograms and risk calculators such as D’Amico criteria, Partin Tables, CAPRA score, or MSKCC calculator. Low risk patients (for example those with PSA < 10, Gleason 6, or clinical T1c) clearly do not benefit from a lymph node dissection. Intermediate risk patients and High risk patients on the other hand may benefit from a lymphadenectomy. It is believed that an extended lymph node dissection (in both lymph node negative and positive patients) may lead to the removal of undetected micrometastases, and therefore improve the survival of patients undergoing prostatectomy. There is a growing body of evidence suggesting that the greater the number of lymph nodes removed is beneficial. However, no uniform consensus exists regarding the limits of boundary of the dissection or the minimum number of lymph nodes that should be removed. Historically, the detection of suspicious lymph nodes at the time of radical prostatectomy lead many surgeons to abandon the operation with the belief that regional lymph node involvement was a sign of widespread metastatic disease and therefore associated with poor prognosis. Patients would subsequently be referred for treatment with hormones and/or radiotherapy. However, there have been a number of recent studies showing very reasonable cancer-specific survival rates even in patients with lymph node positive disease at the time of radical prostatectomy. A recent publication from the European Journal of Urology analyzed the Munich cancer registry and found that patients with lymph node positive disease that did not have their operation aborted on average had 20% improvement in survival compared to those who had their operation aborted.
Endocrine surgery
Robotic thyroidectomy
Introduction :
Thyroidectomies using the open method are effective, well-tolerated and safe but involve transverse incision on the neck measuring 7–10 cm in length. Thyroid disorders are more common in women and they find these scars uncomfortable and cosmetically unacceptable. Hence, minimal access approaches are playing an ever increasing role in neck surgery as they result in a reduction in size or elimination of the scar on the neck. These approaches to endocrine tumors are more appealing in view of the fact that the conventional approach seems out of proportion compared to the small size of the tumors.
We believe that our endoscopic technique using the anterior chest wall approach as described in this paper can be utilized to remove large nodules of the thyroid as well as performing total thyroidectomies. It combines the benefits of the minimal access approach, instrumentation, magnification and precision. The scars produced are hidden beneath the clothes of the patient offering a cosmetic advantage.
Surgical technique
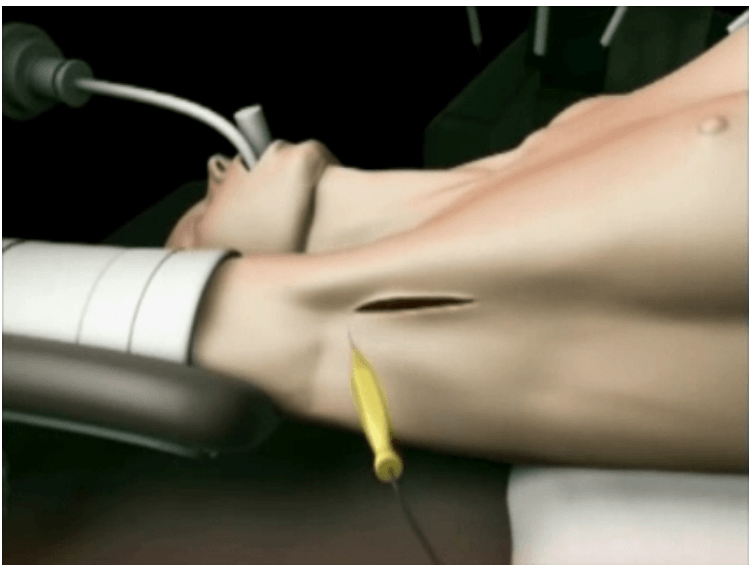
The surgical instruments required include one 11 mm trocar and two 5.5 mm trocars, one 10 mm and 5 mm 0 degree fiber optic endoscopes, Harmonic scalpel Ace, 5 mm dissectors, scissors, an aspiration cannula, 5 mm clip applicator and hemostats. The procedure was performed with the patient in a supine position under general anesthesia with endotracheal intubation. The neck was extended and the chin was in the midline. A 10 mm skin incision was made on the chest over the sternum about 10 cm from suprasternal notch so as to be covered by the patient's clothes postoperatively [Figure 1]. A long hemostat was inserted through this incision in the subcutaneous plane above the sternum advancing forwards towards the subplatysmal plane as shown in Figure. A 10 mm trocar and cannula was then inserted through this incision. Pneumoinsufflation with carbon dioxide (CO2) was begun under endoscopic vision till a continuous pressure of 8 to 10 mmHg was maintained. The gas not only opens up the subplatysmal plane and maintains the operative space, but also may decrease the effect of any minor bleeds [Figure 2].
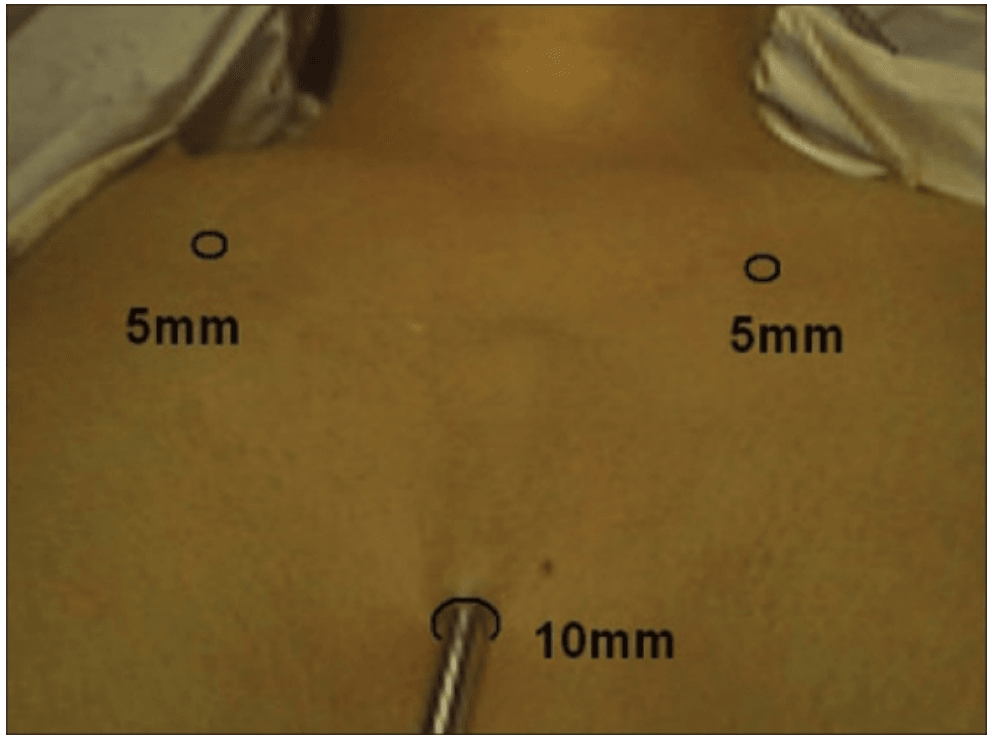
Position of ports
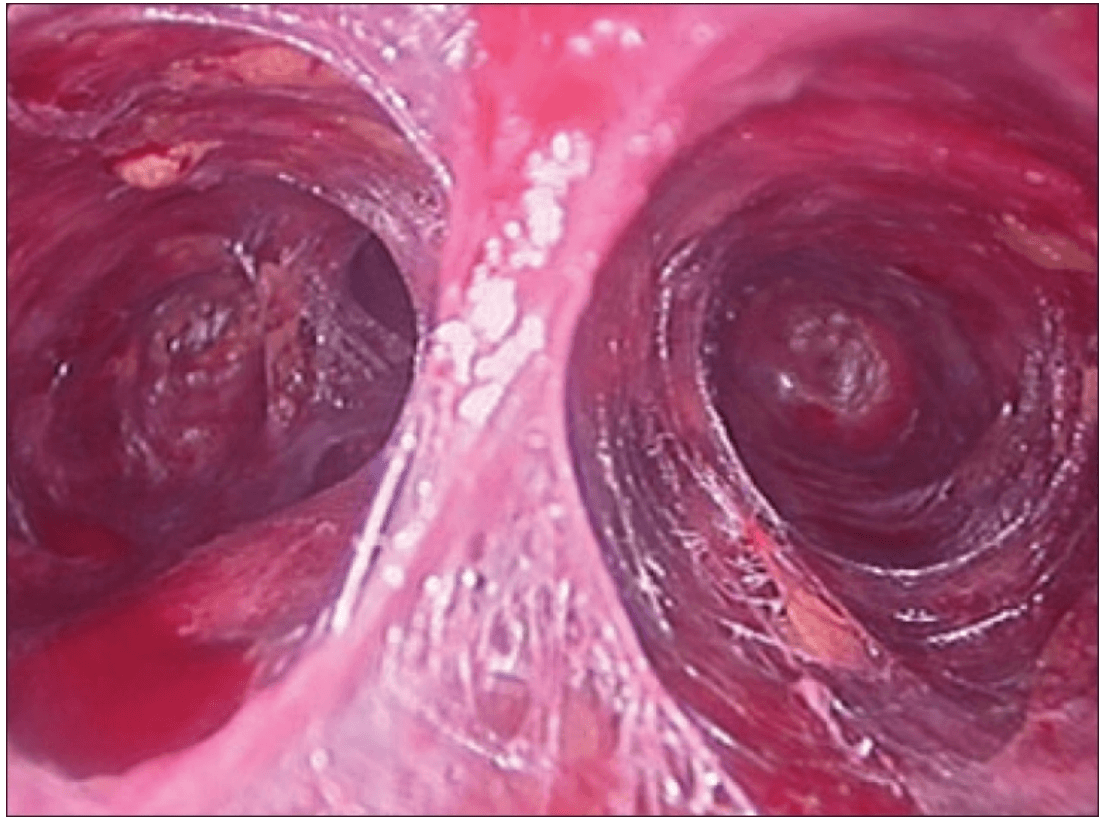
Creating a subplatysmal plane :
The subplatysmal space was further developed by blunt dissection with the 10 mm 0 degree rigid endoscope laterally upto the sternomastoid on the left side.
A 5 mm skin incision was made under the clavicle on the left side at the mid-clavicular point. Under endoscopic guidance the first 5 mm trocar and cannula was inserted on the left side and passed over the surface of the clavicle to enter the subplatysmal plane just anterior to the sternocleidomastoid muscle.
The 5 mm Harmonic scalpel Ace was introduced through this port and was used for sharp dissection of the subplatysmal strands, especially in the midline where the platysma is deficient. The subplatysmal plane was further developed upto the hyoid bone superiorly.
The anterior border of the opposite sternocleidomastoid muscle was dissected from the platysma muscle and a space was created laterally.
The second 5 mm trocar was inserted on the right side infraclavicularly at the midclavicular point and a dissector was inserted.
The strap muscles were separated in the midline and retracted laterally to deliver the gland into the operative space.
The dissection was begun at the lower pole of the thyroid gland [Figure 3]. The inferior thyroid pedicle was identified. The recurrent laryngeal nerve was also identified and protected. Inferior thyroid veins were first coagulated with the Harmonic scalpel. Inferior thyroid artery was clipped or coagulated with Harmonic scalpel. In doing so, care was taken to avoid injuring the recurrent laryngeal nerve which is usually located between the trachea and the carotid artery [Figure 4].
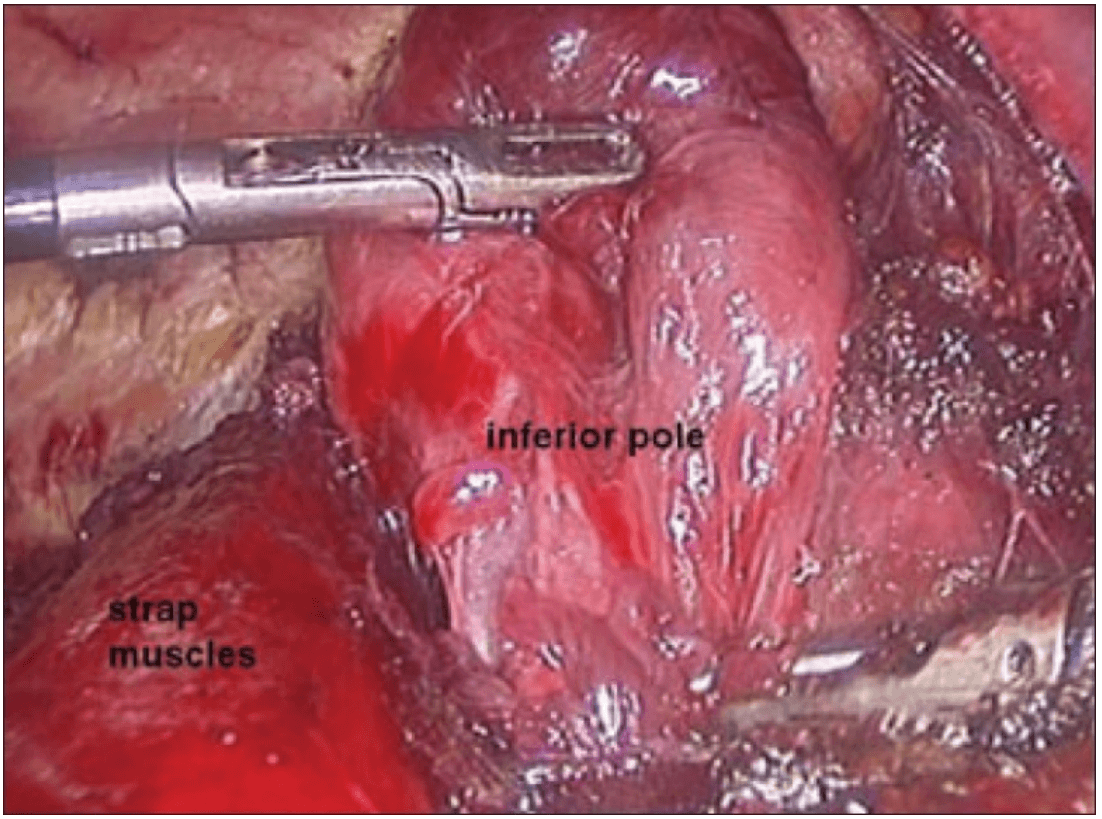
Dissection begins at the inferior pole
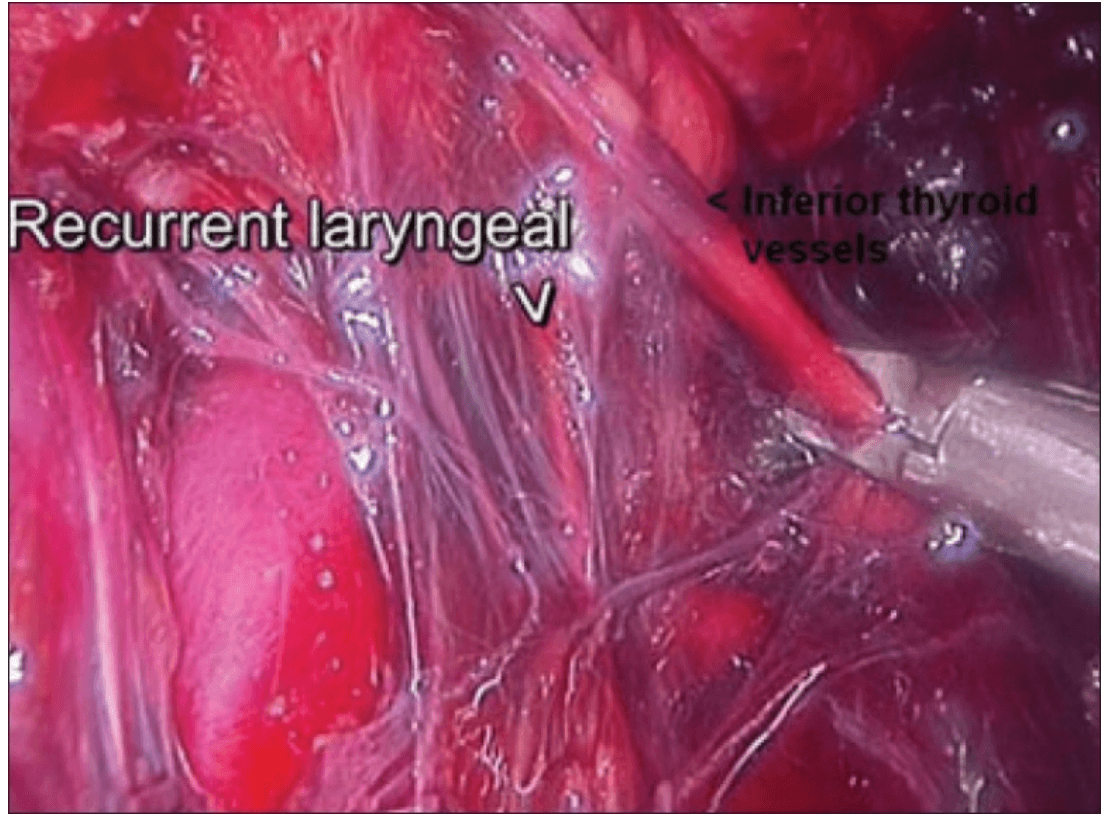
Clipping inferior thyroid vessels. The recurrent laryngeal nerve is identified and preserved.
The inferior parathyroid gland was also identified at this stage.
Once the inferior pole was freed, the lobe was lifted up from the trachea. A constant traction was maintained on the thyroid lobe medially and the lobe was dissected from the lateral and posterior side keeping the recurrent laryngeal nerve under vision [Figure 5]. The lobe was lifted up from trachea till the superior pole was reached. Then the entire lobe was retracted downwards and the superior thyroid pedicle was taken using clips or coagulated using the Harmonic scalpel [Figure 6]. The superior parathyroid gland was also identified and conserved.
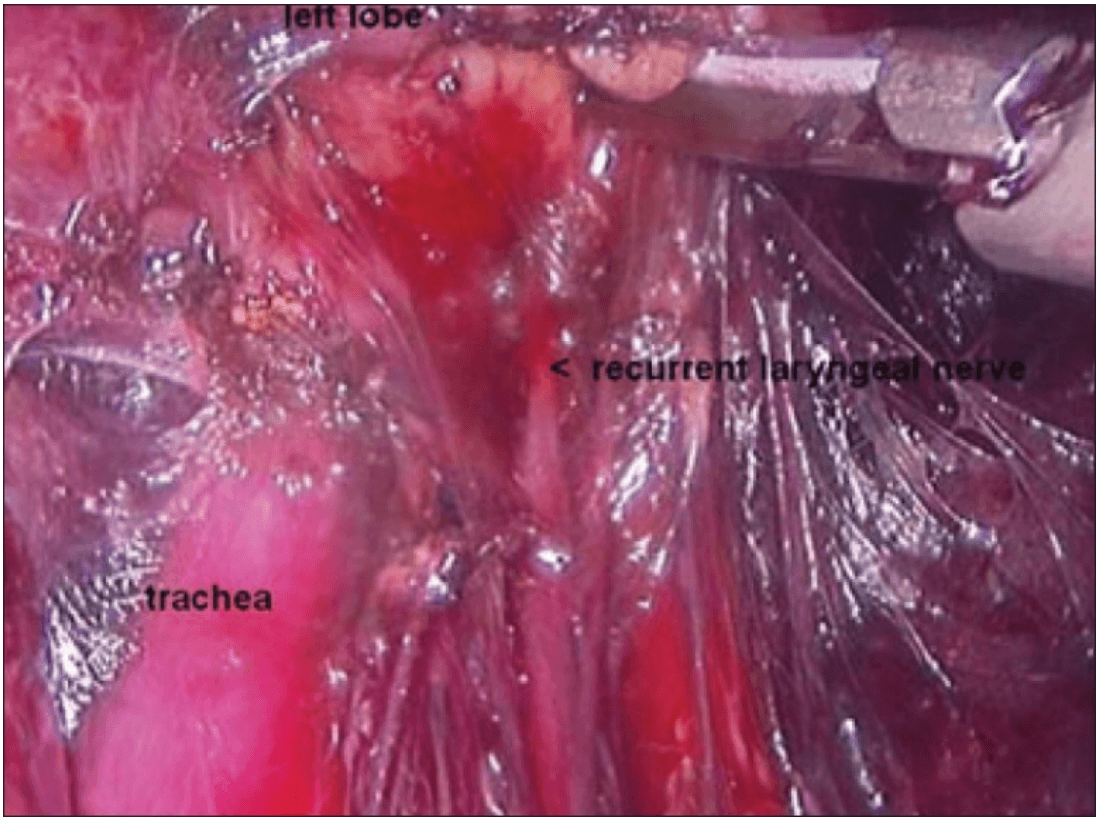
Posterior dissection
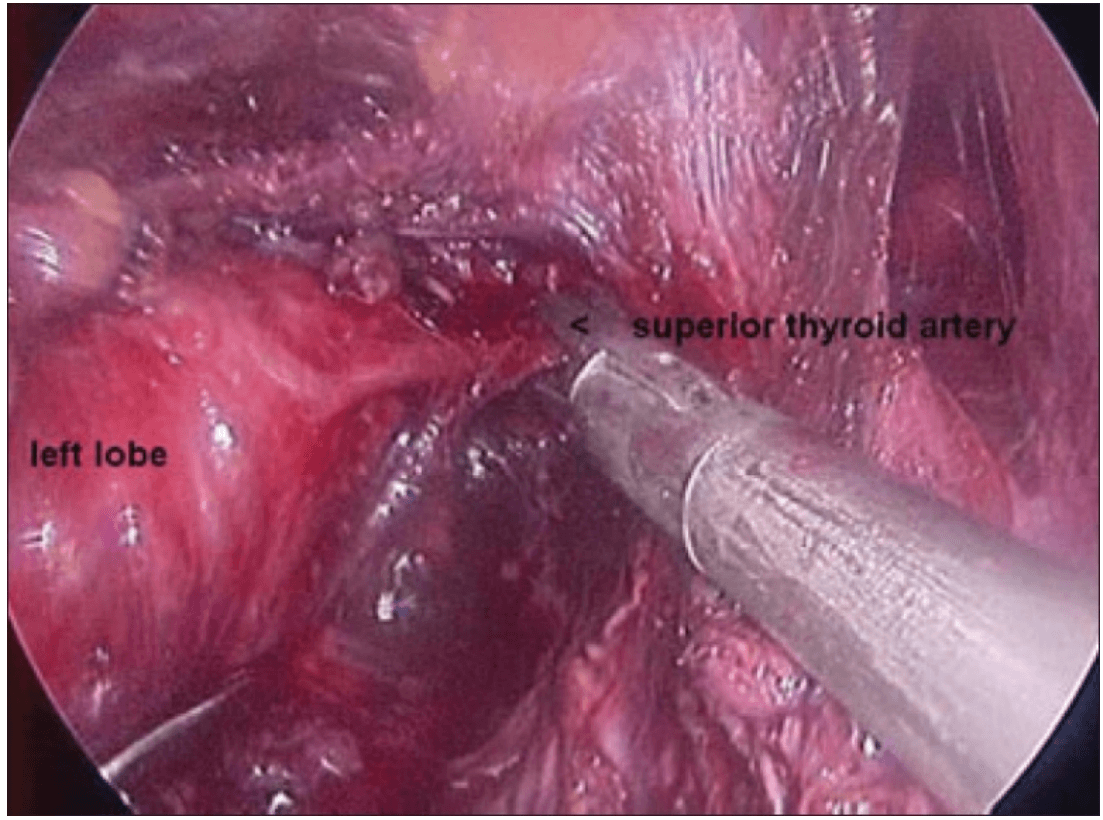
Clipping superior thyroid vessels
The lobe was retracted laterally and the ligament of Berry was cut with the Harmonic scalpel. The isthmus was also separated from the trachea and cut with the Harmonic scalpel. The same procedure was repeated on the other side. The specimen was put in an endobag [Figure 7]. A drain was placed through the 5 mm port.
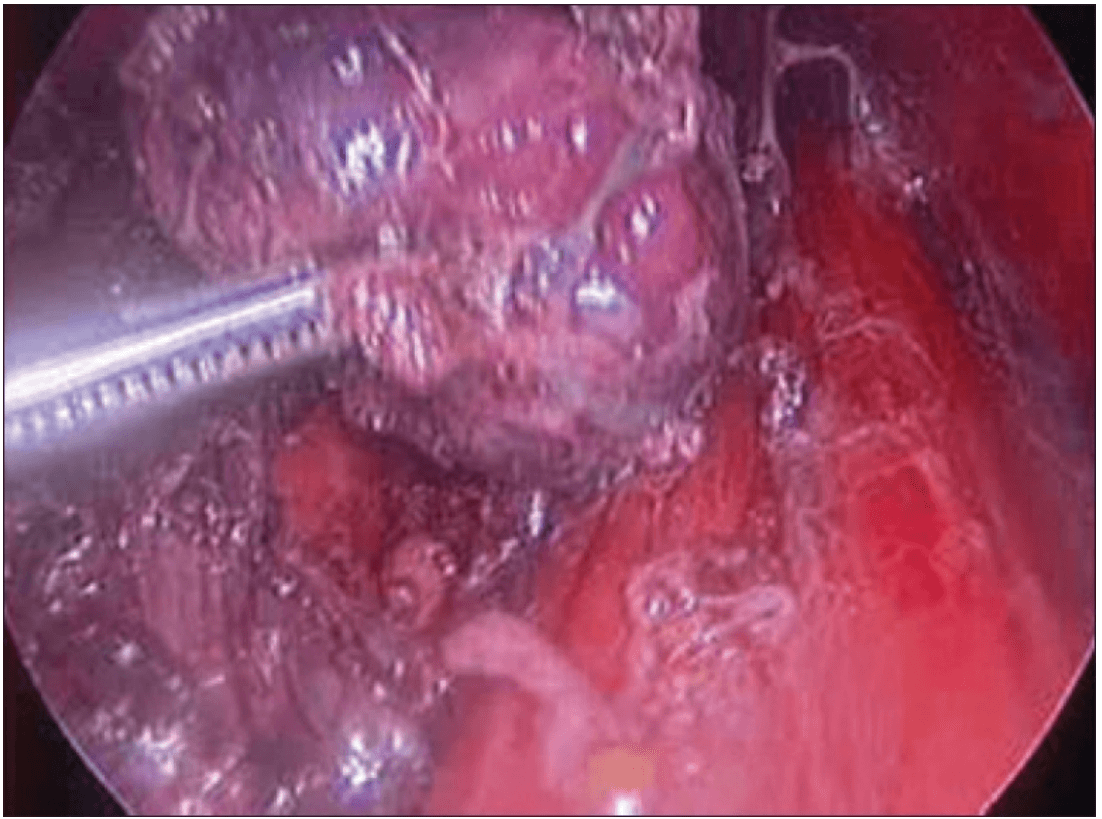
Specimen freed up
A 5 mm telescope was put in via the 5 mm port and specimen bag was guided out through 11 mm port. The skin incision on the sternum was widened if required so as to deliver out the specimen.
The suprasternal incision was widened to a mean size of 5.6 cm (range 2 to 7.5 cm) for removal of the specimen. However this scar was well hidden beneath the clothes of the patients and all patients were satisfied with the cosmetic result of the surgery.
Discussion
Videoscopic neck surgery is developing despite the fact that only potential spaces exist in the neck. These approaches are more appealing since the size of incision of that the conventional approach seems to be out of proportion compared to the small size of the tumors.[2]
Gagner first described the endoscopic subtotal parathyroidectomy with constant CO2 gas insufflations for hyperparathyroidism in 1996 and achieved a good clinical and cosmetic result.[3] Since then minimal access parathyroidectomy has found a role alongside conventional cervicotomy for the treatment of primary hyperparathyroidism.
Huscher and colleagues first described the complete endoscopic right thyroid lobectomy in 1997.[4] Minimally invasive surgery using endoscopic vision is now widely employed for the treatment of thyroid diseases for cosmetic purposes. Since then several approaches to the thyroid have evolved including the cervical approach, the minimally invasive video-assisted thyroidectomy (MIVAT), the transaxillary approach and the breast or anterior chest wall approach.[5–9] Each of these approaches have their own advantages and disadvantages.
Endoscopic surgery has reduced the level of surgical “invasiveness” and results in an improved cosmetic appearance. The site of approach is the most important factor because there is an intimate relationship between the locations of the trocars in terms of the cosmetic result, invasiveness, safety and ease of use.[1]
The cervical approach utilizes small incisions in the neck thus making it cosmetically unacceptable and cannot be used for lesions greater than 4 cm. Only patients who have small nodules with a low index of suspected malignancy are offered this endosopic approach.[5] The operative field is small and because the camera is near the anatomic structures, it often has to be removed for cleaning, which significantly increases the operating time.[6]
The axillary approach makes it difficult to visualize the opposite lobe. Although sectioning the sternohyoid muscle creates a good visual space even for the contralateral region and enables the contra lateral gland of the thyroid to be resected, the operating time is extremely prolonged and the additional scar tissue causes discomfort while swallowing and neck pain as a result of adhesions. Therefore this endoscopic procedure is not indicated for thyroid nodules that extend to the contralateral thyroid lobe.[7]
The anterior chest wall approach utilizes port access at various positions on the anterior chest wall depending on the surgeon, thus avoiding a cervical incision. In our technique, the trocars are over the sternum and infraclavicularly. These are hidden by the clothes of the patient and are not visible routinely.[9,10]
This technique also allows bilateral neck exploration. Hence we have been able to perform total thyroidectomies with central compartment clearance for papillary carcinoma and near-total thyroidectomies for large multinodular goiters. The largest dimension of thyroid lobe removed in our series was 11 cm.
References :
Thyroidectomy :
1) J Minim Access Surg. 2007 Jul-Sep; Endoscopic thyroidectomy: Our technique Shailesh P Puntambekar, Reshma J Palep, Anjali M Patil, Neeraj V Rayate, Saurabh N Joshi, Geetanjali A Agarwal, and Milind Joshi.
Robotic Thyroidectomy
Steps
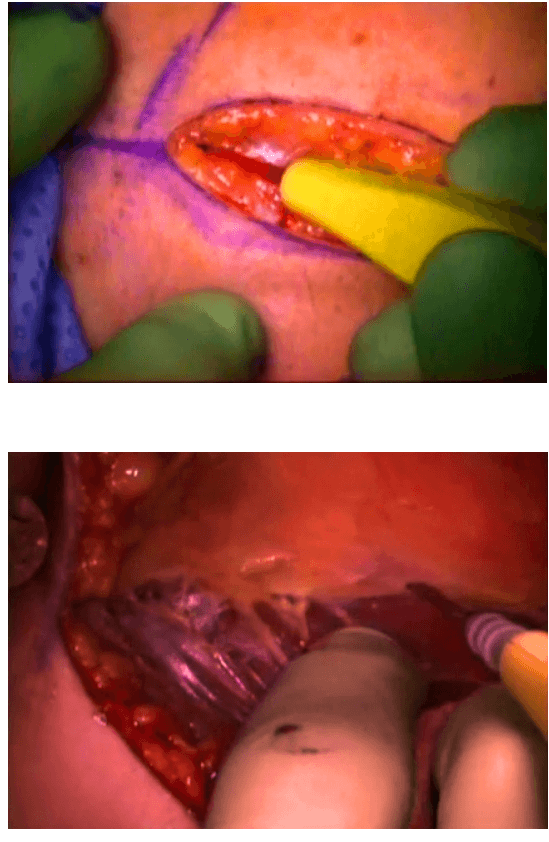
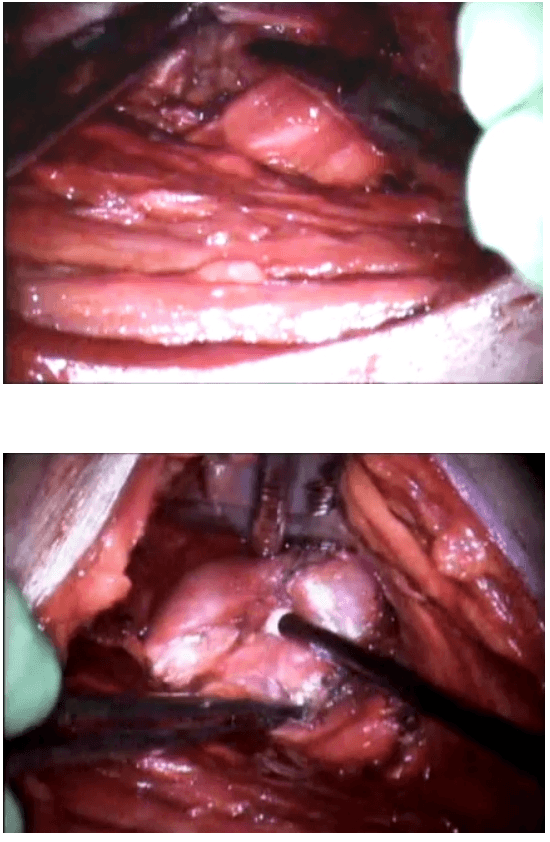
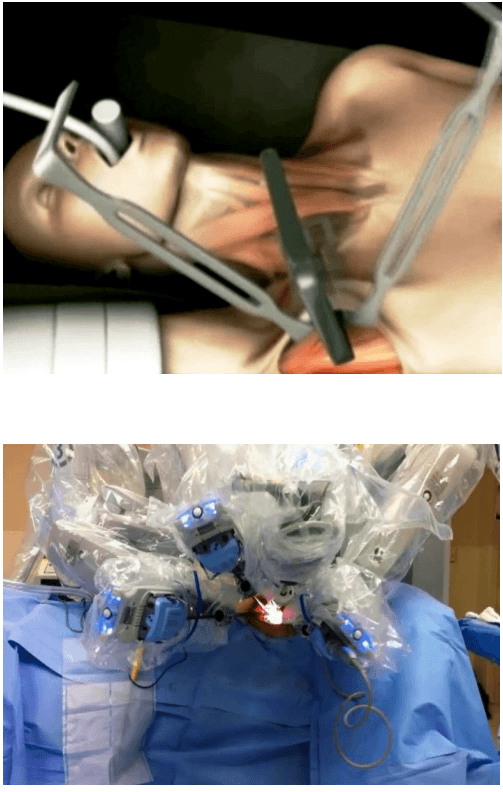
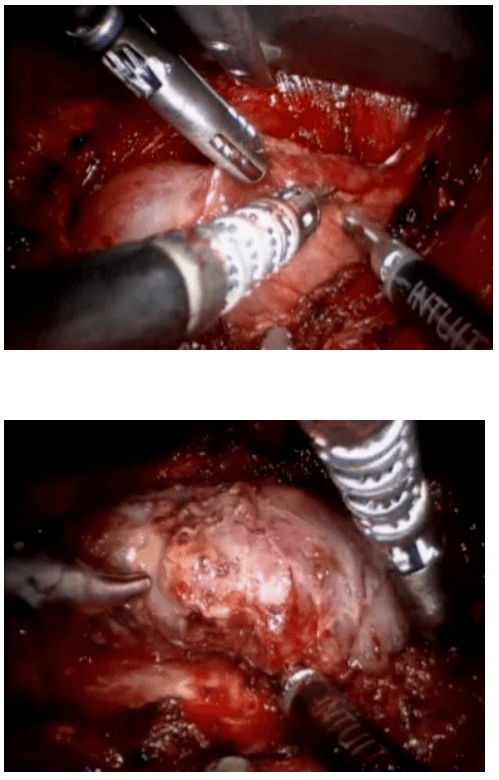
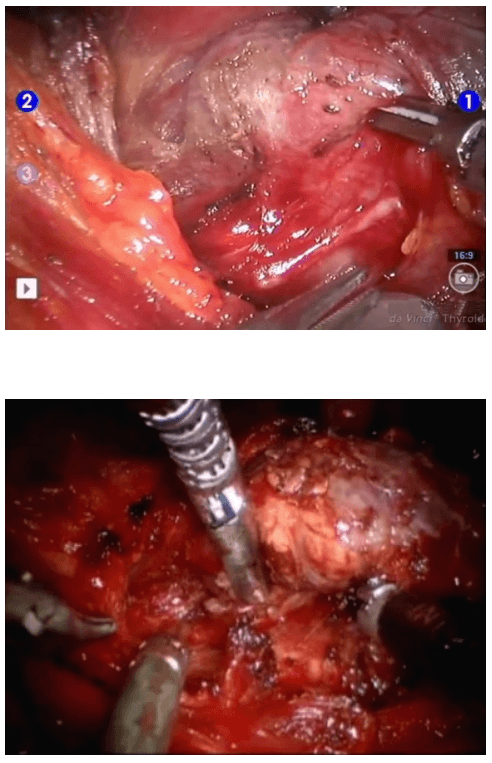
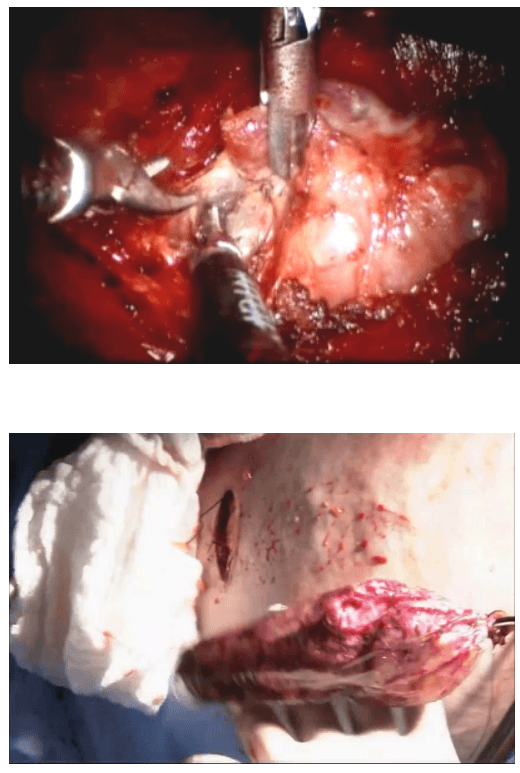
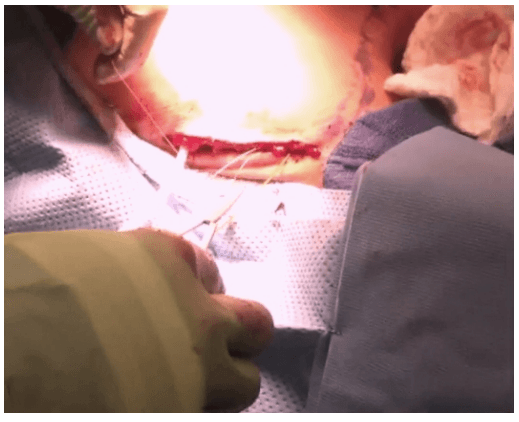
Robotic sleeve gastrectomy :
The laparoscopic sleeve gastrectomy was initially part of the duodenal switch for super-super morbidly obese patients and later as a staged operation for morbid obesity in 2003. The rationale for sleeve gastrectomy was initially to lower the morbidity of this complex surgical procedure by offering a less challenging operation, decreasing operative time, and allowing patients to lose weight before proceeding with the second stage. Because of the excellent results in these patients the use of the sleeve gastrectomy as a primary bariatric operation gained acceptance. The main advantages of this operation are that it is not as technically challenging as gastric bypass or biliopancreatic diversion-duodenal switch (BPDDS), thereby decreasing operative times and morbidity.
Surgical technique :
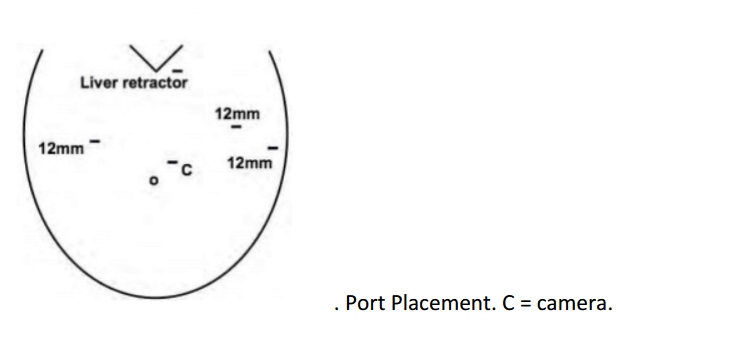
The surgical technique is described by Diamantis et al. in their first clinical experience series (Ayloo et al., 2011; Diamantis et al., 2011), which is similar to a Standard Laparoscopic Sleeve Gastrectomy (LSG). The first step is achieving pneumoperitoneum. Then, a 12-mm port 8 cm above the umbilicus for the camera, a right 12-mm trocar is positioned at the epigastrium, 5 cm towards the left of the midline, and a left 12-mm trocar placed at least 8 cm far away from the camera port, in order to avoid collision of the robotic arms that would hamper the advancement of the procedure. A double cannulation technique is used inserting the 8-mm metallic robotic ports through the standard 12-mm trocars. Two further 12-mm trocars are inserted, one at the right anterior axillary line, 2 cm below the subcostal arch for liver retraction and one at the symmetrical site on the left side to retract the gastrosplenic ligament (18). All the trocars and robotic cannulas are inserted under the guidance of the standard laparoscopic camera and the robotic system approached the patient and is installed (“docked”) afterwards. The robotic camera is docked last, and the robotic cart is positioned over the patient’s left shoulder. Only three arms of the da Vinci S Surgical System™ are used (camera and two working arms). Once the general setup is ready, the procedure begin with the console surgeon grasping with a Cadiere forceps, the greater curvature of the stomach at its lowest part andthe gastrocolic ligament is cut with the da Vinci harmonic scalpel. The division of the gastrocolic and gastrosplenic ligament continues exactly like in a standard LSG. Once the angle of His is clearly visible and mobilized from the left crus, division of the gastrocolic ligament ends 4-6 cm proximally from the pylorus. At this point instead of a bougie preferred by some surgeons, an intra-operative endoscopy can be used for the calibration of the gastric sleeve. Once the endoscope lies across the lesser gastric curvature will taylor the gastrectomy. The console surgeon holds and abducts the mobilized greater gastric curvature with a Cadiere forceps through the right working trocar and the left robotic arm is undocked. The table surgeon inserts the stapler, loaded with a green cartridge, through the working port at the right site of the patient and divides the stomach in a direction from the lowest tip of the greater gastric curvature, 4 cm proximally to the pylorus, towards the lateral edge of the endoscope.
All staple lines are regularly reinforced with prosthetic material (GORE SEAMGUARD bioabsorbable staple line reinforcement, W. L. GORE and Associates Inc.). The left robotic arm is docked once again after the first two fires. The stapling continues in a cephalad direction with the traction of the gastric sleeve using the Cadiere forceps, while the right arm is undocked for the insertion of the stapler, and division of the stomach; also the laparoscopic could be used to mobilize the greater gastric curvature. The stomach is divided till the angle of His, then the endoscope is smoothly withdrawn. Ayloo et al. (Ayloo, et al., 2011) also describes the assistance of the robot to invert the stapling line by placing seroserosal sutures of 2-0 PDS (Ethicon) beginning at the angle of His. The staple line is then inspected from inside bleeding and air leak. A leak test is also performed filled with diluted Povidone 10% solution or methylene blue by some other authors (Galvani et al., 2006; Moser & Horgan, 2004). Finally, the transected, redundant part of the stomach is removed through the left lateral port site mainly through a fascial digital dilation.
Robotic assisted coronary artery bypass grafting :
Eg. A single vessel bypass graft in a female patient.
The robotic take down of the left internal mammary artery and directly anastomosing it to the left anterior descending coronary artery using a small anterior thoracotomy technique.
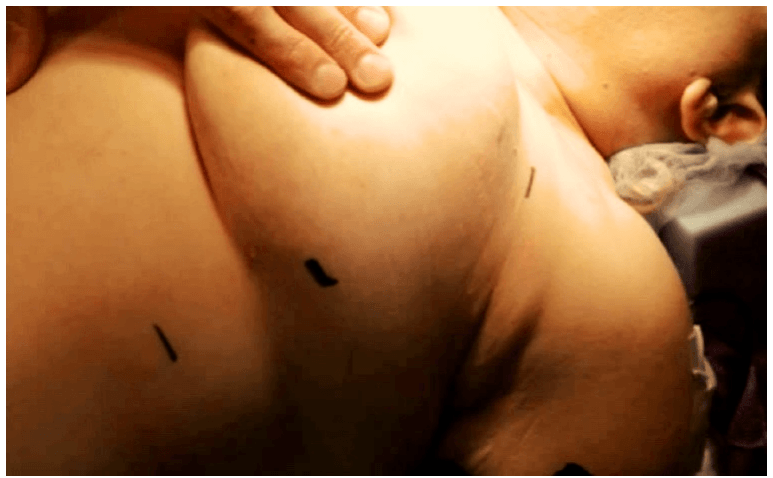
12mm camera port just under the breast in the left 4th/5th intercostal space 2 X 8mm working ports superiorly and inferiorly.
In the chest care is taken to trace the internal mammary artery at the inferior location all the way to its origin from the subclavian artery.
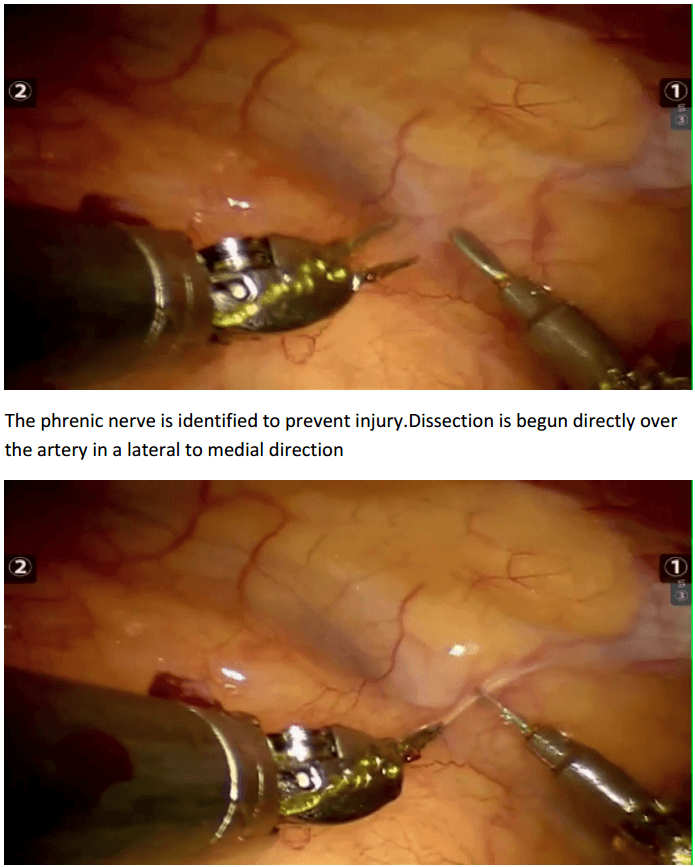
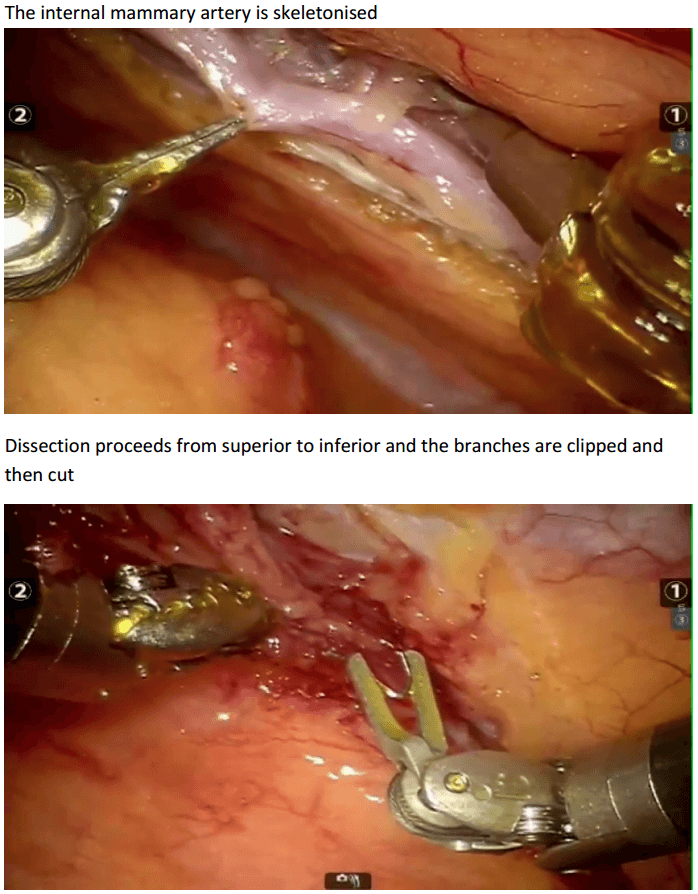
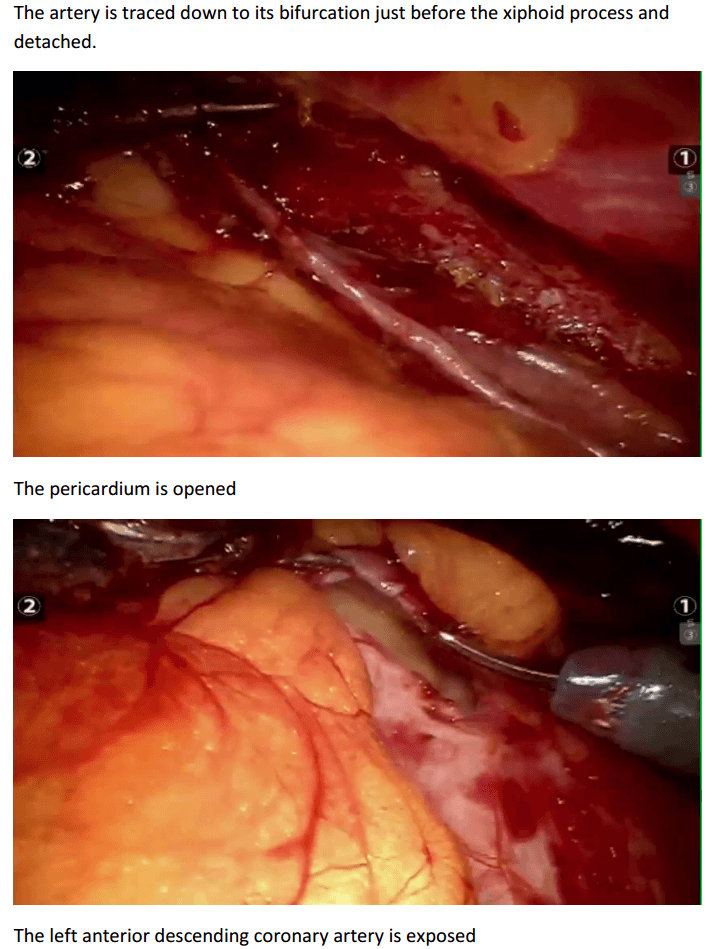
The first non-laparoscopic robot was the Puma 560, used by Kwoh et al to perform neurosurgical biopsies with greater precision in 1985. Three years later, Davies et al performed a transurethral resection using the same machine. This system developed in the PROBOT, a robotic system specifically designed for transurethral resection. Next, ROBODOC was developed by Integrated Surgical Supplies of Sacramento, CA which was designed to move the femur during hip replacement surgeries. This became the first robot approved by the FDA.
Involvement of NASA and the U.S. Army :
As robots developed in the medical field, researchers at the NASA (National Air and Space Administration) Ames Research Center began working on a concept called telepresence surgery (telesurgery) which combined virtual reality, robots, and medicine. In the early 1990's, the scientists from the NASA-Ames team joined the Stanford Research Institute (SRA) to develop a telemanipulator for hand surgery. Eventually, surgeons and endoscopists joined the development team to give their project a full spectrum of experts.
The U.S. Army also became interested because through robots they hoped to decrease wartime mortality by bringing the surgery to the soldier. The system that was developed for the army is known as MASH (Mobile Advanced Surgical Hospital) where a soldier could be loaded into a vehicle with robotic surgical equipment and could be operated on by a surgeon in the mobile unit. It has not yet been tested or approved for the army.
Overview of Major Surgical Robotic Systems and Companies.
A variety of commercial companies have been developed to create surgical robotic systems for the general community.
Computer Motion, Inc. developed the AESOP® Endoscope Positioner: a voiceactivated robotic system for endoscopic surgery. In 1993, this became the first robot approved by the FDA for surgery. The HERMES® Control Center was also developed by Computer Motion, Inc. and brought a centralized voice command and recognition sytem to the robotic medical devices. Integrated Surgical Systems (now Intuitive Surgery, Inc.) redesigned the SRI Green Telepresence Surgery system and created the daVinci Surgical System® classified as a master-slave surgical system. It uses true 3-D visualization and EndoWrist®. It was approved by FDA in July 2000 for general laparoscopic surgery, in November 2002 for mitral valve repair surgery, and is also presently involved in a cardiac clinical trial in the United States for totally endoscopic coronary artery bypass graft surgery. There are over 210 da Vinci Systems in use throughout the United States, Europe and Japan.
In 2001, SOCRATES™ Robotic Telecollaboration System was created by Computer Motion, Inc.. It includes integrated telecommunication equipment along with the robotic devices in order to provide remote surgical telecollaboration. This system was used for the first-ever transatlantic telesurgery performed.
Computer Motion merged with Intuitive Surgical, Inc., in June of 2003.
They introduced the ZEUS® Surgical System in 1998. This system consists of a surgeon control center and three table-mounted robotic arms for endoscopic surgery. Zeus was the system used to perform the first fully endoscopic robotic surgery and the initial beating-heart, totally endoscopic coronary bypass procedure.
Many more robots and robot instruments and programs are being researched and developed in the United States and around the world. With a competitive healthcare market in the United States, having cutting edge equipment, the newest technologies, and the newest testing modalities are important to the success of the organization. Robotics in medicine is a fairly new, yet advancing field.
The da Vinci® Surgical System
The da Vinci Surgical System is a sophisticated robotic platform designed to expand the surgeon’s capabilities and offer a state-of-the-art minimally invasive option for major surgery.
With da Vinci, small incisions are used to insert miniaturized wristed instruments and a high-definition 3D camera. Seated comfortably at the da Vinci console, the surgeon views a magnified, high-resolution 3D image of the surgical site inside the body.
At the same time, the latest robotic and computer technologies scale, filter and seamlessly translate the surgeon's hand movements into precise micromovements of the da Vinci instruments.
Although it is often called a “robot”, the da Vinci System cannot move or operate on its own; the surgeon is 100% in control.
Features :

The da Vinci Surgical System is the only commercially available technology that can provide the surgeon with the precision, dexterity and control of traditional open surgery, while only requiring 1-2 cm incisions. da Vinci Surgical System consists of an ergonomically designed surgeon's console, a patient cart with four interactive robotic arms, a high-performance vision system and patented EndoWrist instruments.

At the da Vinci console, the surgeon operates while seated comfortably, viewing a highly magnified 3D image of the body’s interior. To operate, the surgeon uses master controls that work like forceps. As the surgeon manipulates the controls, da Vinci responds to the surgeon’s input in real time, translating his or her hand, wrist and finger movements into precise movements of miniaturized instruments at the patient-side cart.

da Vinci 's patient cart holds up to threeEndoWrist instruments and one 3D camera. To access the target anatomy, the surgeon introduces the precisely controlled EndoWristinstruments into the body through a series of dime-sized incisions. A broad range of instrument types are available to help the surgeon perform specialized surgical tasks with precision and control.
da Vinci Surgery Facts
More than 1.5 million da Vinci procedures have been performed worldwide since 2000 100% of top-ranked U.S. hospitals own at least one da Vinci System #1 minimally invasive surgical option for hysterectomy in the U.S. Used in 4 out of 5 radical prostatectomies in the U.S.
Components of the daVinci Surgical System
Surgeon Console

* Using the da Vinci Surgical System, the surgeon operates seated comfortably at a console while viewing a high definition, 3D image inside the patient’s body.
* The surgeon's fingers grasp the master controls below the display with hands and wrists naturally positioned relative to his or her eyes.
* The system seamlessly translates the surgeon's hand, wrist and finger movements into precise, real-time movements of surgical instruments.
Patient side-cart

* The patient-side cart is where the patient is positioned during surgery. It includes either three or four robotic arms that carry out the surgeon's commands.
* The robotic arms move around fixed pivot points.
* The system requires that every surgical maneuver be under the direct control of the surgeon. Repeated safety checks prevent any independent movement of the instruments or robotic arms.
Endowrist instruments

* A full range of Endowrist instruments is available to the surgeon while operating.
* The instruments are designed with seven degrees of motion - a range of motion even greater than the human wrist.
* Each instrument has a specific surgical mission such as clamping, suturing and tissue manipulation.
* Quick-release levers speed instrument changes during surgery.
Vision System

* The vision system is equipped with a high-definition, 3D endoscope (flexible tube with a camera and light at the tip) and image processing equipment that provides true-to-life images of the patient’s anatomy.
* A view of the operating field is available to the entire OR team on a large viewing monitor (vision cart). This widescreen view provides the surgical assistant at the patient’s side with a broad perspective and visualization of the procedure.
Recent advances
Firefly Fluorescence Imaging for the da Vinci Si system
The da Vinci® Si™ Surgical System now has integrated fluorescence imaging capability providing realtime, image-guided identification of key anatomical landmarks using near-infrared technology.

Renal parenchyma (before activation)

Renal parenchyma (after activation)

Renal hilum (before activation)

Renal hilum (after activation) ©2014 Intuitive Surgical, Inc
Single-Site™ camera and instruments

Robotic appendicectomy
Procedure


Robotic cholecystectomy
Procedure


Robotic right hemicolectomy
Indications
Benign conditions
Adenomatous polyps of the colon that cannot be removed endoscopically, carcinoids, Irritable bowel syndrome (Crohn disease and sometimes ulcerative colitis), Caecal volvulus, Severe appendicitis with involvement of the cecum in the inflammatory process, Isolated right-side colonic diverticular disease (rare).
Malignant conditions
Adenocarcinoma of the right colon (most common) Malignant tumors of the appendix and cecum.
Contraindications
The main contraindication for right hemicolectomy in patients with malignancies is acute obstruction, in which a 2-stage right hemicolectomy is advisable. The authors believe that in cases of large intestinal obstruction with altered parameters and vital signs, a bypass procedure is initially a better choice than radical resection, which the patient is less likely to tolerate. Therefore, in the first stage, an ileotransverse anastomosis is performed, and in the second, right hemicolectomy is performed.
Other contraindications include significant cardiopulmonary impairment and coagulopathy.
Technical considerations
In order to plan an operation for a patient with colon cancer, the surgeon must have a thorough understanding of the tumor's location in the bowel, the stage of the cancer, and the patient's physiologic status. The location of the tumor and the histopathology are important data elements that allow preoperative selection of an operative plan and determination of the optimal resection margins.
The presence of a lesion at watershed areas of vascular supply, such as the hepatic and splenic flexures, may necessitate more extensive resection of colonic length for a safe and complete oncologic procedure. An extended right or left colectomy may be indicated to remove all contributing vascular supplies.
In addition, information consistent with hereditary nonpolyposis colon cancer supports the resection of the entire diseased colon rather than a simple segmental resection. This diagnosis may also be supported by special stains of the biopsy specimen that demonstrate microsatellite instability, the hallmark of the disease, which develops from mutations in the DNA mismatch repair system.
Relevant anatomy
The colon is a 5-6–ft long part of the large intestine (lower gastrointestinal tract) that is shaped like a "U." Embryologically, the colon develops partly from the midgut (ascending colon to proximal transverse colon) and partly from the hind gut (distal transverse colon to sigmoid colon). The ascending (right) colon lies vertically in the most lateral right part of the abdominal cavity. The cecum is at the proximal blind end (pouch) of the ascending colon. The ascending colon takes a right-angled turn just below the liver (right colic or hepatic flexure) and becomes the transverse colon, which has a horizontal course from right to left.
Preprocedural planning
Thorough preparation of the bowel is necessary before the operation. Standard bowel preparation may be conducted over a 24-hour period and is usually performed after admission. The patient is allowed to drink only clear liquids for 24 hours, and about 4 L of polyethylene glycol solution is given to the patient to be taken over 2-3 hours in the afternoon of the day before the procedure. A sodium phosphate enema is given on the night before the operation.
Two doses of metronidazole and neomycin sulfate are given after the lavage preparation on the day before surgery. An intravenous (IV) second-generation cephalosporin is administered within 1 hour before incision. Electrolyte levels are obtained again on the night before surgery after the lavage.
Equipment
Patient preparation includes adequate anesthesia and proper positioning
Anesthesia
General anesthesia is preferred for an open right hemicolectomy. An additional epidural block can be placed for postoperative pain management. After induction of anesthesia, a 16-French or 18-French Ryle tube is passed and kept on continuous drainage. The patient is then catheterized with a 14-F Foley catheter for monitoring of intraoperative and postoperative urine output.
Positioning
The standard position for an open right hemicolectomy is supine with strapping of the ankle and wrists to allow intraoperative changes to other positions, such as the Trendelenburg position. The surgeon stands on the patient's left, and the first assistant stands across from the surgeon on the patient's right. The scrub nurse stands beside the surgeon. If a second assistant is needed, he or she usually stands across from the surgeon to the left of the first assistant.

For right hemicolectomy, the patient is placed in a supine or lithotomy position. The patient is then secured to the operating table with the help of a bean bag, with both arms tucked at bedside. Additional shoulder harnesses are placed in order to support the patient when in the Trendelenburg position. The robot is brought in from the right side and the bedside assistant and the scrub nurse are situated to the patient’s left side. Once the robot is docked, there can be no change to the patient’s position or the robot’s position, without first undocking the robotic arms.
Monitoring and follow-up
Postoperatively, nasogastric aspiration is maintained until ileus resolves. Clear liquids are started when the patient has a soft abdomen with normal bowel sounds and expels flatus without nausea, vomiting, or abdominal distention. If the patient tolerates liquids well, normal intake can be started after 1 days. IV fluids should be continued until the patient can tolerate normal oral intake. The urinary catheter may be removed 2-3 days after the operation.
Patients who recover sufficiently may be discharged on day 7, and sutures or staples may be removed on day 10
Technique
Choice of ports
Port placement for the robotic procedure closely resembles the port configuration for laparoscopic right hemicolectomy. We routinely use only two of the three robotic working arms, along with a camera, although all three robotic working arms can be used if desired. One assistant laparoscopic port is added for additional retraction, as well as an energy device or an endostapler.

Determination of extent of resection
The location of the tumor determines the line of resection. If the tumor is in the cecum, a 10-cm margin of terminal ileum must be resected; however, if the tumor is in the ascending colon, only a few centimeters of ileum is required as a margin. The line of resection should extend to the right side of the transverse colon at the level of the right branch of the middle colic vessels (see the images below).

Take care to preserve the main branch of the middle colic vessels. To ensure proper lymph node harvesting, the right colic and ileocolic vessels are taken at their origins. Omental attachments to the right colon are generally removed with the specimen.
Procedure The procedure begins with diagnostic laparoscopy. The abdomen is inspected to determine the feasibility of minimally invasive resection and to identify the extent of disease. The patient is placed in the Trendelenburg position with the right side up. This allows for the small bowel and omentum to be displaced to the left upper quadrant, exposing the cecum and terminal ileum. The robot is then brought from the right side of the patient and docked onto the ports. We routinely use a robotic hook cautery on the left robotic arm and a bipolar fenestrated grasper on the right robotic arm. Depending on the surgeon’s preference and anatomical variations, either a medial to lateral or lateral to medial approach can be used. In this case presented, a lateral to medial technique was applied. The cecum is grasped and retracted medially and the peritoneum incised in the right pericolic gutter. This step helps to open up the avascular retroperitoneal plane of dissection. In this plane, the entire right colon is mobilized up to the hepatic flexure. During this part of the dissection, the right gonadal vessels and the right ureter should be identified and preserved. Next, the ileocolic pedicle is controlled. At this point, the cecum is retracted laterally and the ileocolic artery is carefully dissected close to its origin. The artery is then transected using a suitable energy device. Alternative methods include vascular endostapling or suture-ligation with the robotic system.
The mobilization of the hepatic flexure is the next step. The table is tilted to the reverse Trendelenburg position, which allows for the omentum and the transverse colon to shift caudad, thus exposing the hepatocolic ligament. At this point, it is necessary to undock the robotic arms temporarily from the ports before changing position. The transverse colon is retracted inferiorly and the gastrocolic ligament divided with the help of bipolar coagulation or an energy device. The dissection is continued toward the hepatic flexure and the final attachments of the colon to the retroperitoneum are divided. This completes the mobilization of the entire right colon and the robotic part of the procedure.
Once complete, the robot is undocked and the incision for a camera port is extended superiorly to create a small midline minilaparotomy. The mobilized right colon is then exteriorized through this incision and resected. The standard side to side ileocolic anastomosis is created in open fashion.
Totally robotic right hemicolectomy can also be done. Intracorporeal hand-sewn anastomosis may be required. The specimen may be retrieved through a Pfannenstiel incision.
Ref. Wideochir Inne Tech Malo Inwazyjne. Sep 2013; 8(3): 253–257 Robotassisted right colectomy: surgical technique and review of the literature Wojciech Witkiewicz, Marek Zawadzki, [...], and Sławomir Marecik
Advantages over laparoscopic procedure
Advocates of the robot-assisted technique point to superior retraction, visualization, and dissection offered with the robot, resulting in a better mesorectal grade, earlier recovery of urogenital function, and lower conversion rates.
Gynaecology
Steps of robotic hysterectomy
1 Visualisation of the active colpotomiser
1 Ligation and division of right upper pedicles. Ligation and division of left upper pedicles
2 Dissection of the UV fold and creation of the bladder flap (Ureteric studies confirm that the ureters are 10-40mm away from the colpotomizer lip. By using the UV fold incisions as a marker, you have a landmark to aim for once you do your upper pedicles. This is particularly useful in dealing with a large uterus as making your UV fold incision first guides the direction of your broad ligament dissection. Again, rotating the colpotomizer lip under the uterine vessels allows precise coagulation.)
5 Coagulation of the right uterine artery. Coagulation of the left uterine artery
6 Colpotomy incision left side anterolateral, continue the incision inferiorly following the contour of the colpotomiser. The green colpotomiser funnel lip is clearly visualized. The colpotomy incision follows the contour of the colpotomiser funnel. Elevate the uterus and rotate the colpotomiser. Continue the colpotomy following the contour of the colpotomiser posterior , medially. (Note how the colpotomiser elongates the vaginal tissue for haemostatic transection. Posterior colpotomy left side
8 Colpotomy incision right side. Colpotomy is initiated antero lateral mirror image of the left side. The green lip of the colpotomiser is easily visualized. The colpotomy incision follows the contour of the colpotomiser. The uterus is elevated and the colpotomiser is rotated. Posterior colpotomy is completed. Anterior colpotomy. Colpotomiser lip is rotated to facilitate haemostatic completion of the colpotomy. (Note how the colpotomy incision is performed inside the lip of the colpotomiser).
9 The uterus is removed.
10 The right adnexa is identified and grasped. IP ligament and ureter are located and identified. IP ligament is coagulated. IP ligament is divided. Right adnexa is placed inside the collection probe. The left adnexa is grasped and identified. Ureter and IP ligament are located and identified. IP ligament is coagulated and divided. Left adnexa is placed into the collection probe.
11 Vaginal vault closure right side (using figure of eight sutures). Collection probe maintains pneumoperitoneum. Vaginal vault closure left side (using figure of eight sutures).
Laparoscopic Assisted Robotic Myomectomy
Robotic-assisted laparoscopic myomectomy for the surgical removal of uterine fibroids. while leaving the uterus intact.
The robot's arms are fitted with five to eight millimeter surgical instruments to perform the various steps of the surgical procedure.
The keys steps of a robotic myomectomy are illustrated in the images below. The images were taken during an actual robotic myomectomy procedure.

da Vinci endometriosis
Steps Involved In Robotic Prostatectomy
Posterior dissection of seminal vesicles and prostate :
The seminal vesicles are cystic structures attached to the prostate and function in storing and adding the nutrients to the semen. The seminal vesicles are always removed with the prostate during surgery. A posterior approach allows for energy free and traction free dissection of the nerve bundles that run along the side and tips of the seminal vesicles. The posterior approach also allows for perfect visualization of large or asymmetric seminal vesicles, situations which could be very complicated in an anterior approach. In addition, this type of approach allows us to bypass a large median lobe (protrusion of the prostate into the bladder) without compromising visualization.
Developing the space of Retzius and anterior prostate dissection with sparing of the Endopelvic Fascia.
This step drops the bladder and the prostate from the abdominal wall. It allows the surgeon direct visualization of the anterior prostate and the dorsal vascular complex. By sparing the Endopelvic fascia, an Intra-facial dissection is more likely to be successful. See neurovascual bundle dissection below for more details.
Division of the prostate from the bladder by bladder-neck sparing technique to preserve the internal sphincter mechanism.
The bladder and prostate are fused together by two layers of bladder muscle in addition to fatty tissue. This area includes the internal urinary sphincter that includes muscle fibers that have a role in the subconscious control of urinary function. In most patients preservation of the bladder neck sphincter mechanism can result in early urinary continence. A proper preservation can also decrease the risk of strictures or scars of the bladder neck known as bladder neck contractures. When the bladder neck is not spared, the subsequent large opening may result in a time-consuming reconstruction to taper the opening. Larger openings also require a longer suture line and therefore may be more susceptible to leakage of urine from the anastamsosis. Given all these factors and assuming there are no biopsy features putting the patient at risk for bladder neck involvement or the presence of a large median lobe, we always strive to preserve the bladder neck.
Dissection of lateral prostatic fascia and sparing of the neurovascular bundles (NVB) :
The nerve bundles carry neural information and blood flow into the deep pelvis. These structures are critical for both erections and urinary control after surgery. Multiple studies to date have shown a direct relationship between the degree of nerve sparing and post-operative potency and urinary control. Contrary to what most patients believe, the nerve sparing is not an all or none concept. Depending on the extent of the cancer, the nerve dissection can be individually tailored to the patient and his cancer. Many factors come into the decision but include the risk of extracapsular extension based on preoperative nomograms/risk-tables (link to separate section/post), the results of pre-operative T3 MRI of the prostate (link so section), the findings of a rectal exam under anesthesia, intra-operative findings and the ease of “peeling” the bundles away from the prostate. The degree of precision and dexterity that is needed to perform the dissection of the nerve bundles away from the prostate is similar to what is required to “peel” the skin off of a table top grape (link to video). Our goal is to clearly remove all prostate and cancerous tissue but as important of a goal is to leave all non-prostate tissue as it was prior to the surgery. Many times, surgeons use the terms extrafascial, interfascial, and intrafascial to describe different techniques to dissect the prostate and the nerve bundles.
Extrafascial: This is also known as non-nerve sparing or wide-excision dissection. When there is either high suspicion that the tumor has penetrated the capsule wall deep into the extracapsular fatty tissue or is involving the nerve bundle itself this may require us to resect the nerve bundle all together with the prostate. Usually a pre-operative MRI can identify the extent of involvement. In this type of dissection, the endopelvic fascia is incised deep near the levator ani muscles to carry out this type of dissection. In patients who are not interested in nerve preservation due to baseline erectile dysfunction a wideexcision may not be critical. However, even in patients with clear evidence of extracapsular involvement we may be able to do a graded dissection and spare some of the neurovascular bundle on the side affected with cancer in hopes of maximizing post-surgical potency. We use intra-operative frozen sections whereby we send tissue at the edge of the dissection to get a preliminary assessment of any tumor at the margin and subsequently guide our dissection based on those results. We are also currently working on a novel technology that will be able to guide us in real-time identification of prostate tumor using fluorescent dyes targeting the tumor and near-infared imaging similar to what we have been able to pioneer with kidney cancer surgery (link to Firefly). Although we are currently evaluating with this technology in an animal model, we hope to soon apply this to clinical use and recruit patients into a clinical trial.
Interfascial dissection: The endopelvic fascia is incised and the neurovascular bundles are spared posterolaterally to take some of the tissue around the prostate (periprostatic fascia) with the specimen. The component of nerves and vessels that can sometimes be found on the anterior aspect of the prostate are therefore not spared. As noted above, the clinical extent of the tumor has an impact of whether or not we decide to do this type of graded dissection.
Intrafascial dissection: This is the most delicate and precise type of dissection. Think of this as a custommade, very “fitted” type of dissection. In this type of dissection, the endoplevic fascia, the neurovascular bundles, the periprostatic fascia and Denonvillier’s fascia are all spared and left intact. The plane of dissection is directly guided on top of the prostate capsule. By sparing all these structures, we maximize the patient’s chance of regaining erection and urinary control after surgery.
Control of dorsal vascular complex (DVC) :
As its name implies, the DVC contains an array of both veins and arteries that carry and drain blood from the penis. Due to the large amount of blood flowing in this structure, inadvertent injury can result in significant amount of bleeding. The higher amount of blood loss associated historically with open prostatectomy techniques was related directly to this point of the procedure. Fortunately, with the utilization of the CO2 gas utilized for laparoscopic and robotic surgery, venous bleeding from the DVC is no longer a major issue as the gas can provide passive pressure and prevent oozing from this area. Two methods are used to control the DVC: either suture ligation or endoscopic stapling. One of our preferred methods of control is to used an endoscopic stapler. As we have previously published, endoscopic stapling allows for a consistent, efficient and reliable method for getting control without risking a positive margin at the apex of the prostate.
Preparation of Apical Urethra – preserve length and muscle fibers :
Prostates come in all sizes and shapes. Some are smaller, some are bigger. Most of the variation that can be seen in shape is usually seen at the apex. The apical prostate surrounds the urethra near the external sphincter complex. The goal at this point of the operation is to achieve a long and thick urethral stump that will subsequently be re-connected to the bladder neck. There is a fine line between dissecting too deep (the levator muscles and the external sphincter complex can be inadvertently damaged) or too shallow (risk leaving prostate tissue behind).
Posterior Reconstruction :
Also known as a Male sling, Rocco reconstruction or Rhabdosphincter reapproximation. This technique allows for a posterior support of the sphincter complex like a hammock and prevents the urethra from slipping further down into the pelvis during activity which may lead to leakage such as coughing, sneezing or laughing. The reconstruction also brings the bladder down into a supported position and therefore removes any tension on the completed urethra-bladder anastamosis. Most experts agree that this type of reconstruction leads to shorter recovery times to recover urinary control..
Urethrovesical anastomosis :
The goal at this point of the procedure is to create a watertight and tension-free connection between the urethra and the prostate. One of the most important advancements to our practice has been the ability to utilize a barbed suture (V-Loc Link to Covidien) that maintains the reapproximated ends without allowing any gaps between the edges of the tissue. As a results for years now we have avoided using any post-oeprative drains unless we are dealing with a very large bladder neck or a reconstructed bladder neck.
Pelvic Lymph Node dissection: Removal of pelvic lymph nodes – extended dissection for patients at greater risk of involvement based on biopsy features, clinical exam and PSA
Even tough pre-operative CT or MRI may not show evidence of regional lymph node involvement, the accuracy of these imaging tests is only around 80%. The decision to identify and remove the lymph nodes that drain the prostate during prostatectomy is made on an individual basis. We calculate risk of lymph node involvement based on widely available nomograms and risk calculators such as D’Amico criteria, Partin Tables, CAPRA score, or MSKCC calculator. Low risk patients (for example those with PSA < 10, Gleason 6, or clinical T1c) clearly do not benefit from a lymph node dissection. Intermediate risk patients and High risk patients on the other hand may benefit from a lymphadenectomy. It is believed that an extended lymph node dissection (in both lymph node negative and positive patients) may lead to the removal of undetected micrometastases, and therefore improve the survival of patients undergoing prostatectomy. There is a growing body of evidence suggesting that the greater the number of lymph nodes removed is beneficial. However, no uniform consensus exists regarding the limits of boundary of the dissection or the minimum number of lymph nodes that should be removed. Historically, the detection of suspicious lymph nodes at the time of radical prostatectomy lead many surgeons to abandon the operation with the belief that regional lymph node involvement was a sign of widespread metastatic disease and therefore associated with poor prognosis. Patients would subsequently be referred for treatment with hormones and/or radiotherapy. However, there have been a number of recent studies showing very reasonable cancer-specific survival rates even in patients with lymph node positive disease at the time of radical prostatectomy. A recent publication from the European Journal of Urology analyzed the Munich cancer registry and found that patients with lymph node positive disease that did not have their operation aborted on average had 20% improvement in survival compared to those who had their operation aborted.
Endocrine surgery
Robotic thyroidectomy
Introduction :
Thyroidectomies using the open method are effective, well-tolerated and safe but involve transverse incision on the neck measuring 7–10 cm in length. Thyroid disorders are more common in women and they find these scars uncomfortable and cosmetically unacceptable. Hence, minimal access approaches are playing an ever increasing role in neck surgery as they result in a reduction in size or elimination of the scar on the neck. These approaches to endocrine tumors are more appealing in view of the fact that the conventional approach seems out of proportion compared to the small size of the tumors.
We believe that our endoscopic technique using the anterior chest wall approach as described in this paper can be utilized to remove large nodules of the thyroid as well as performing total thyroidectomies. It combines the benefits of the minimal access approach, instrumentation, magnification and precision. The scars produced are hidden beneath the clothes of the patient offering a cosmetic advantage.
Surgical technique
The surgical instruments required include one 11 mm trocar and two 5.5 mm trocars, one 10 mm and 5 mm 0 degree fiber optic endoscopes, Harmonic scalpel Ace, 5 mm dissectors, scissors, an aspiration cannula, 5 mm clip applicator and hemostats. The procedure was performed with the patient in a supine position under general anesthesia with endotracheal intubation. The neck was extended and the chin was in the midline. A 10 mm skin incision was made on the chest over the sternum about 10 cm from suprasternal notch so as to be covered by the patient's clothes postoperatively [Figure 1]. A long hemostat was inserted through this incision in the subcutaneous plane above the sternum advancing forwards towards the subplatysmal plane as shown in Figure. A 10 mm trocar and cannula was then inserted through this incision. Pneumoinsufflation with carbon dioxide (CO2) was begun under endoscopic vision till a continuous pressure of 8 to 10 mmHg was maintained. The gas not only opens up the subplatysmal plane and maintains the operative space, but also may decrease the effect of any minor bleeds [Figure 2].

Position of ports

Creating a subplatysmal plane :
The subplatysmal space was further developed by blunt dissection with the 10 mm 0 degree rigid endoscope laterally upto the sternomastoid on the left side.
A 5 mm skin incision was made under the clavicle on the left side at the mid-clavicular point. Under endoscopic guidance the first 5 mm trocar and cannula was inserted on the left side and passed over the surface of the clavicle to enter the subplatysmal plane just anterior to the sternocleidomastoid muscle.
The 5 mm Harmonic scalpel Ace was introduced through this port and was used for sharp dissection of the subplatysmal strands, especially in the midline where the platysma is deficient. The subplatysmal plane was further developed upto the hyoid bone superiorly.
The anterior border of the opposite sternocleidomastoid muscle was dissected from the platysma muscle and a space was created laterally.
The second 5 mm trocar was inserted on the right side infraclavicularly at the midclavicular point and a dissector was inserted.
The strap muscles were separated in the midline and retracted laterally to deliver the gland into the operative space.
The dissection was begun at the lower pole of the thyroid gland [Figure 3]. The inferior thyroid pedicle was identified. The recurrent laryngeal nerve was also identified and protected. Inferior thyroid veins were first coagulated with the Harmonic scalpel. Inferior thyroid artery was clipped or coagulated with Harmonic scalpel. In doing so, care was taken to avoid injuring the recurrent laryngeal nerve which is usually located between the trachea and the carotid artery [Figure 4].

Dissection begins at the inferior pole

Clipping inferior thyroid vessels. The recurrent laryngeal nerve is identified and preserved.
The inferior parathyroid gland was also identified at this stage.
Once the inferior pole was freed, the lobe was lifted up from the trachea. A constant traction was maintained on the thyroid lobe medially and the lobe was dissected from the lateral and posterior side keeping the recurrent laryngeal nerve under vision [Figure 5]. The lobe was lifted up from trachea till the superior pole was reached. Then the entire lobe was retracted downwards and the superior thyroid pedicle was taken using clips or coagulated using the Harmonic scalpel [Figure 6]. The superior parathyroid gland was also identified and conserved.

Posterior dissection

Clipping superior thyroid vessels
The lobe was retracted laterally and the ligament of Berry was cut with the Harmonic scalpel. The isthmus was also separated from the trachea and cut with the Harmonic scalpel. The same procedure was repeated on the other side. The specimen was put in an endobag [Figure 7]. A drain was placed through the 5 mm port.

Specimen freed up
A 5 mm telescope was put in via the 5 mm port and specimen bag was guided out through 11 mm port. The skin incision on the sternum was widened if required so as to deliver out the specimen.
The suprasternal incision was widened to a mean size of 5.6 cm (range 2 to 7.5 cm) for removal of the specimen. However this scar was well hidden beneath the clothes of the patients and all patients were satisfied with the cosmetic result of the surgery.
Discussion
Videoscopic neck surgery is developing despite the fact that only potential spaces exist in the neck. These approaches are more appealing since the size of incision of that the conventional approach seems to be out of proportion compared to the small size of the tumors.[2]
Gagner first described the endoscopic subtotal parathyroidectomy with constant CO2 gas insufflations for hyperparathyroidism in 1996 and achieved a good clinical and cosmetic result.[3] Since then minimal access parathyroidectomy has found a role alongside conventional cervicotomy for the treatment of primary hyperparathyroidism.
Huscher and colleagues first described the complete endoscopic right thyroid lobectomy in 1997.[4] Minimally invasive surgery using endoscopic vision is now widely employed for the treatment of thyroid diseases for cosmetic purposes. Since then several approaches to the thyroid have evolved including the cervical approach, the minimally invasive video-assisted thyroidectomy (MIVAT), the transaxillary approach and the breast or anterior chest wall approach.[5–9] Each of these approaches have their own advantages and disadvantages.
Endoscopic surgery has reduced the level of surgical “invasiveness” and results in an improved cosmetic appearance. The site of approach is the most important factor because there is an intimate relationship between the locations of the trocars in terms of the cosmetic result, invasiveness, safety and ease of use.[1]
The cervical approach utilizes small incisions in the neck thus making it cosmetically unacceptable and cannot be used for lesions greater than 4 cm. Only patients who have small nodules with a low index of suspected malignancy are offered this endosopic approach.[5] The operative field is small and because the camera is near the anatomic structures, it often has to be removed for cleaning, which significantly increases the operating time.[6]
The axillary approach makes it difficult to visualize the opposite lobe. Although sectioning the sternohyoid muscle creates a good visual space even for the contralateral region and enables the contra lateral gland of the thyroid to be resected, the operating time is extremely prolonged and the additional scar tissue causes discomfort while swallowing and neck pain as a result of adhesions. Therefore this endoscopic procedure is not indicated for thyroid nodules that extend to the contralateral thyroid lobe.[7]
The anterior chest wall approach utilizes port access at various positions on the anterior chest wall depending on the surgeon, thus avoiding a cervical incision. In our technique, the trocars are over the sternum and infraclavicularly. These are hidden by the clothes of the patient and are not visible routinely.[9,10]
This technique also allows bilateral neck exploration. Hence we have been able to perform total thyroidectomies with central compartment clearance for papillary carcinoma and near-total thyroidectomies for large multinodular goiters. The largest dimension of thyroid lobe removed in our series was 11 cm.
References :
Thyroidectomy :
1) J Minim Access Surg. 2007 Jul-Sep; Endoscopic thyroidectomy: Our technique Shailesh P Puntambekar, Reshma J Palep, Anjali M Patil, Neeraj V Rayate, Saurabh N Joshi, Geetanjali A Agarwal, and Milind Joshi.
Robotic Thyroidectomy
Steps


Robotic sleeve gastrectomy :
The laparoscopic sleeve gastrectomy was initially part of the duodenal switch for super-super morbidly obese patients and later as a staged operation for morbid obesity in 2003. The rationale for sleeve gastrectomy was initially to lower the morbidity of this complex surgical procedure by offering a less challenging operation, decreasing operative time, and allowing patients to lose weight before proceeding with the second stage. Because of the excellent results in these patients the use of the sleeve gastrectomy as a primary bariatric operation gained acceptance. The main advantages of this operation are that it is not as technically challenging as gastric bypass or biliopancreatic diversion-duodenal switch (BPDDS), thereby decreasing operative times and morbidity.
Surgical technique :
The surgical technique is described by Diamantis et al. in their first clinical experience series (Ayloo et al., 2011; Diamantis et al., 2011), which is similar to a Standard Laparoscopic Sleeve Gastrectomy (LSG). The first step is achieving pneumoperitoneum. Then, a 12-mm port 8 cm above the umbilicus for the camera, a right 12-mm trocar is positioned at the epigastrium, 5 cm towards the left of the midline, and a left 12-mm trocar placed at least 8 cm far away from the camera port, in order to avoid collision of the robotic arms that would hamper the advancement of the procedure. A double cannulation technique is used inserting the 8-mm metallic robotic ports through the standard 12-mm trocars. Two further 12-mm trocars are inserted, one at the right anterior axillary line, 2 cm below the subcostal arch for liver retraction and one at the symmetrical site on the left side to retract the gastrosplenic ligament (18). All the trocars and robotic cannulas are inserted under the guidance of the standard laparoscopic camera and the robotic system approached the patient and is installed (“docked”) afterwards. The robotic camera is docked last, and the robotic cart is positioned over the patient’s left shoulder. Only three arms of the da Vinci S Surgical System™ are used (camera and two working arms). Once the general setup is ready, the procedure begin with the console surgeon grasping with a Cadiere forceps, the greater curvature of the stomach at its lowest part andthe gastrocolic ligament is cut with the da Vinci harmonic scalpel. The division of the gastrocolic and gastrosplenic ligament continues exactly like in a standard LSG. Once the angle of His is clearly visible and mobilized from the left crus, division of the gastrocolic ligament ends 4-6 cm proximally from the pylorus. At this point instead of a bougie preferred by some surgeons, an intra-operative endoscopy can be used for the calibration of the gastric sleeve. Once the endoscope lies across the lesser gastric curvature will taylor the gastrectomy. The console surgeon holds and abducts the mobilized greater gastric curvature with a Cadiere forceps through the right working trocar and the left robotic arm is undocked. The table surgeon inserts the stapler, loaded with a green cartridge, through the working port at the right site of the patient and divides the stomach in a direction from the lowest tip of the greater gastric curvature, 4 cm proximally to the pylorus, towards the lateral edge of the endoscope.

All staple lines are regularly reinforced with prosthetic material (GORE SEAMGUARD bioabsorbable staple line reinforcement, W. L. GORE and Associates Inc.). The left robotic arm is docked once again after the first two fires. The stapling continues in a cephalad direction with the traction of the gastric sleeve using the Cadiere forceps, while the right arm is undocked for the insertion of the stapler, and division of the stomach; also the laparoscopic could be used to mobilize the greater gastric curvature. The stomach is divided till the angle of His, then the endoscope is smoothly withdrawn. Ayloo et al. (Ayloo, et al., 2011) also describes the assistance of the robot to invert the stapling line by placing seroserosal sutures of 2-0 PDS (Ethicon) beginning at the angle of His. The staple line is then inspected from inside bleeding and air leak. A leak test is also performed filled with diluted Povidone 10% solution or methylene blue by some other authors (Galvani et al., 2006; Moser & Horgan, 2004). Finally, the transected, redundant part of the stomach is removed through the left lateral port site mainly through a fascial digital dilation.
Robotic assisted coronary artery bypass grafting :
Eg. A single vessel bypass graft in a female patient.
The robotic take down of the left internal mammary artery and directly anastomosing it to the left anterior descending coronary artery using a small anterior thoracotomy technique.

12mm camera port just under the breast in the left 4th/5th intercostal space 2 X 8mm working ports superiorly and inferiorly.
In the chest care is taken to trace the internal mammary artery at the inferior location all the way to its origin from the subclavian artery.


