Abdomen, named Pandora’s Box is, certainly a temple of unexpected situations. Gaining access to create space for operability with gas or without is the FIrst and foremost step in minimal access surgery. Any work well begun is half done. Which needs to be done sans additional complications with safety being the prime worry. The advance of pneumoperitoneum brings about panoramic view from the entire abdomen in all its glory and clarity with precision. Our aim would be to achieve this view and space for the surgical dissection, suturing and achieve homeostasis, with completing procedure to everyone’s total satisfaction with good results. The individual has to be relaxed. Every step has to be forethought, and carried out with clinical precision and tactile sensation. The avalanche of literature describing iatrogenic accidents during advance of pneumoperitoneum with veress needle and trocars is to create awareness only and understanding of benefits and drawbacks is important to tread safe and sure paths to success.
There are two techniques for creation of Pneumoperitoneum:
- Closed and 2. Open technique. (Hassan method)
- Closed Technique
- Veress Needle

This is spring loaded central slim trocar and also the needle traverses the rectus sheath and enters the peritoneum. The inner trocar retracts since the needle encounters resistance and springs back on entering the peritoneal cavity. This spring loaded mechanism needs to be con?rmed to stay working orderprior to initial insertion and also the patency of lumen by checking the gas flow with the needle. Both disposable and reusable (nondisposable) Veress needles can be found. The former is really a one-place plastic design (external diameter, 2mm; 14 gauge; length, 70 or 120 mm), whereas the second is made of metal and may be disassembled. Look into the Veress needle for patency by flushing saline by way of it. Then occlude the tip from the needle and drive fluid into the needle under moderate pressure to check on for leakages. Replace a disposable Veress needle if it leaks; check the screws and connections on the reusable Veress needle.
Following, push the blunt tip of the Veress needle from the handle of the knife or a solid, flat surface to be certain that the blunt tip will retract easily and will spring forward quickly and smoothly. A red indicator within the hub from the disposable needle can be seen to maneuver upward as the tip retracts. Place the supine patient inside a 10-to-20 degree head-down position. If there aren't any scars on the abdomen, choose a site of entry in the superior of inferior border from the umbilical ring. There are several methods to immobilize the umbilicus and provide resistance to the needle. The inferior margin from the umbilicus can be immobilized by pinching the superior border from the umbilicus between your thumb and forefinger of the nondominant hand and rolling the superior margin from the umbilicus inside a cephalad direction. Alternatively, in the anesthetized patient, a small towel clip can be put on each side from the upper margin of the umbilicus; this makes it a bit easier to stablize the umbilicus and lift it upward.
Next, make a curvilinear incision in the midline of the superior or inferior margin from the umbilicus. Using the dominant hand, keep the shaft (not the hub) from the Veress needle just like a dart and gently pass the needle into the incision - either at a 45-degree caudal angle towards the abdominal wall (in the asthenic or minimally obese patient) or perpendicular to the abdominal wall in the markedly obese patient. You will see a sensation of initial resistance, followed by a give, at two points. The first point occurs since the needle meets and traverses the fascia and the second since it touches and traverses the peritoneum. As the needle enters the peritoneal cavity, a definite click can often be heard as the blunt-tip portion of the Veress needle springs forward into the peritoneal cavity.
Connect a 10-ml syringe containing 5 ml of saline to the Veress needle. You will find five tests that should be performed in sequence to verify proper keeping the needle.
- .Hiss Test:- This is the sound of air flowing into the negative pressure of the peritoneum through the Veress needle as accentuated by elevation of the abdominal wall, when the tip from the needle is correctly positioned. Unfortunately, the listener’s ear has to be close to the top of the Veress needle to listen to the “hiss”, and theatre noise often precludes this.
- .Aspiration Test:- A Syringe filled with saline attached to the Veress needle can be used next. Fluid instilled to the peritoneal cavity will flow from the tip from the needle and cannot be aspirated back into the syringe. If fluid is aspirated back, an incorrect needle tip placement is probably. In addition, is bowel content or blood is aspirated, the incorrect position from the needle tip is again obvious.
- .Negative Pressure Test:- The insufflation tubing from the insufflator should next be connected to the Veress needle. Monitoring the peritoneal pressure just before any insufflation at this time will reveal a small negative pressure easily accentuated by abdominal wall elevation.
- . Early Insufflation Pressures:- The next clue to correct positioning is monitoring of the insufflation pressure that ought to not exceed 8mm Hg at 11 liter/min. The static pressure must not exceed 3mm Hg. Pressures of > 15mm Hg with a low or no flows of gas indicate incorrect needle tip position.
- . Volume Test:- In the average adult the volume required to distend the peritoneum adequately, and which creates a pressure of 8-10 mm Hg is all about 2.5 liters of gas. If the static pressure as measured by the insufflator reaches these pressures with less than 1 liters of gas, suspicion should arise how the needle tip is incorrectly placed. If this sounds like extra peritoneal then it will often be associated with asymmetric anterior abdominal wall distension.
Monitor the patient’s pulse and blood pressure level closely for any vagal reaction during the early phase of insufflation. When the pulse falls precipitously, allow the CO2 to escape, administer atropine, and reinstitute insufflation slowly following a normal heartbeat has returned. After 1 litre of CO2 continues to be insufflated uneventfully, increase the flow rate about the insufflator to > 6 litre/min. When the 15 mm Hg limit is reached, the flow of CO2 is going to be stop. At this point approximately Three to six litre of CO2 must have been instilled into the abdomen. When percussed, the abdomen should sound as through you are thumping a ripe watermelon.
II. Alternate Entry Sites
Prior abdominal surgery mandates care in selection of the first trocar site and could prompt consideration of use of the open technique. When the previous incisions are very well from the umbilicus, the umbilical site may still be used, with whether closed or open technique. A midline scar near the umbilicus increases the risk that adhesions is going to be tethering intra-abdominal viscera towards the peritoneum at this level. In this situation, the closed technique may still used, but it's safer to use another insertion site. This website ought to be well away from the previous scar and lateral to the rectos muscles, to reduce the thickness of abdominal wall traversed and avoid the inferior epigastria vessels. In general, patients with prior low vertical midline scars ought to be approached through a trocar placed in the lateral border of the rectus muscle either in the left or right upper quadrant. With previous upper vertical midline incision or multiple incisions near the midline, the best lower quadrant site may be appropriate.

Alternatively, it is possible to perform a wide open technique with the Hasson Canula.
- Upper Abdomen: Within the upper abdomen, the subcostal regions are good choices. Carefully percuss the positions from the liver and spleen to prevent inadvertent injury to these organs, and decompress the stomach with a nasogastric or orogastric tube.
- Lower Abdomen: The best lower quadrant is superior to the left because many individuals have congenital adhesions between the sigmoid colon and anterior abdominal wall. Decompress the bladder when utilizing a closed insertion technique at, or caudal to the umbilicus.
III. Insufflation of Peritoneal Cavity
Carbon dioxide may be the standard gas used for most operative laparoscopy. It doesn't support combustion, after absorption from the peritoneum it is readily excreted via the lungs and, if accidentally injected straight into a blood vessel resulting in co2 embolism, this really is easier treated than air or nitrous oxide embolism (especially if the rate of insufflation is kept at 11/min). Of maximal importance within the setting of operative laparoscopy may be the equipment accustomed to deliver the co2 towards the peritoneum. Optimum exposure is obtained with a constant penumoperitoneum at 10-15 mm Hg pressure. Operative laparoscopy entails using multiple cannula and the frequent altering of instruments. Gas leakage is significant and also the early generation of insufflators could only deal with automatic flow rates of 11/min, which could be manually increased to 31/min. This resulted in repeated fluctuations of carbon dioxide pressure with loss of view, and incurred delays necessitated by refilling of the peritoneal cavity. This problem was further compounded when the lavage/ suction equipment was adopted.
The latest generation of automatic electronic insufflators has resolved this issue. This insufflator is effective at automatic flow rates as high as 81 liters/min. Operative procedures without these machines are tedious and time-consuming. In addition, it offers good monitoring of the pressure inside the abdomen, which can be also pre-selected and adjusted. Maintenance of a low intra-abdominal pressure is especially useful in women with lax abdominal walls following pregnancy, where very adequate visualization can be acquired at pressures of 100 mm Hg. The benefit is a decrease in postoperative shoulder-tip pain brought on by diaphragmatic stretching.
If throughout the induction from the initial penumoperitoneum the needle tip is felt to be incorrectly positioned the following steps should be taken. When the pressure test, volume test or aspiration tests suggest extraperitoneal insufflation then the needle is simply withdrawn and re-inserted. The number of passes required should be recorded within the operation note. If arterial blood is aspirated in those days simple withdrawal of the needle and re-insertion is reasonable. However, if blood fountains support the Veress needle, major vessel injury is probably along with a laparotomy should be performed. If bowel content is aspirated, then your needle is pulled and re-inserted, in another site if local adhesions are suspected. On this event, it is important to inspect the region of bowel injury once the laparoscope is first introduced. If the hole in the bowel consists of a simple puncture, the administration of antibiotics and local lavage / suction then careful postoperative observation may be all that is required. More extensive injuries, e.g. when the bowel has been tangentially lacerated, require immediate suture repair either laparoscopically or by open operation. In most cases a preliminary scan of the peritoneum and organs around Veress needle insertion is mandatory. Any sign of retropertioneal haemorrhage is suggestive of main vessel injury. Pneumo-omentum, carbon dioxide in the bowel mesentery, or retroperitoneum can easily be left to resorb.
IV. Test for Adhesions
A 12 cm long, 0.8 mm needle attached to a saline-filled syringe is introduced perpendicularly with the abdominal wall in the area where initial trocar insertion is envisaged. As the needle is advanced, gas is slowly aspirated, and continuous bubbling is seen in the syringe. This can stop all of a sudden when visceral peritoneum is touched. The level of the needle in the skin is then marked with a finger on the shaft of the needle, and bubbling from the gas is observed since the needle is removed until bubbling stops again. The distance that the needle has been withdrawn enough where bubbling stopped gives a precise idea of the length between visceral and parietal peritoneum. By repeating the procedure at 45 degree a mental picture of the underlying carbon dioxide cushion can be developed. The presence of mental or bowel adhesions is suggested by erratic variation from the size of the co2 cushion at cushion at different angles. This informative guide indicates a place for safe introduction from the laparoscope trocar. This test isn't always required.
It's particularly beneficial in patients with previous laparotomy.
V. Placement of First Cannula -> Blind Entry
The website for insertion of the first trocar which supports the laparoscope is generally around the umbilicus. This ought to be altered whenever the sounding test recommends underlying adhesion of bowel or momentum in most cases straightforward insertion is possible. Two approaches are achievable here: direct or “Z” routes. If your pyramidal trocar is used this may only be introduced with safety directly with the linear alba. >The “Z” technique, which is only possible using the traumatic conical system, entails advancement from the trocar / cannula with an initial subcutaneous path before passage of the instrument with the rectus abdominis. The advantages of the “Z” technique include avoidance of the weak linea alba and also the creation of a shutter type closure after withdrawal of the trocar. The disadvantage, poor laparoscopic cholecystectomy, is enhanced difficulty of extraction of the gallbladder with the “trap-door” particularly if the stone load is large. A direct tract (with the linea alba) is therefore preferable. The point is the defect in the linea alba or rectus sheath ought to be approximated by suture at the end of the procedure to decrease the risk of subsequent incisional hernia formation.
In patients likely to have adhesions, the risk and harshness of organ trauma is reduced if a 5.5mm cannula is inserted first and foremost and an in initial scan from the underlying omentum, bowel and retroperitoneum is built to don't include injury. Once the surgeon is content using the position and absence of latrogenic damage, the small cannula is replaced with a 11mm cannula while using trocar dilation system. Once the chance of considerable adhesions is high as in patients after challenging or multiple previous surgical intgerventions, or when the sounding test suggests bowel or omentum is adherent towards the parietal peritoneum, insertion from the cannula tip should be done under vision. This eminently safe technique, which is to be highly recommended in these difficult situations, is accomplished by a 5.5mm cannula with a beveled tip which is inserted to simply beyond the linea alba, such that its tip lies in the extraperitoneal fat if the direct route is used, or even the rectus abdominis muscle when the “Z” manner of insertion is adopted. The central trocar will be withdrawn and replaced with the 5 mm forward-viewing telescope connected to the light source. Under vision, by gentle rotation, the cannula is advanced with the muscle and extraperitoneal fat before peritoneum is reached. Intact penumoperitoneum free of adhesions can look as a translucent membrane with clearly visible small arteries on its surface.
By comparison, within the presence of adherent intestinal or omentum the peritoneum assumes an opaque appearance on transillumination using the telescope. If this is encountered, the position of the cannula tip is altered until clear transparent peritoneum is visualized. This gives a “safe window” for entry of the cannula to the peritoneal cavity. This is done by cannula rotation and gentle pressure from the wrist. Once the surgeon is content how the 5.5 mm cannula is correctly positioned, it might then get replaced with the 11 mm cannula using the trocar dilation technique. Finally, when the surgeon doesn't have knowledge about the above mentioned techniques or once they can't be used with safety (that is rare), open dissection right down to the peritoneum should be considered (open laparoscopy). Only a small opening in the peritoneum is built to limit gas leakage. Special cannula, e.g. Hassan, is available for this function.
II “Open” Technique With Hasson Cannula
The open Hasson cannula provides the surgeon by having an alternative, extremely safe method to go into the abdomen, especially in someone that has previously undergone intraabdominal procedures. During these patients particularly, the blind insertion of the trocar would be fraught with then potential for in jury towards the abdominal viscera. Some surgeons use the open cannula routinely in all patients for placement of the first umbilical trocar. The open cannula includes three pieces: a coneshaped sleeve, a metal or plastic material sheath with a trumpet or flap valve, and a blunt-tipped obturator. On the sheath or on the cone-shaped sleeve can be moved down and up the sheath until it's properly positioned; it may then be tightly affixed to the sheath. The two fascial sutures are then wrapped tightly around the struts, thereby firmly seating the cone-shaped sleeve to the fasciotomy and peritoneotomy. This creates a highly effective seal therefore the pneumoperitoneum is going to be maintained.
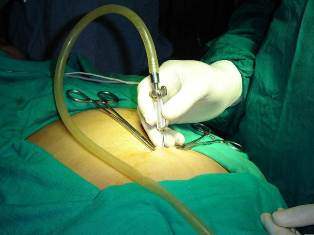
Make a Two to three cm transverse incision at the selected entry site (within the quadrant from the abdomen farthest away from the preexisting abdominal scars or perhaps in the periumbilical skin crease if there's been no prior midline surgery) Dissect the subcutaneous tissue with scissors, and identify and incise the actual fascia. Gently sweep the preperitoneal fat from the peritoneum in an exceedingly limited area. Keep the peritoneum between hemostats and open sharply. This incision ought to be just long enough to admit the surgeon’s index finger. Confirm entry into the abdominal cavity visually by digital palpation, to ensure the absence of adhesions near the incision. Place an absorbable suture on either side of the fascial incision. Some surgeons put the fascial sutures first, use theses to elevate the fascia, and then make the fascial incision. Insert the totally assembled open cannula through then peritoneotomy using the blunt tip from the obturator protruding. Once the obturator is well within the abdominal cavity, move forward the conical collar of then open cannula down the sheath until it's firmly seated within the peritoneal cavity. Secure the collar towards the sheath using the setscrew. Next, twist or tie the two separate fascial sutures round the struts about the sheath or collar of the open cannula, thereby fixing the cannula in position. Connect the CO2 line towards the sidearm port from the cannula and withdraw the blunt-tipped obturator. Establish pneumoperitoneum with the insufflator set a higher flow. Increase intra-abdominal pressure to 12 to fifteen mm Hg. With facility, you'll be able to establish pneumoperitoneum just as fast (or faster) with the open technique as can be done with Veress needle and “closed” trocar passage. Indeed, many surgeons think about this to be the safest way to establish pneumoperitoneum.
If a Hasson cannula isn't available, a typical cannula from a wide open trocar can be put by an open technique. In this case, place two concentric pursestring monofilament sutures within the midline fasica and make an incision into the free peritoneal cavity through the center from the purse strings. Keep both sutures long, and pass the tails of every suture through a 3 cm segment of the red rubber catheter, thereby creating two modified Rummel toumiquests. Place a typical laparoscopic sheath (with sharp-tipped trocar removed), cinch the pursestring sutures from the sheath and secure by placing clamp about the red rubber catheter. Following the operation, close the fasica by simply tying the sutures.
Watch out for Compliations
- Bleeding from abdominal wall
- Cause and Prevention:- This problem usually manifests itself as a continuous stream of blood dripping from one from the trocars, and/or as blood seen on the surface from the abdominal viscera or omentum. Less commonly, delayed presentation as a hematoma of the abdominal wall or rectus sheath may occur. This source of bleeding is usually the inferior epigastric artery or one of their branches. Abdominal wall hemorrhage may be controlled having a variety of techniques, including application of direct pressure using the operating port, open or laparoscopic suture ligation, or tamponade having a Foley’s catheter inserted to the peritoneal cavity.
- Recognition and management:- To look for the point at which the vessel is injured, cantilever the trocar into each of four quadrants until the flow of blood is noted to prevent. Then place a suture in this manner it traverses the entire border from the designated quadrant. Specialized devices have been made that facilitate keeping a suture, but aren't always readily available. The needle should go into the abdomen somewhere from the trocar and exit on the other side, thereby encircling the full thickness from the abdominal wall. This suture can either be passed percutaneously utilizing a large curved No. 1 absorbable suture as monitored endoscopically, or using a straight Keith needle passed to the abdomen and then out using laparoscopic grasping forceps. The suture, which encircles the abdominal wall, is tied over a gauze bolster to tamponade the bleeding site.
- Visceral Injury
- Cause and Prevention:- Careful observation of the steps enumerated above will minimize the risk of visceral injury. However, placement of the Veress needle is a blind maneuver, as well as with extreme care puncture of a hollow viscus is still possible.
- Recognition and Management:- If aspiration of the Veress needle returns yellowish or cloudly fluid, the needle is probably within the lumen of the bowel. Because of the small caliber from the needle itself, normally , this is a harmless situation. Simply take away the needle and repuncture the abdominal wall. After successful insertion of the laparoscope, examine the abdominal viscera closely for significant injury. If, however, the laparsocopic trocar itself lacerates the bowel, you will find four possible courses of action, with respect to the surgeon’s experience: formal open laparotomy and bowel repair or resection; laparoscopic suture repair from the bowel injury; laparoscopic resection of the injured bowel and reanastomosis; minilaparotomy, utilizing an incision just big enough to exteriorize the injured bowel segment for repair or resection and reanastomosis (like the manner of laparoscopic - assisted bowel resection). If at all possible, leave the trocar in place to assist in identifying the precise site of injury.
- Major Vascular Injury
- Cause and Prevention:- Major vascular injury can occur when the sharp tip from the Veress needle or even the trocar nicks or lacerates a mesenteric or retroperitoneal vessel. It's rare once the open (Hasson Cannula) technique is used.
- Recognition and Management:- If aspiration of the Veress needle reveals bloody fluid, remove the needle and repuncture the abdomen. Once access to the abdominal cavity continues to be achieved successfully, execute a full examination of the retroperitoneum to look for an expanding retroperitoneal hematoma.
If there is a central or increasing retroperitoneal hematoma, laparotomy with retroperitoneal exploration is mandatory to evaluate for and repair major vascular injury. Hematomas of the mesentery and people positioned laterally within the retroperitoneum are generallyn innocuous and could be viewed. If during closed insertion from the initial trocar there's a ruch of blood through the trocar with related hypotension, get away from the trocar in place (to supply some tamponade of hemorrhage and assist in identifying the tract) and instantly perform laparotomy to repair what is probably be a personal injury to the aorta, vena cava, or iliac vessels.