Ligation in continuity requires the ability to tie one of the described externally tied slip knots. This technique is used to ligate larger vessels during dissection and is used routinely, in our practice to ligate the cystic duct during laparoscopic Cholecystectomy.
It uses the same principles as ligation with a pie-tied loop but requires the surgeon to position the ligature prior to tying the knot, which forms the loop.
Two types of externally tied slip knot are generally used in World Laparoscopy Hospital. They should be sufficient to cover most clinical situations. They are;
- The Meltzer knot
- The Tayside knot
A long length of ligature is required (100cm). It must be long enough to have the knot pusher threaded on to it, to be passed into the abdomen, round the structure to be ligated and to be brought out again and still have sufficient length for the surgeon to tie his / her knot. The mechanics of this are detailed in the appropriate procedure card.
The knot chosen to complete the loop depends on the clinical situation and the material in use.
The Meltzer slip knot
This modification of the Roeder knot was described in 1991 by Meltzer for use with PDS, and has now superceded the use of Roeder’s knot. It has four components:
- A double hitch
- Three winds
- Two half hitches
- A slide
Applications
The Meltzer knot is now used by the Prof. Dr. R. K. Mishra instead of the Roeder knot to tie the medial end of the cystic duct during Cholecystectomy and to fix the cystic duct drainage cannula after trans-cystic clearance of ductal stones, as catgut is no longer available.
The Tayside knot
The Tayside knot is safe for use with any braided material. It supplies a degree of resistance to reverse slippage equivalent to a surgeons knot.
The knot has six components
- A single hitch
- Three winds
- A locking hitch
- Stacking the loops
- The slide
- Tensioning the knot internally
Applications
The Tayside knot is suitable for use with all braided sutures (2/0 or stronger). It is used with Dacron for ligation of vessels such as the azygous vein, splenic artery/vein or the inferior mesenteric artery/vein.
Clipping
- Choose the correct size of clip for the structure
- Double clip important structures (better to ligate)
- Do not clip fatty pedicles
- Check positioning of jaws, the tips and content before clipping
- Beware of cross clipping
Pledget dissection techniques
Endoscopic pledget dissection was first introduced in Europe in 1987. After taking his master degree from University of Europe Dr. Mishra brought this technique to World Laparoscopy Hospital. It has been used consistently since then in difficult cases to considerable advantage and without any complications during its use. A special endoscopic pledget or peanut swab 5.0mm ratcheted holder, manufactured by Storz (with strong jaws and inward facing tongs at the end of the jaws for security), is used in a manner similar to that employed in open surgery. The holder grasping the pledget is introduced inside a reducer tube through an 11.0mm cannula. The blunt dissection is safe and is used to open planes and expose structures especially when the anatomy is obscured by adhesions. The movement consists of forward and backward wipes accompanied by clockwise/ counterclockwise rotation of the pledget swab, it is also useful for controlled a small bleeder by compressions before this is secured by clipping or electrocoagulation.
Removal must be carried out under vision to ensure that the swab is inside the reducer tube before withdrawal of the instrument, otherwise there is a real risk of losing the small pledget swab in the peritoneal cavity.
Clinical applications
The pledget is an invaluable tool for the rapid dissection of loose areolar planes when it is wiped or pushed against the line of cleavage to separate the tissues.
In addition the pledget may be useful in maneuvers to control minor haemorrhage. The pledget can be placed over the bleeding point to apply pressure. When used on an oozing operative field it adsorbs some of the blood and may clarify the anatomical position.
It is important to have a routine to minimize loss of the peanut swab inside the abdomen:
- always use a reducer tube to insert and remove the swab
- Employ a fail safe system (ratchet & elastic band) to maintain the grip of instrument used for insertion.
- Keep the pledget in view from insertion to retraction into the introducer tube. Be sure it is retrieved into the introducer, not the cannular end.
If you can’t see, STOP.
Internal suturing
The technique for suturing needs to be modified depending on the instrumentation in use. A lot of work is currently being carried out on designs for new needle holders and automatic suturing. We present a straightforward technique that can be used with simple instruments.
lnstrumentation
The needle
Although conventional open surgical needles (half circle) can be used endoscopically, the endoski needle developed in Europe is designed specifically for endoscopic use and is a hybrid of the straight and half circle needle. It carries an atraumatic suture and has a straight shaft and a terminal tapering curve (that corresponds to ¼ of a circle), giving it the shape of a miniature ski. The shaft is a modified rectangle, which becomes more and more rounded towards the tip so that the curved portion of the needle is round bodied. This combination allows for an easier grip of the shaft by the jaws of the needle holder and smooth passage of the curved portion of the needle through the tissues.
Needle Holders
In World Laparoscopy Hospital we use two 5 mm Cuschieri needle holders. These have single action tapered jaws. The handles are spring loaded and the most recent versions have diamond coating for gripping the suture material without damage. A relaxed ‘open hand” grip is strongly recommended for these instruments. Please note that there are a wide variety of needle holders (or drivers). In practice, it is vital for each surgeon to become accustomed to a particular type and use that pair all the time, This is crucial for efficient and safe suturing,
Needle Control
Introduction into the body cavity
We recommend the use of the introducer tube to protect all ligatures and sutures from the cannulae valve mechanisms.
The suture material on the endoski needle is trimmed to a suitable length. For a continuous suture this will be approximately 15 to 20cm. The suture length must never exceed 20cm as this will result in very difficult intracorporeal suturing since the length is magnified (2.5 times) by the imaging system. The needle holder is first passed through an introducer tube. The tail of the suture is held next to the tip of the needle and the suture picked up by the needle holder at its mid point. It is then withdrawn into the introducer tube until neither the needle nor the tail is visible. The introducer tube can then be passed through a port and the needle extruded from the tube. The suture is watched into the abdomen and placed on a convenient surface e.g. the flat, smooth anterior surface of the stomach,
Manipulation
- A trailing needle is a safe needle
- A held needle should always be in view.
- The tips of the two needle holders must always be in view
- The two needle holders must never cross each other by move parallel to each other from one side to the other.
The ability to maneuver the needle into the desired position in the needle holder jaw is one of the first skills you must acquire. It is well worth practicing the techniques for this as it will make all subsequent tasks much easier. This task causes much frustration until it can be achieved at will.
The first step is to arrange the needle to the required orientation on the tissues (preferably on a serosal surface and not fatty tissue). Recommended techniques to get the needle in the right attitude on the tissues include the “nudge”, the “push”, and the twist” techniques! This maneuver should be better demonstrated for learning.
Position
The needle must next be positioned correctly in the jaws of the needle holder. Ideally the needle is grasped in the right orientation by the tips of the jaws. It is a mistake to grasp the needle by the back of the jaws as this impairs precision needle driving through the tissues and also reduces the grasping force so that needle swivel is more likely.
For a right handed surgeon in a straight forward situation the needle is held in the right hand needle (RH) holder with the tip pointing to the left. The tip of the needle points upward and the shaft of the needle should make an obtuse angle with the shaft of the holder.
The key elements in achieving this are
- The needle position on the tissues
- The angle of approach of the holder
- The pick up actions
Adjustments to the angle can be made using
- Other needle holder
- Surrounding tissue
- Tensioned suture material
Passage through the tissues
Position the needle appropriately in the needle holder and identify the position of the first entry point. Place the tip of the needle at this position so that the sharp tip enters the tissue at right angles. When approximately 1/2 of the curve of the needle has entered the tissue (corresponding to 2.0mm) the wrist is supinated and lifted slightly to passage the curved section of the needle through the tissues. When the point of the needle is seen to emerge at the exit point, the grasp is maintained and the needle end (not tip) is grasped by the other (assisting) needle holder before it is released by the dominant needle holder. For the second bite (in other tissue edge) the dominant needle holder can retrieve the needle directly from the assisting needle holder provided the needle is in a favorable position for direct transfer. Other wise it is more ergonomic to drop the needle and pick it up by the dominant holder. Once the two edges have been passaged, the needle is dropped and the suture pulled to the desired point by an instrument to instrument technique through the tissues. A trailing needle can do much less harm than one that is held rigid in the holder. A grasped needle must always be in view.
Tensioning
A continuous suture is initially tensioned by pulling through the suture material. Further tightening can be achieved by use of the dominant needle holder although one must be careful not to fray or damage the suture. The jaws are opened and placed on either side of the suture as it exits from the tissues but kept open. They can then be used to apply counter pressure on the tissues as the suture is pulled tight by the assisting needle driver. Tension in a suture line is then maintained by occasional locking sutures and the appropriate use of an assistant. In clinical practice tension on the suture line is kept by the assistant using a special suture holder that does not damage the suture. This has rounded jaws.
Continuous suturing
It has been our practice to start a continuous suture with a Europe Jamming Slip knot. An equally acceptable alternative is an internal tied knot if the surgeon is proficient.
A continuous suture can be finished in a number of ways. We recommend the Aberdeen termination, an internal tie to a convenient tail or a slipping loop tied to itself.
Europe Jamming slip knot
This is a recommended way of starting a continuous suture. This knot has an external component but is completed, once inside the body cavity, after the first bites of tissue have been taken.
The external component has three steps
- A simple slipping loop
- Passage of the tail through the first loop,
- Creating a second loop
- Tensioning of the second loop
The second loop should slip only from the tail, the knot should not be tightened at this stage and the length of both the loop and of the tail should be at least 1 cm.
Once inside the knot is locked by passage of the standing part of the suture through the loop, which is then slipped to lock the knot.
Applications
Any continuous suture e.g. closure of viscerotomies following stapled anastomosis, sutured anastomosis such as cholecystojejunostomy, gastrojejunostomy etc. It can also be used as an interrupted suture when additional one or two hitches are advised for security (in our practice an internally tied knot would be used in preference for an interrupted suture).
Aberdeen termination
This is an adaptation of a termination commonly used in abdominal closure following open surgery. The continuous suture is finished by the formation of three interlocking loops. In order to simplify the maintenance of tension in the suture line the penultimate stitch can be locked. A further bite is then taken and the suture pulled through, though not completely. A small loop of suture is left, enough that the needle holder can be passed through it to pick up the standing part of the suture. A loop of this is then drawn through the first loop, which is tightened down onto the tissues. The needle holder is then passed through the new loop to repeat the maneuver three times.
It is important that each loop be tightened as you proceed. To do this, tension must be applied to the leg of the loop, which exits, from the tissues or the preceding loop.
The standing part and needle are delivered completely through the last loop. The standing part is held up and the suture tensioned with counter pressure from the jaws of the needle holder placed on either side of the suture. The suture is cut off leaving a reasonable length (approximately 1 cm).
Interrupted sutures
Microsurgical tying
This is a precise, choreographed set of actions. Each maneuver is designed to help make the whole process smooth and reproducible with economy of movement and structured choreography, so that suturing is efficient with minimum of wasted time. The technique will be demonstrated in video in further assignments. Note the following important points.
- The Passive and Active role of the holders
- The formation of the initial “C’
- Its relation to the tail of the suture
- The conscious assessment of position
- The use of the natural bias of the thread
- Appropriate rotations of the needle active and passive needle holder that must be manipulated in consort
- Note the importance of keeping the ends of the two needle holders in the operative field
- Note the importance of two-handedness for efficient suturing
Interrupted Knots
In World Laparoscopy Hospital the Europe Jamming Loop knot is used to create interrupted sutures. For additional safety a further hitch or two are recommended if it is to be used as an interrupted suture. More commonly interrupted intracorporeal sutures are made by the use of the Surgeon’s or the Tumbled Square knots.
Applications of Interrupted Sutures
Interrupted sutures have a multitude of uses. Simple examples are closure of the common bile duct after exploration and Fundoplication
New techniques and devices are developed constantly in laparoscopic surgery, and can be costly. With this simple tripod device, the cost of making an extracorporeal slipknot is reduced. The other advantage is that it makes the technique of creating a slipknot easy, so that it can be learned quickly not only by the surgeons but also by the nursing assistants.
Keywords: extracorporeal slipknot, laparoscopic surgery, tripod.
Despite laparoscopic surgery being a minimally invasive procedure, the cost and operating time constraints have decreased the popularity of certain feasible procedures.
The operating time will be shortened as more experience is gained. The cost of laparoscopic instruments, such as disposable trocars and other accessories, can prove to be very high. To minimize the cost of laparoscopic surgery, improvements in the techniques and devices are constantly made.
KNOTS AND SUTURING
Intracorporeal knot tying and the extracorporeal slipknot (Roeder knot) are challenging techniques of suturing which are encountered in laparoscopic surgery.1 All laparoscopic surgeons should be familiar with the techniques of both intracorporeal and extracorporeal suturing. These techniques are useful to ligate a blood vessel, to approximate tissue planes or to create an anastomosis. The preformed ligature loop is useful in ligating a vascular pedicle, the stump of a blood vessel or the appendix.2
The holding and tensile characteristics of the extracorporeal slip-knot depend on the types of ligature material used and the types of knot applied. Slipknots tied with silk and polyamide are less secure than the equivalent knots tied with dacron, lactomer and polydioxanone.3
DEVICE AND TECHNIQUE
Device
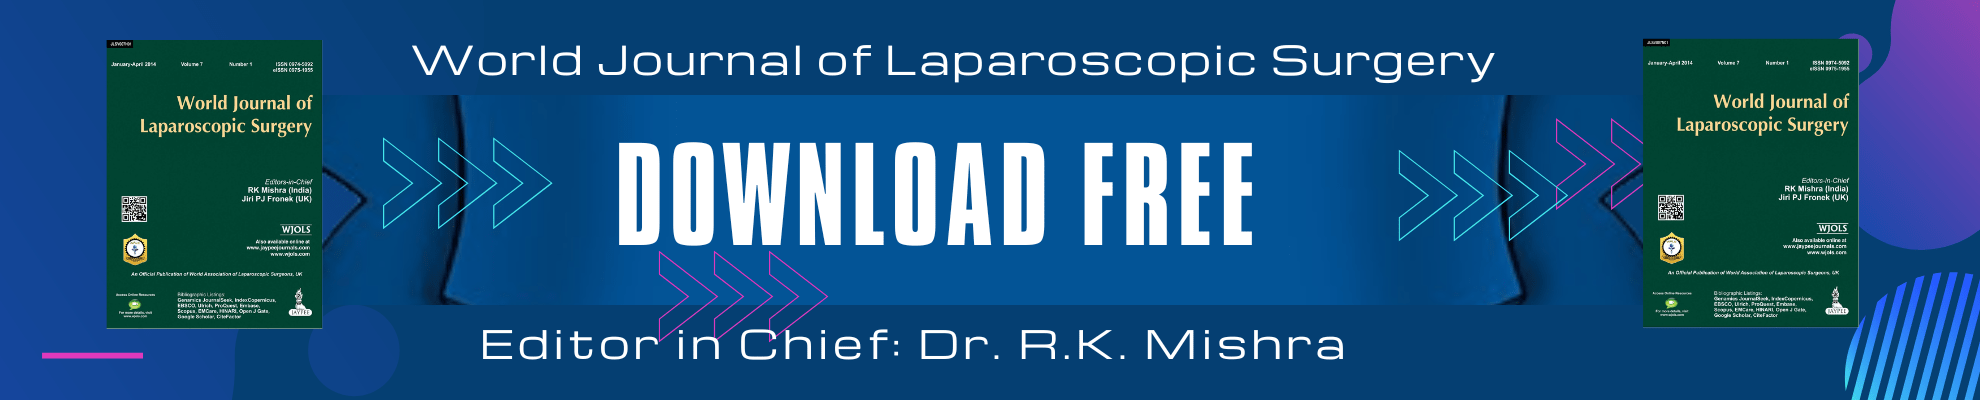
I have found a useful device to help me to tie extracorporeal slip-knots. The cost of each manufactured ligature loop is significantly reduced with the help of this device. (Each manufactured ligature loop costs Brunci $20, while each self-made ligature loop costs Brunei $2.) This is particularly important in developing countries with a cost-conscious health budget.
This device is a plastic tripod (see Figure 1). It is obtainable from pizza home delivery companies, and is normally used as a box supporter to stabilize the pizza. This device is completely free of charge.
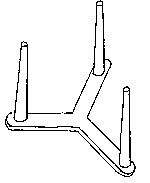
Figure 1 Tripod device.
Technique
The technique of tying an extracorporeal slipknot can be made easy with the help of this device. The technique is illustrated in Figures 2—7.
Half a knot (one throw) is formed and the ligature is placed on the tripod (see Figure 2). One of the legs of the tripod is held with the left thumb and left index finger, with the half knot next to the leg. Tension is created on all sides of the ligature over the legs of the tripod with the left middle finger, and by pulling the shorter end with the right thumb and right index finger in the opposite direction. The shorter end now swings around the half knotted and adjacent sides of the ligature, the swing is then repeated four times with the tension maintained after each swing (Figures 3 and 4). The last swing (fourth) should then hitch on to the previously half knotted side of ligature. The shorter end must now be pulled towards the direction of the longer end of the ligature to tighten the hitch, and then in the opposite direction so that the hitch is not too tight (see Figure 5). This will allow the knot to slip easily. The knot is now nearly completed and can be taken off the tripod. The adjacent side to the knot can be pulled with the right thumb and right index finger lightly to tighten the smaller loop (see Figure 6)
404 H. B. Chua
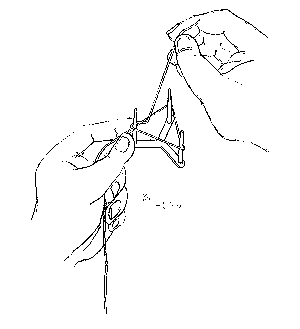
Figure 2 Half a knot and ligature placed on the tripod.
Figure 3 Four swings around the half knotted and adjacent sides of the ligature.
Extracorporeal slipknot 405
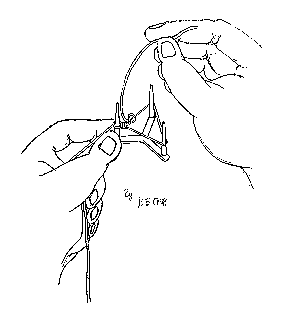
Figure 4 Fourth swing hitch at the half knotted side of the ligature.
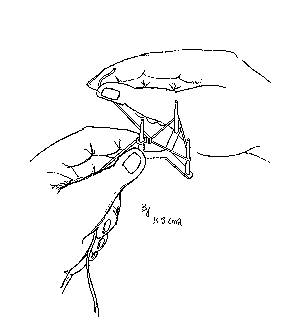
Figure 5 Tightening of hitch.
406 H. B. Chua
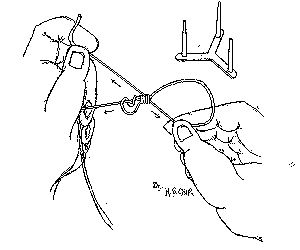
Figure 6 Tightening of smaller loop to complete the slipknot.
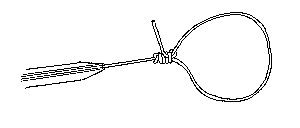
Figure 7 Completed slipknot.
at the same time keeping both ends of the ligature under tension. This should not be too tight, in order to allow the knot to slip easily. The ligature loop can now be enlarged if the line of slip is kept straight (see Figure 7). The shorter end is now cut, leaving 1 cm in length behind to prevent the knot coming undone. The longer end of the ligature can be tunnelled through a hollow pushrod. The slipknot ligature loop is now ready for use. The knot is simply tightened by the pushrod intracorporeally.
DISCUSSION
This tripod device is inexpensive and useful. It makes the technique of tying extracorporeal slipknots easy to learn. No doubt, this will prove to be helpful to young laparoscopic surgeons in training.
ACKNOWLEDGEMENTS
I thank Mr S. K. S. Yapp, senior specialist surgeon, for providing a laparoscopic work opportunity in Brunei. I also thank Dr K. H. Tan for helping with the manuscript.
REFERENCES
- Nathanson LK. Laparoscopic Appendicectomy. Hospital Update 1992; 18(8): 580—5.
- McDougall EM. Laparoscopic knot tying. In: Claymen RV, McDougall EM, eds. Laparoscopic Urology. St Louis: Quality Medical Publishing, Inc, 1993; 122—53.
- Shimi SM, Lirig M, Vander-Velpen G, Cusehieri A. Comparative study of holding strength of slipknot using absorbable and nonabsorbable ligature materials. Surg Endosc 1994; 11: 1285—91. Paper accepted 25 September 1996
Correspondence: Mr Chua Hock Beng FRCS (Ed), Senior Medical Officer, Ripas Hospital, Bandar Sen Begawan, Negara Brunei Darussalam
© 1997 The Royal College of Surgeons of Edinburgh, J. R. Coll. Surg. Edinb.,42, December, 4O3-4O6